
Every dispatch has a Freight & Tracking card. It records how the goods travelled: the carrier, the con note, the cartons and pallets that went, what the carrier charged you and what you are charging the customer. From there Evolution builds the tracking link, puts the freight on the invoice, prints it all on the delivery docket and, if you want, emails the customer their tracking details.
All of this is part of Evolution itself. It works the same whether or not you run an online store, and needs no plugin or carrier account to be connected.
The Freight & Tracking Card
Open any dispatch — from Dispatches in the menu, or from the Dispatch tab on a project — and open its Freight & tracking tab. The tab also opens straight from the Freight figure at the top of the dispatch, which shows where the freight is up to without opening the tab: the stage (To book, Booked, In transit, Delivered) with the carrier and con note, or Own delivery with the driver, or Customer collects. An amber outline means something needs a look — a committed dispatch still to book, or own delivery with a carrier recorded; red means an exception.
The tab takes you through three steps. Each step’s heading shows a green tick once it’s done, or what is still missing; the first step that isn’t done is outlined.
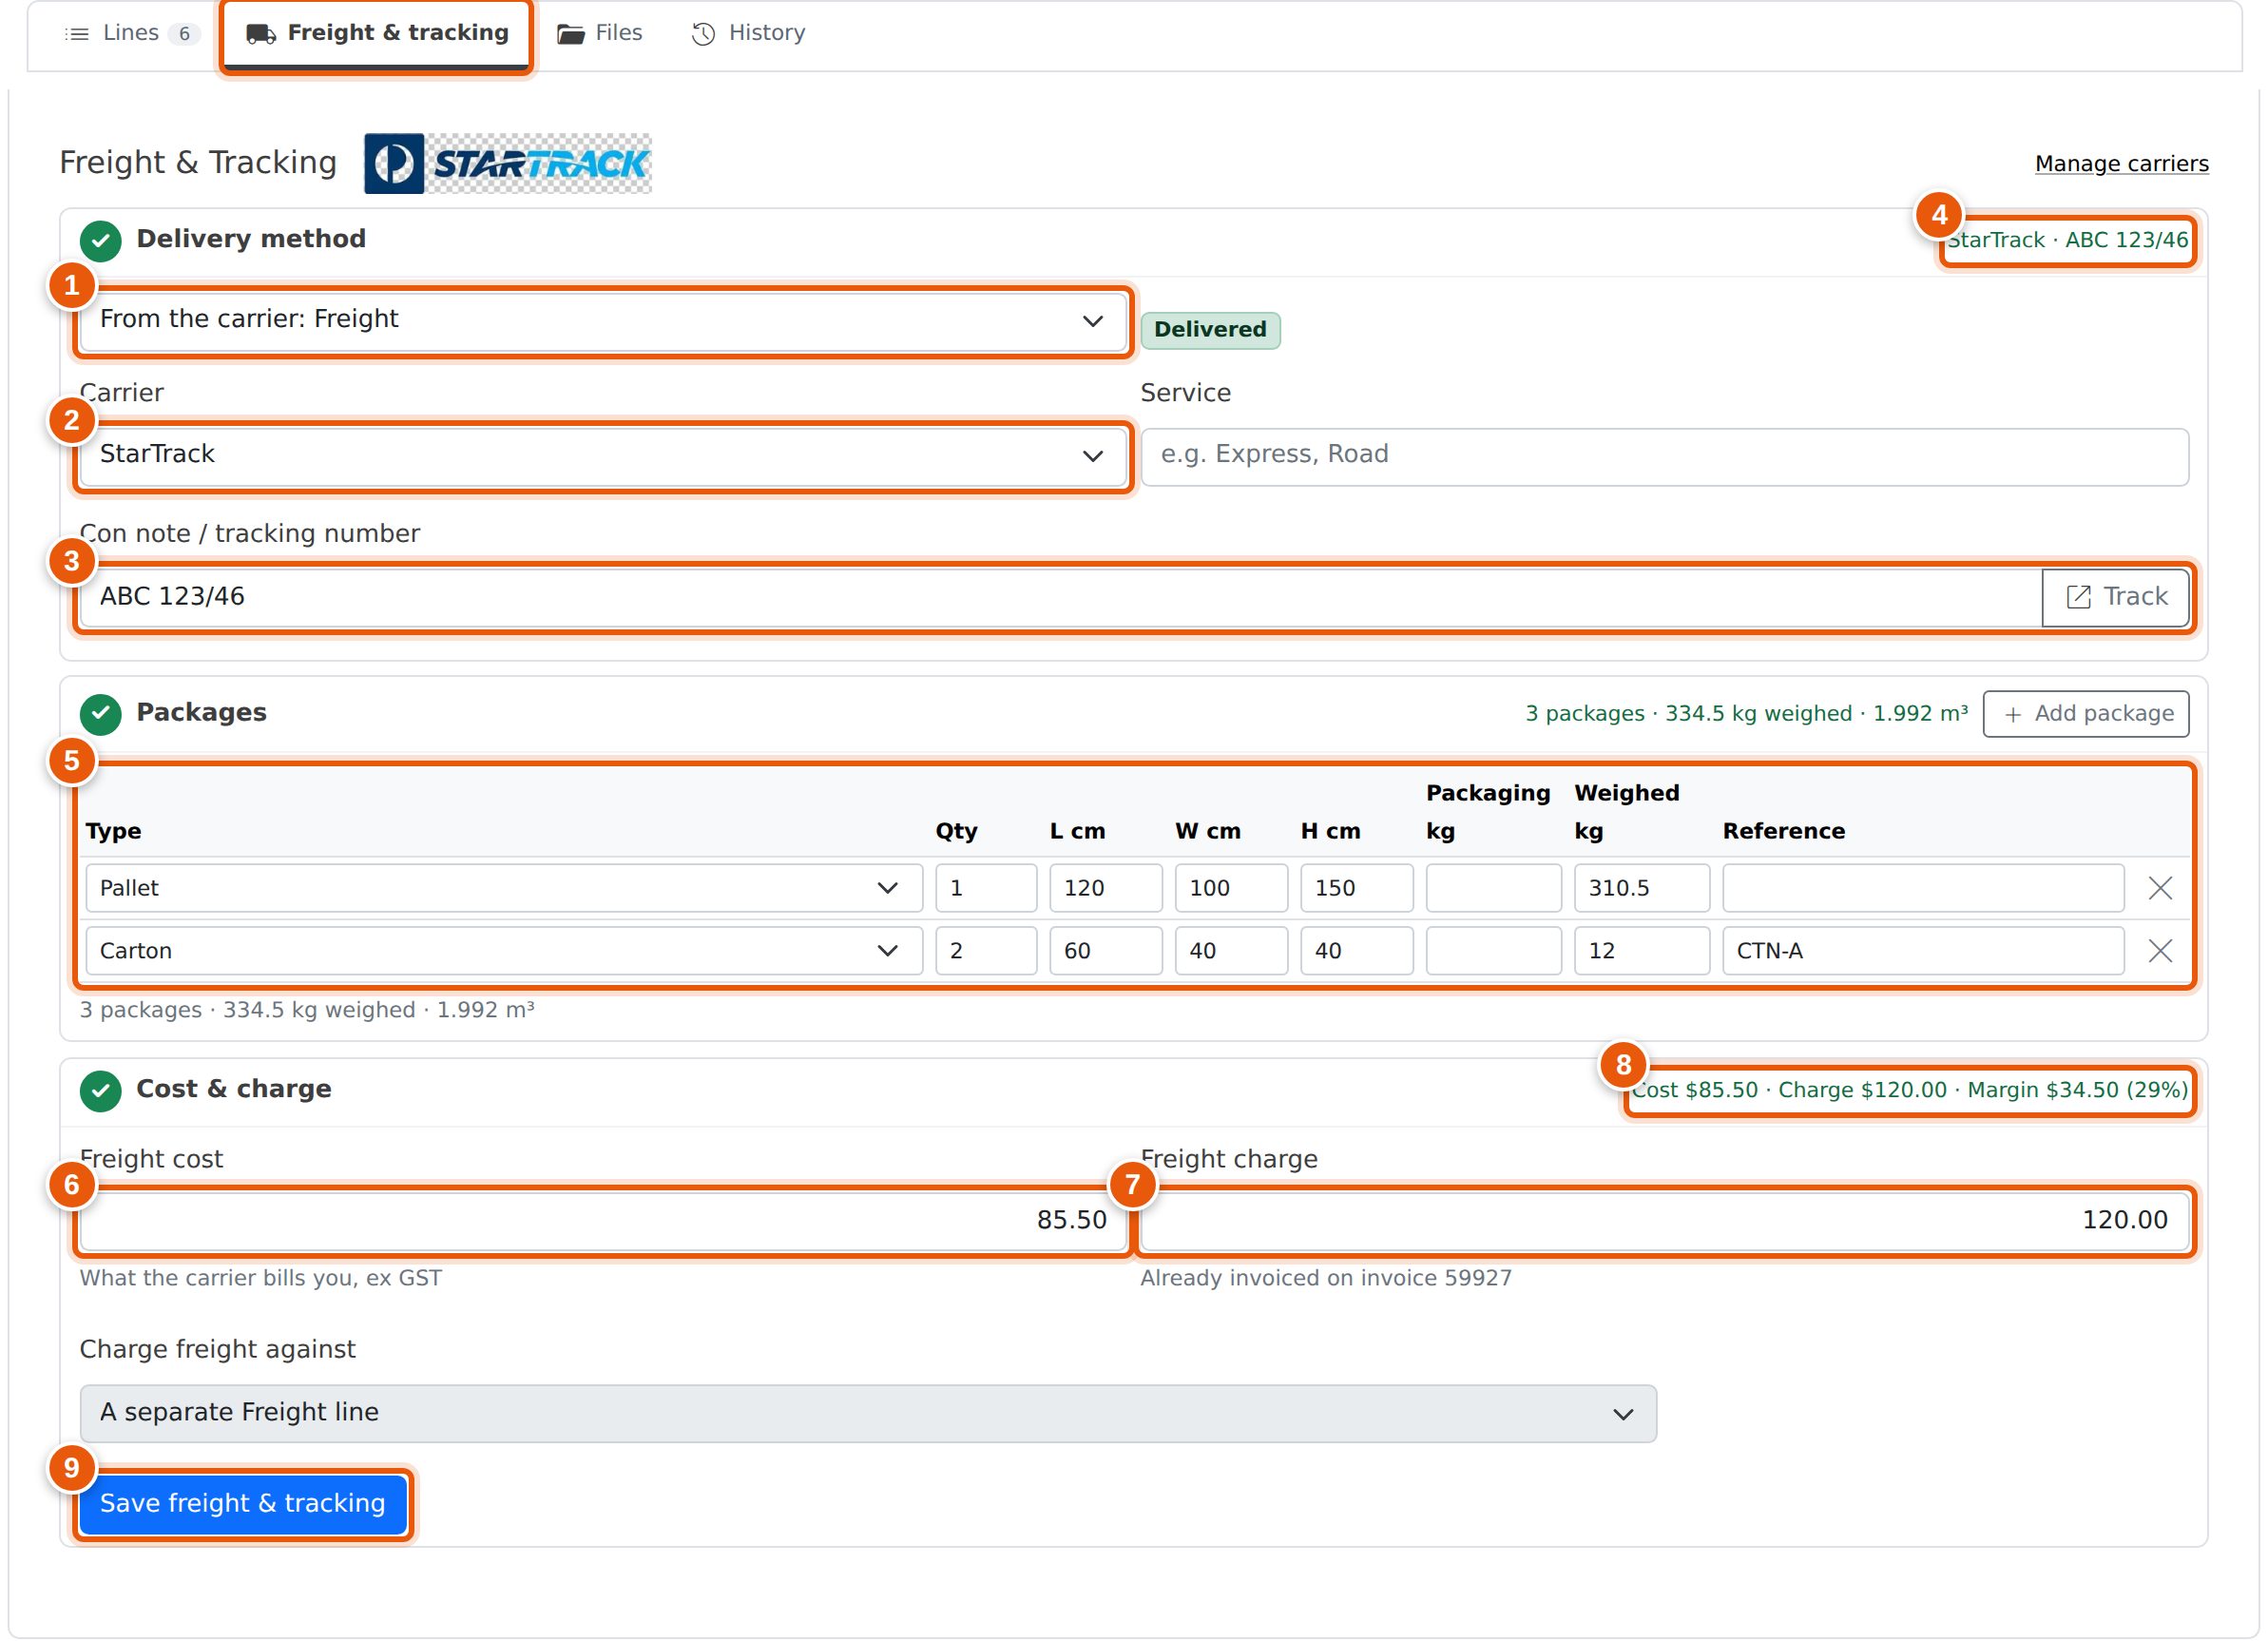
Step 1 — Delivery method
- Delivery method — freight, own delivery or customer collect. Left on its first choice it follows the dispatch’s activity (or its carrier).
- Carrier — chosen from your Carriers list, with the Service (Express, Road and so on) beside it.
- Con note / tracking number, with a Track button that opens the carrier’s tracking page.
- The step’s summary — the carrier and con note once both are in.
Step 2 — Packages
- Packages — one row per kind of package that went. The heading shows the totals: number of packages, gross weight (weighed or estimated) and cubic metres.
Step 3 — Cost & charge
- Freight cost — what the carrier bills you.
- Freight charge — what you charge the customer.
- The step’s summary — cost, charge and your margin. It turns amber when you’re charging less than the freight cost.
- Save freight & tracking.
For freight, step 1 also shows the consignment’s stage and its manifest. See Shipping Hub → How Goods Leave.
Own delivery and customer collect hide the carrier and con note, and steps 2 and 3 become optional. If a carrier or con note is already filled in, the fields stay in view and step 1 turns amber: clear them, or change the method to freight.
Carrier and Con Note
Pick the Carrier. If it has a usual service set up, an empty Service box is filled in for you. Then type or paste the con note. As soon as both are in, the Track button appears, as long as the carrier has a tracking link set up. It is built from the carrier’s tracking link, so nobody has to find or paste a link.
A carrier that isn’t on your list can still be recorded. Choose Other… and two more boxes appear for the carrier’s name and, if it has one, a tracking link. If you will use that carrier again, add it under Carriers instead. The Manage carriers link at the top of the card goes straight there.
Packages and Weight
Press Add package for each kind of package that went: one row for 1 pallet, another for 2 cartons of the same size. Each row has:
- Type — one of your Package Types (your standard cartons and pallets, grouped by kind), or a kind under Custom size — Carton, Pallet, Bundle, Length, Crate, Satchel or Other — for anything else.
- Qty — how many identical packages.
- L, W, H — the dimensions of one package, in centimetres.
- Packaging kg — the empty weight of one carton or pallet. Shown once your database has package types.
- Weighed kg — what one package weighed on the scale, packed. Optional.
- Reference — a label or carton number, if you use them.
Picking one of your package types fills in its size and packaging weight. Change any of them for this dispatch: for a pallet, type the loaded height. A weighed package heavier than its type’s maximum load turns red as a warning.
The totals line underneath adds it up as you type: package count, gross weight and cubic metres. The gross weight is:
- the weighed total, when every package has been weighed;
- otherwise an estimate: the weight of the items plus the packaging weight of every package, shown as ≈ 342 kg estimated (items 310 + packaging 32). When some packages are weighed and some aren’t, it stays an estimate and says Weigh every package to use the scale weight.
Press × at the end of a row to remove it.
You don’t have to enter packages. Without them, the card shows the gross weight Evolution works out from the items on the dispatch. That is the same figure the docket has always printed.
Freight Cost and Charge
| Field | What it is for |
|---|---|
| Freight cost | What the carrier charges you, ex GST. It is for your own records. It isn’t posted anywhere, and the carrier’s bill is still entered as a bill as usual. You can change it at any time, because carrier bills often arrive after the goods have gone and been invoiced. |
| Freight charge | What you charge the customer, ex GST. When the dispatch is invoiced, this becomes a freight line on the invoice — see Invoicing a Dispatch. This box only appears once a freight item has been set up (see Setting Up). |
Saving
Press Save freight & tracking. It works whatever the dispatch status is, so you can add the con note after the dispatch has been committed and the goods have gone, which is when you usually have it. A message under the button says what was saved.
On a dispatch that hasn’t been committed yet, the card is also saved by the dispatch’s own Save button, in the bar at the foot of the screen, along with everything else.
Every change is written to the dispatch’s History tab. That covers a new carrier or con note, the packages changing, and the freight cost or charge moving, each with what it used to be.
Emailing Tracking to the Customer
Evolution can email the customer their tracking details. The email has the carrier, con note and package count, and a Track your delivery button that opens the carrier’s tracking page. It goes to the email address of the dispatch’s contact.
It is sent as soon as a con note is entered or changed, whether the dispatch is still a draft or already committed. Many businesses only commit a dispatch once the customer has signed for the goods, so the email goes when the freight is booked rather than waiting for the commit. Committing the dispatch, or saving it again without changing the con note, doesn’t send it again.
The result goes in the dispatch History either way. You will see Tracking emailed to …, Tracking not emailed: dispatch N has no valid contact email, or the reason it failed.
The email is sent from your business email address when your sending domain allows it, and replies come back to you.
Finding a Dispatch by Con Note
The Dispatches register has a Carrier / Con note column, and the Search box matches carriers and con notes. When a carrier calls about a consignment, or a customer quotes a tracking number, type it in and the dispatch comes straight up.

Delivery Docket Placeholders
Delivery docket templates can print the freight details. Add these placeholders to your Delivery Docket template in Settings → Files. Each one is replaced with that dispatch’s details, or left blank when there is nothing to print.
| Placeholder | Prints |
|---|---|
@carrier; | The carrier’s name. |
@service; | The service. |
@connote; | The con note / tracking number. |
@trackingUrl; | The tracking link, as text. Wrap it in your own link in the template if you want it clickable. |
@packages; | A table of the packages: type (the package type’s name, else the kind), qty, dimensions, packaging kg (when any package has one), kg each and reference. |
@packageCount; | The total number of packages. |
@grossWeight; | The gross weight in kg: the weighed total when every package is weighed, otherwise the items plus packaging (see Packages and Weight). |
@cubic; | The total cubic metres, from the package dimensions. |
@driver; | The driver on the dispatch — a staff member or the freight subcontractor. |
@signedby; | The name of the person who signed for the delivery. |
@signature; | The captured delivery signature, as an image. |
The existing @weight; placeholder now also prints the packages’
weight when packages have been entered, so dockets that already use it pick up the
more accurate figure without any change.
Setting Up
- Check your carriers. Under Shipping → Carriers, disable the ones you don’t use, add your own, and fill in tracking links — see Carriers.
-
To charge freight, create an inventory item for freight (for
example code
FREIGHT). Give it the income account and GST code freight should post to. Then, under Settings → Settings on the PROJECTS tab, enter its code in Freight Item for Dispatch Invoicing. The Freight charge box then appears on dispatches. - To email tracking to customers, set Email Tracking Details to the Customer on the same tab to Yes.
Related Pages
- Shipping Hub — booking, manifesting and tracking every dispatch’s freight on one screen.
- Carriers — the carrier list and tracking links.
- Invoicing a Dispatch — the freight line and Ship Via on the invoice.
- Runsheets & Deliveries — planning your own delivery runs.
- Email Sending Domains & SPF — which address the tracking email comes from.