
The General Ledger lists every line posted to your chart of accounts. Invoices, credit notes, bills, payments, stocktakes and journals all post here. Open it from Accounting › General Ledger. It opens on the last seven days of posted lines, newest first.
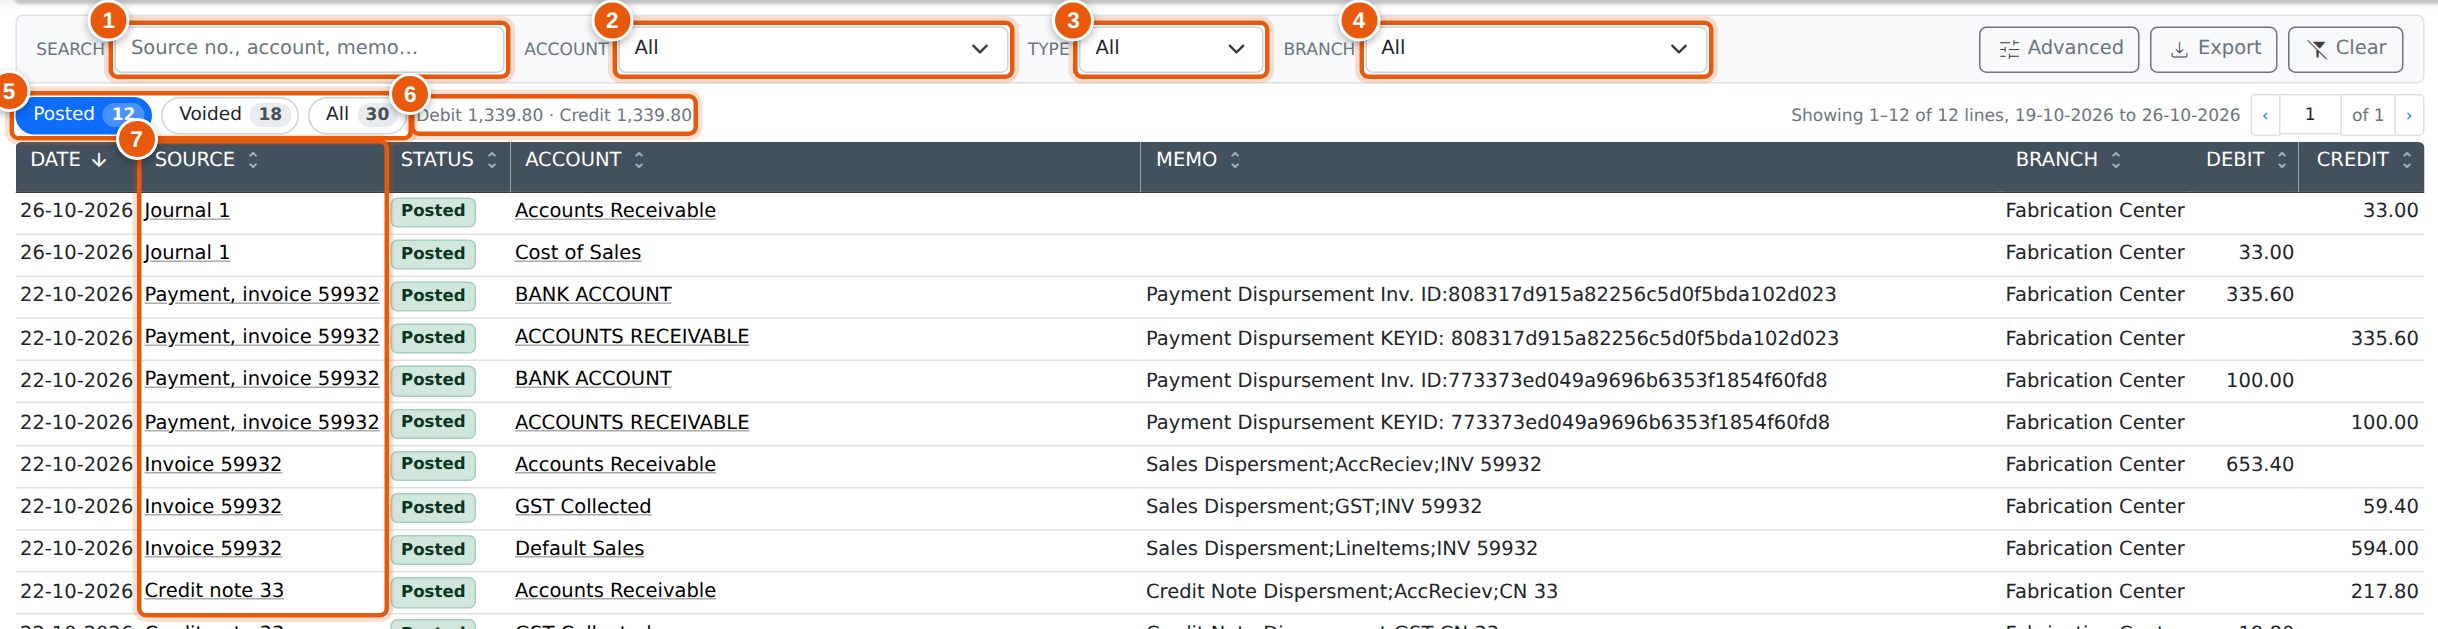
The Filters
The list updates as you type or pick. The filters are kept for next time you open the page.
- Search: a document number (such as an invoice or bill number), a payment key, or part of an account name or memo. Matching text is highlighted in the list.
- Account: one account from the chart of accounts, grouped by category. Disabled accounts are listed after the active ones in each group and marked (disabled), so you can still look up their history. With an account chosen, an Account history link appears next to it: see Account History.
- Type: the kind of document that posted the line, such as Invoice, Bill, Bill payment, Credit note, Stocktake or Journal.
- Branch: the branch the line was posted against.
Clear puts every filter back to its default: posted lines from the last seven days. Click a column heading to sort by it, and click again to reverse the order.
Posted, Voided and All
The buttons above the list split the lines by status. Each shows how many lines match your filters.
- Posted (the default) shows the lines that make up your account balances.
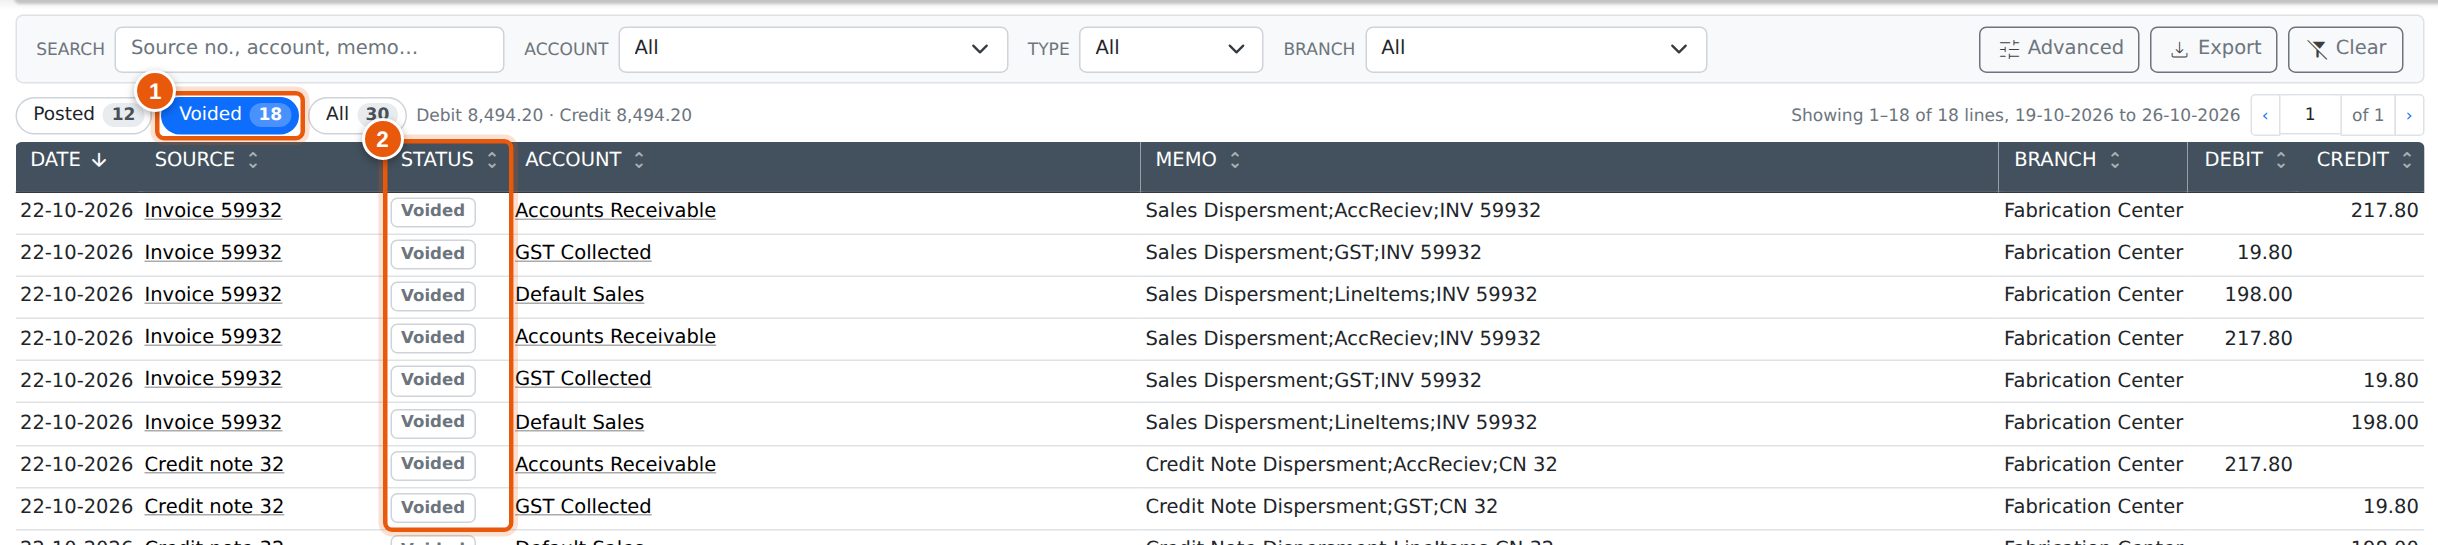
- Voided shows lines that were cancelled. This happens when a document is un-committed or changed and re-posted: the old lines are voided and new ones are posted. Voided lines no longer count towards any balance.
- All shows both together. The Status column tells them apart.
Click the active button again to go back to Posted.
Next to the buttons, Debit and Credit total every line that matches your filters, across all pages, not just the 100 lines on screen. For a complete transaction the two totals are equal.
Opening the Source Document
The Source column names the document that posted each line. Click it, or anywhere on the row, to open that document:
| Source shows | Opens |
|---|---|
| Invoice 1234 | The invoice. |
| Credit note 56 | The credit note. |
| Bill 789 | The supplier bill. |
| Bill payment, bill 789 | The bill the payment was made against. |
| Payment, invoice 1234 | The invoice a customer payment was applied to. |
| Payment, 3 invoices | All the lines of a payment spread over several invoices (see Seeing a Whole Transaction). |
| Payment rounding, invoice 1234 | The invoice the rounding adjustment belongs to. |
| Stocktake 12 | The stocktake. |
| Journal 8, Adjustment 3 | All the lines of that journal or adjustment. |
The Account name opens that account's history.
Seeing a Whole Transaction
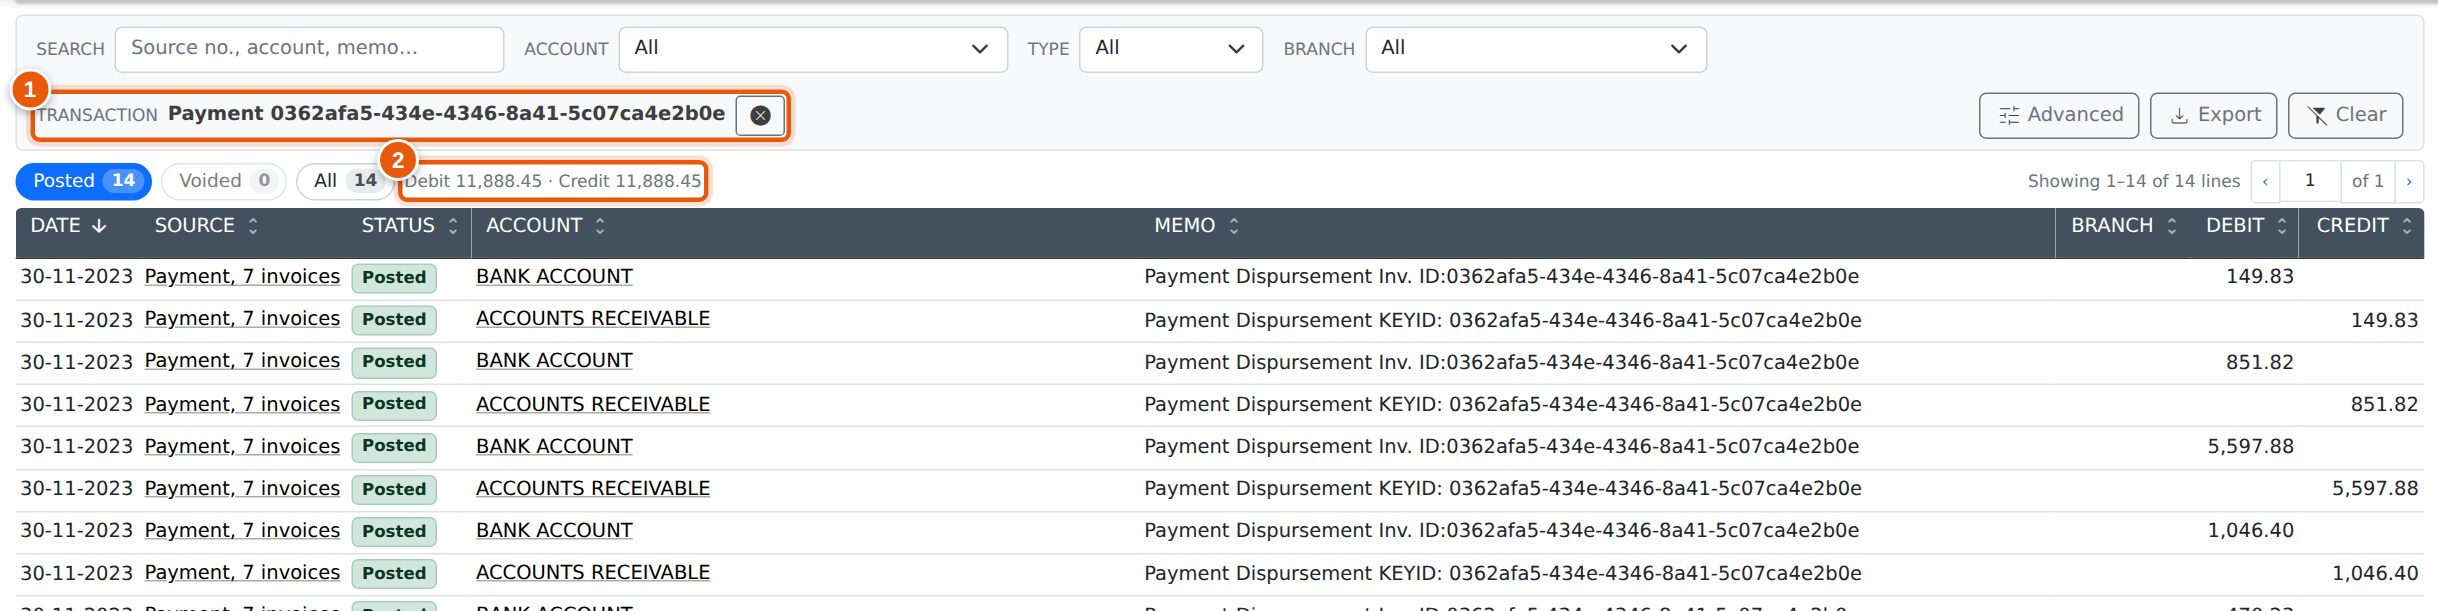
When a Source opens a whole transaction, the ledger shows only that transaction's lines and a Transaction item appears in the filter bar (1). The date range is ignored here, so you see every line however old. The totals (2) show whether the transaction balances.
Click the cancel button next to the transaction, or Clear, to go back to the full ledger.
Date Range, Amounts and Export
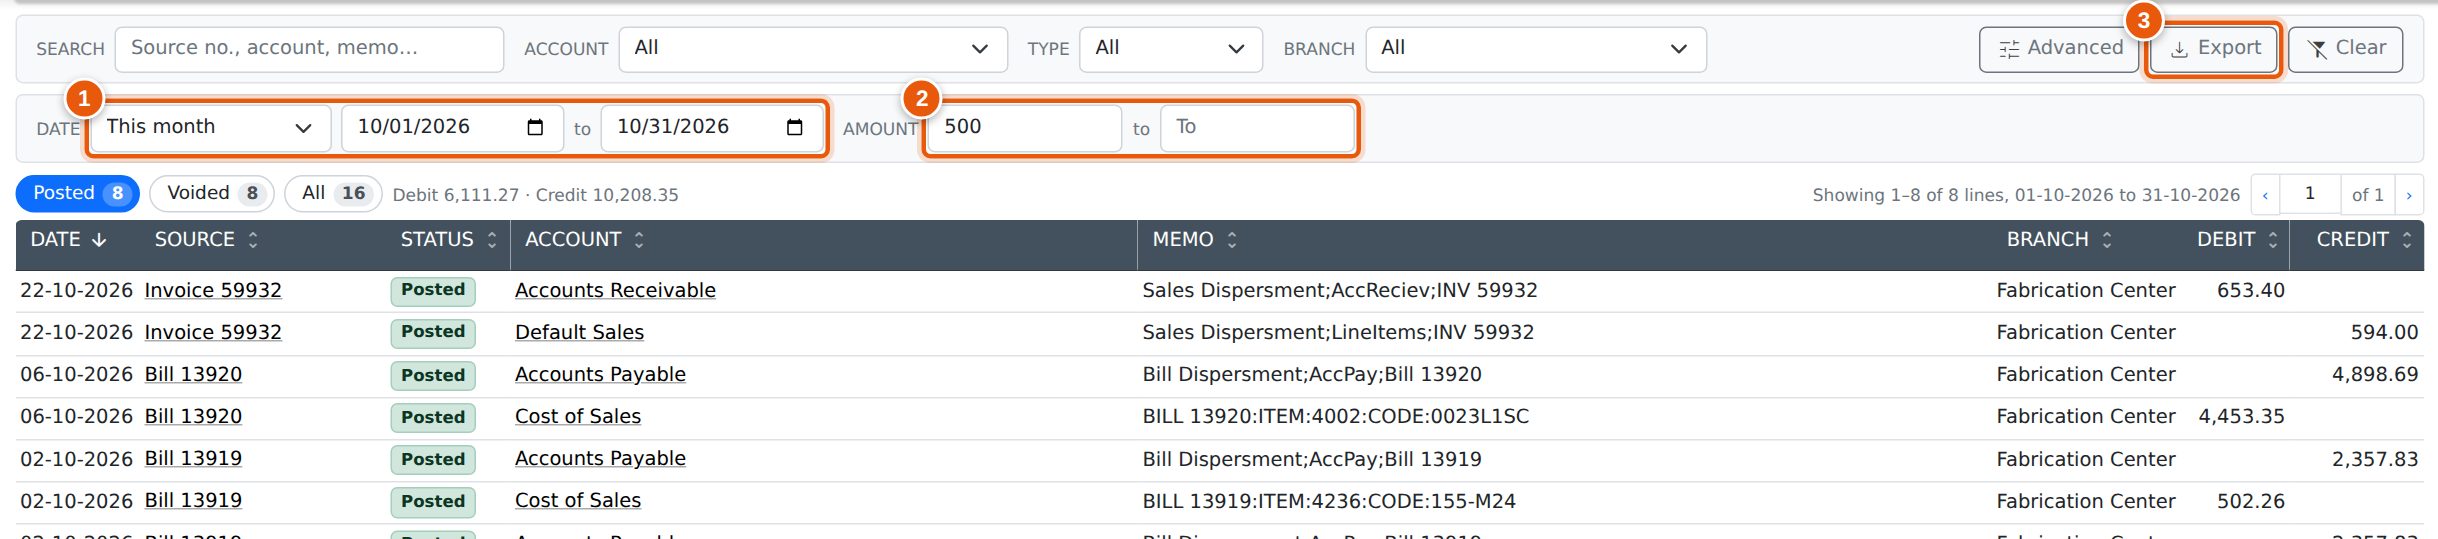
Advanced opens two more filters:
- Date: the posting date range. It starts at the last seven days. Pick a period from the list to fill both dates: Last 7 days, This month, Last month, This quarter, Last quarter, This financial year or Last financial year. Quarters and financial years follow your company’s end of financial year. Change either date by hand and the list shows Custom.
- Amount: lines whose debit or credit falls between the two amounts. Leave either box empty for no limit.
Export (3) downloads every line that matches your filters and the current Posted / Voided / All button as a CSV file, in the order shown on screen. The file has the date, source type and number, payment key, status, account code and name, memo, branch, debit and credit.
The Chart of Accounts
The Chart of Accounts lists every account your documents and journals post to. Open it from Accounting › Chart of Accounts. Anyone with General Ledger access can view it. Adding or changing an account needs General Ledger at Admin level (or a Super User).
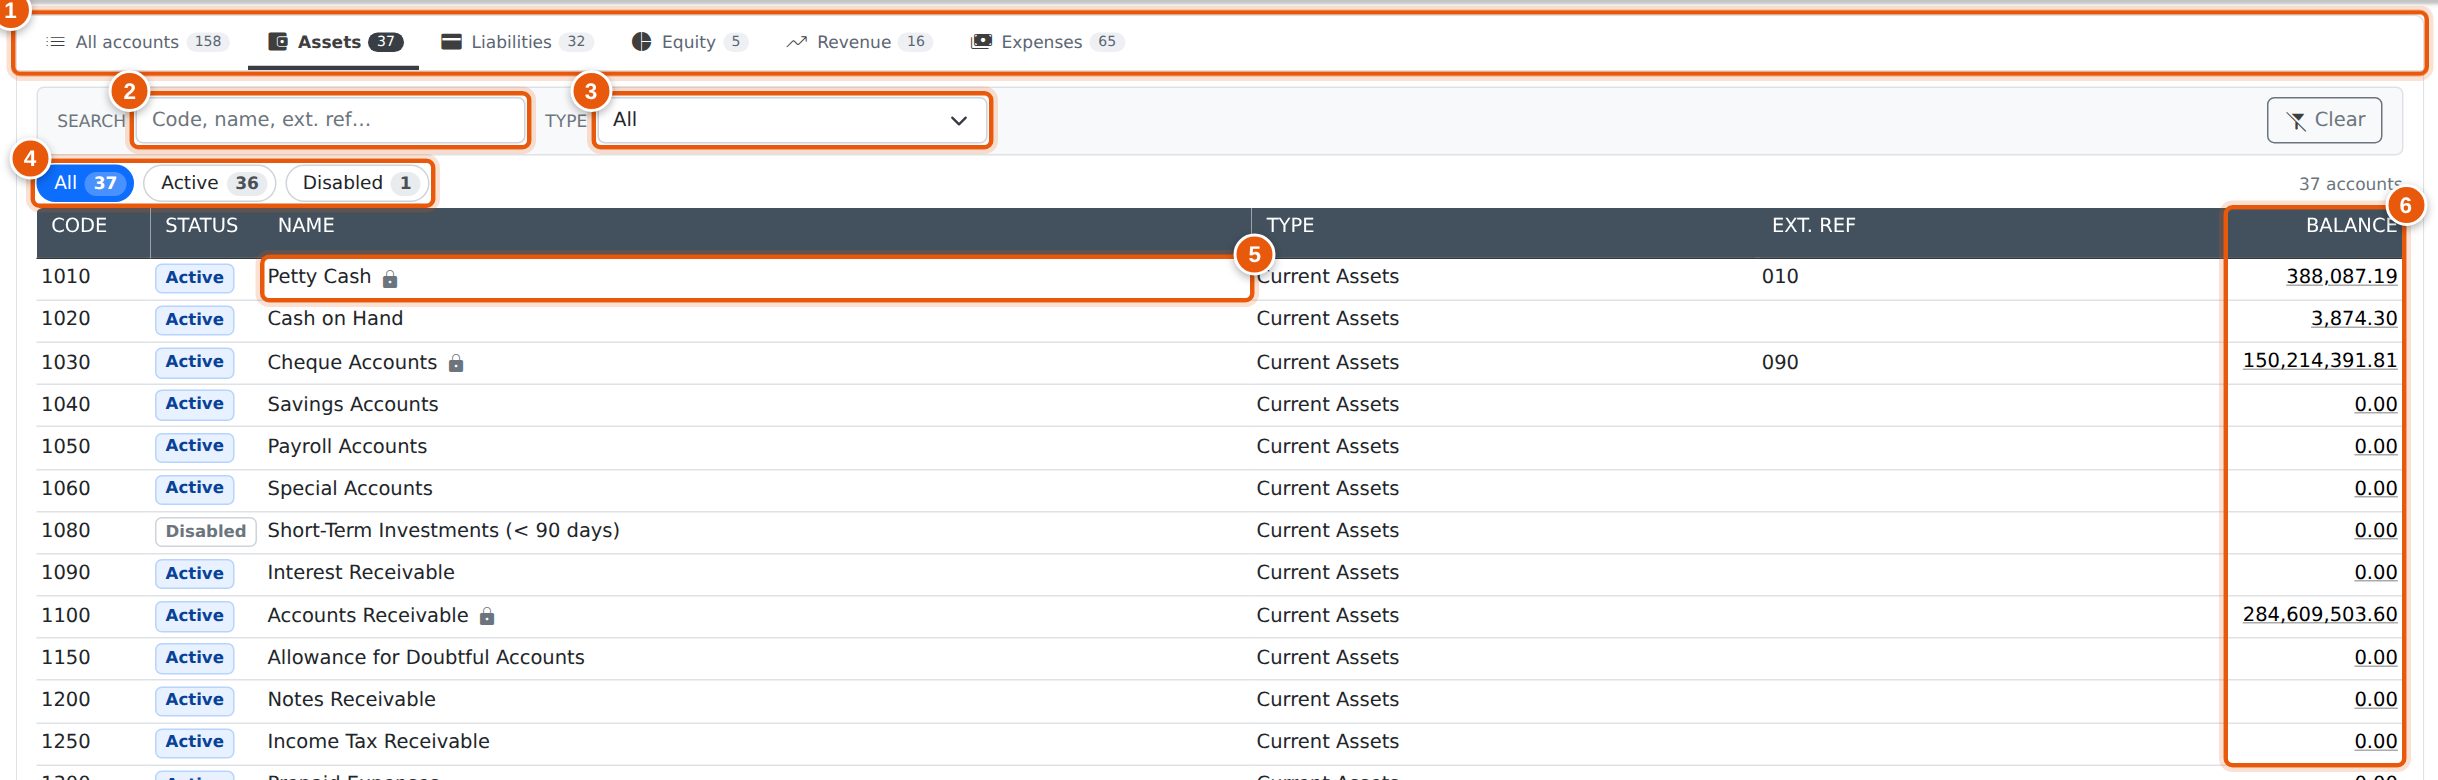
- Tabs: All accounts, then one tab for each class, as in Xero: Assets, Liabilities, Equity, Revenue and Expenses. Each tab shows how many accounts it holds. The page remembers the tab you were on.
- Search matches the account code, name and external reference. Every word you type must match. Searching for a parent account also brings up its sub-accounts.
- Type narrows the list to one account type, such as Current Assets. It only offers the types on the open tab.
- All, Active and Disabled filter by status. The list opens on All.
- A lock next to the name marks an account Evolution uses itself, for example the Accounts Receivable control account, a default bank account or a tax rate’s account. Hover over it to see what for.
- Balance: for assets, liabilities and equity, the balance at today. For revenue and expenses, this financial year to date. Balances read the natural way for the account, so a normal balance is positive. Click a balance to open the account’s history for this financial year.
Sub-accounts
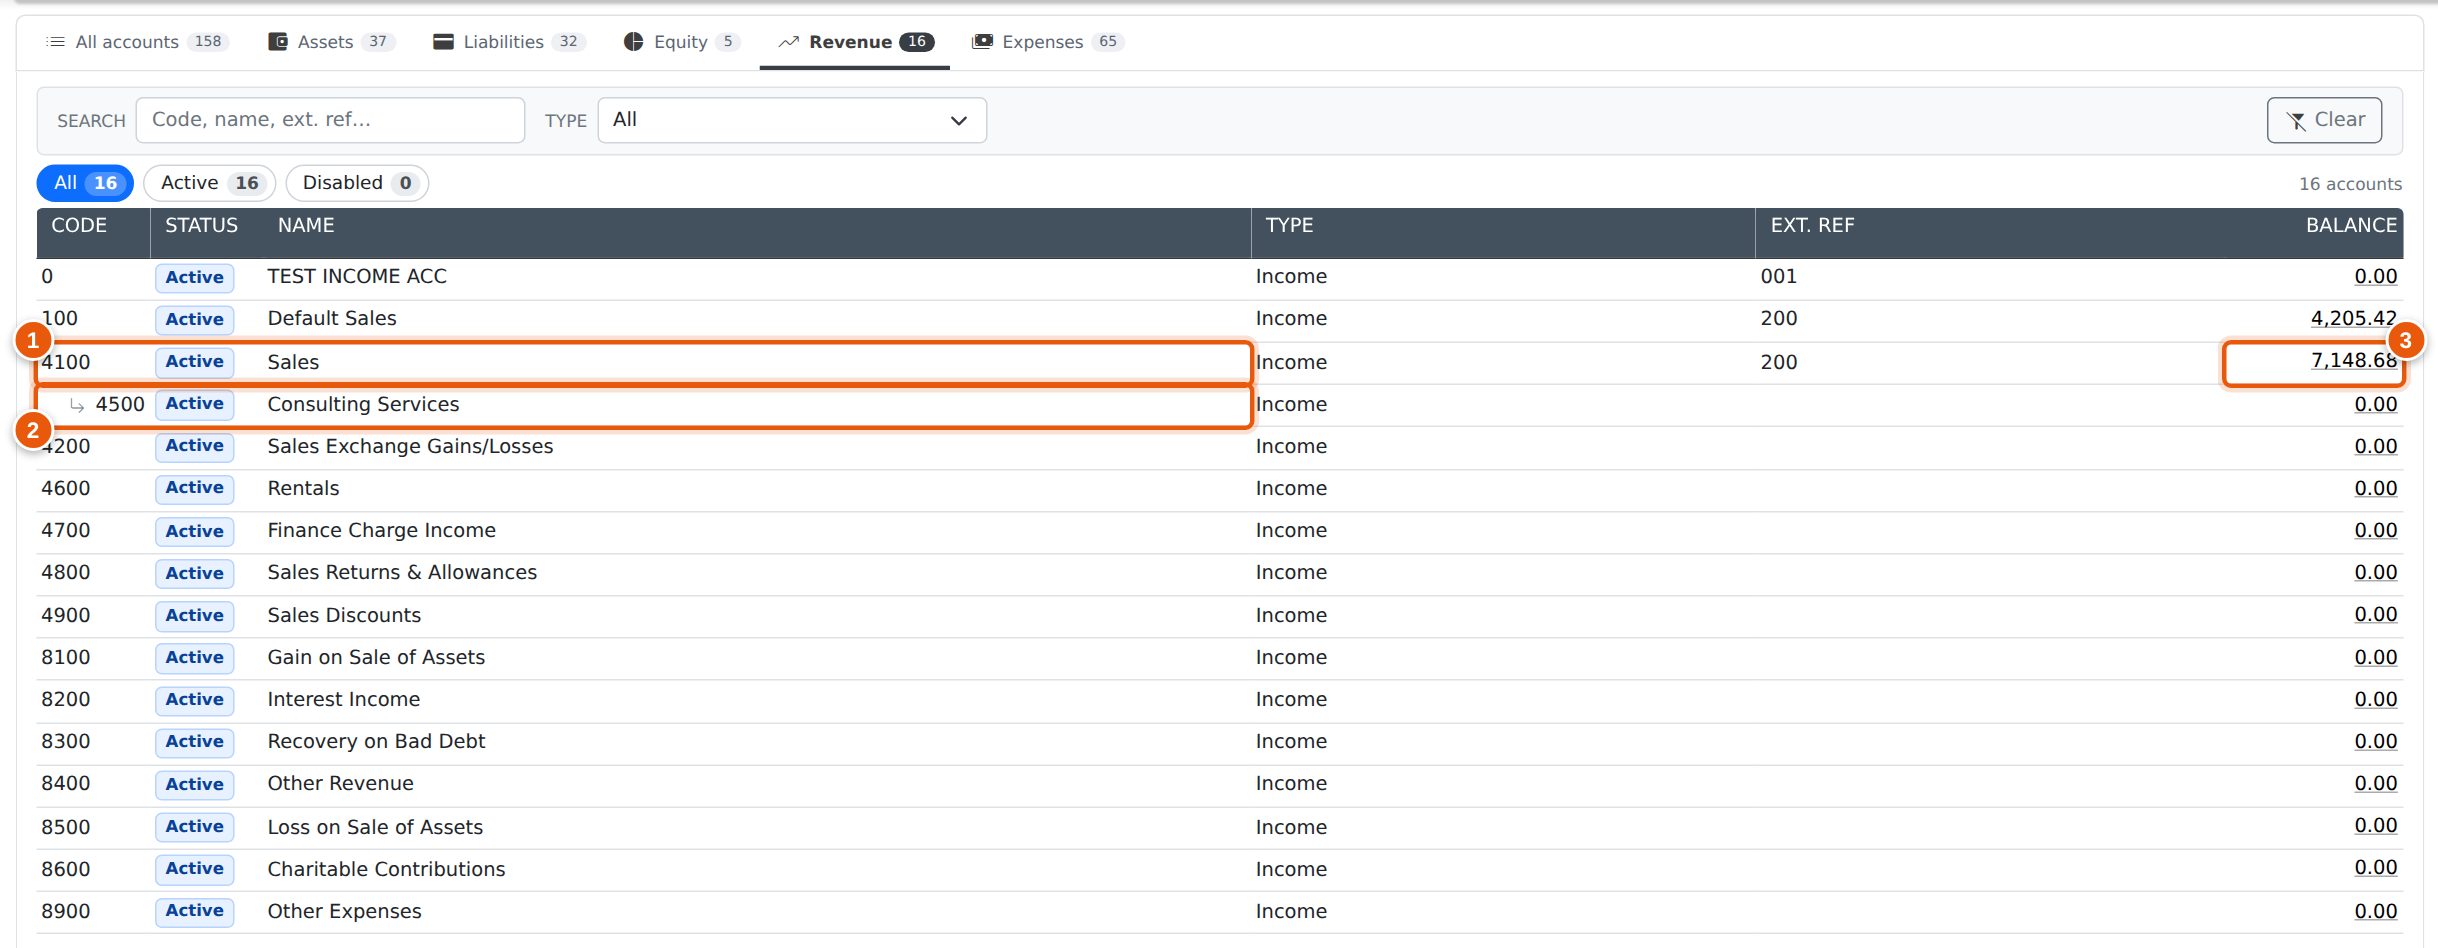
An account can sit under another account of the same type, for example Consulting Services under Sales. A sub-account is listed indented under its parent (1, 2), and the parent’s balance includes its sub-accounts (3). An account’s history shows only its own lines. A sub-account cannot have sub-accounts of its own.
Adding or changing an account
Click the add_circle_outline button at the top right of the page to add an account. A new account starts with the first type on the open tab. Click an account’s row to change it.
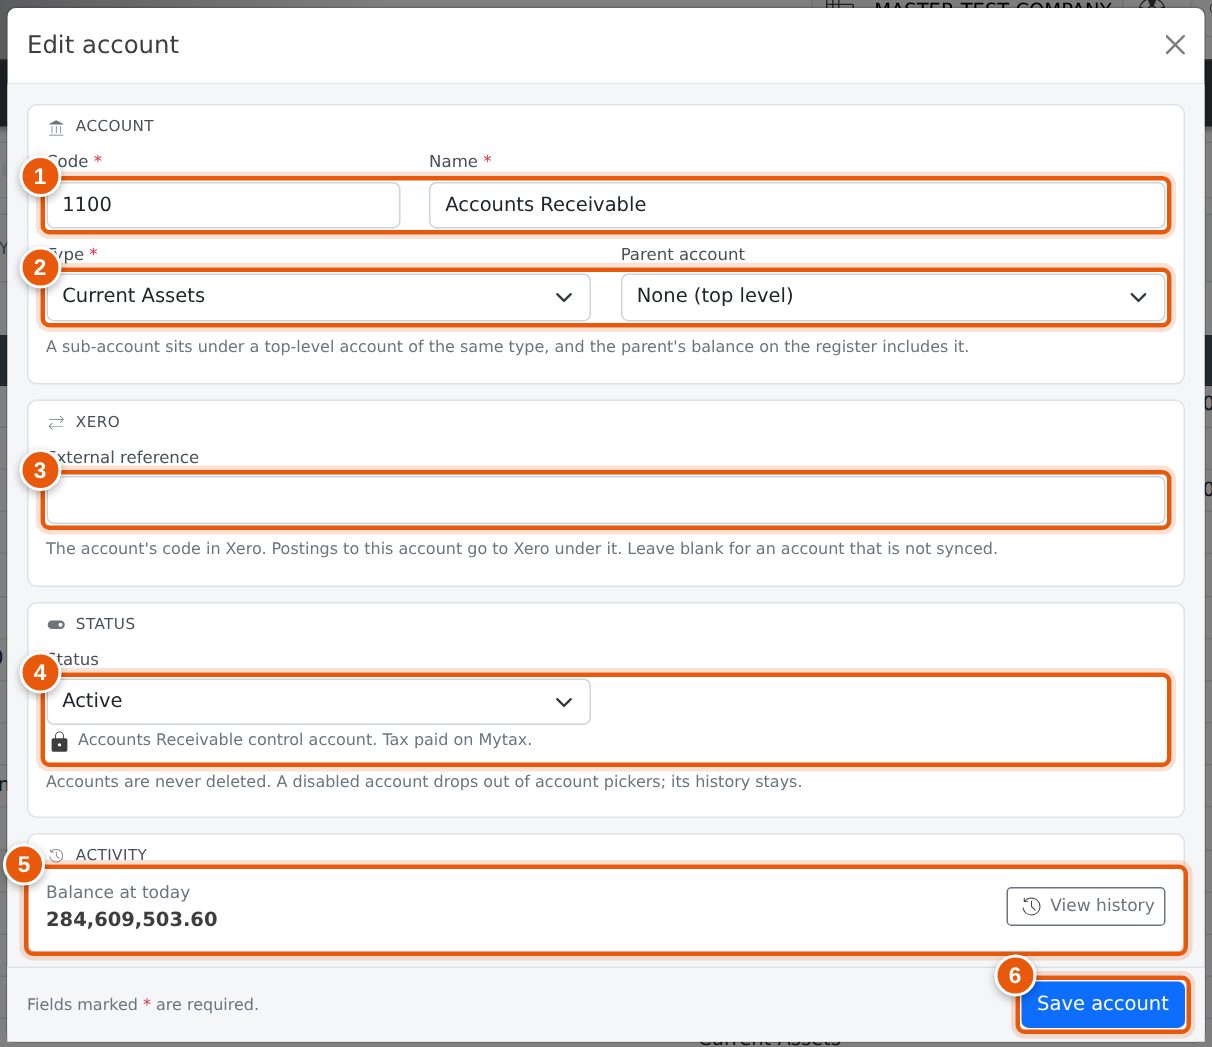
- Code and Name. The code is a whole number, up to nine digits, and no two accounts can share one.
- Type, which sets the tab the account appears on, and an optional Parent account. Only active top-level accounts of the same type can be a parent. An account that has sub-accounts stays at the top level and keeps its type.
- External reference: the account’s code in Xero. Leave it blank for an account that is not synced.
- Status. Accounts are never deleted. A disabled account drops out of account pickers, and its history stays. If the account is a control account, still has a balance or has active sub-accounts, Evolution tells you before it disables it. The lock line lists what Evolution uses the account for.
- Activity: the account’s balance, and View history to open its account history.
- Save account. Every change is recorded in the audit log with your name.
Account History
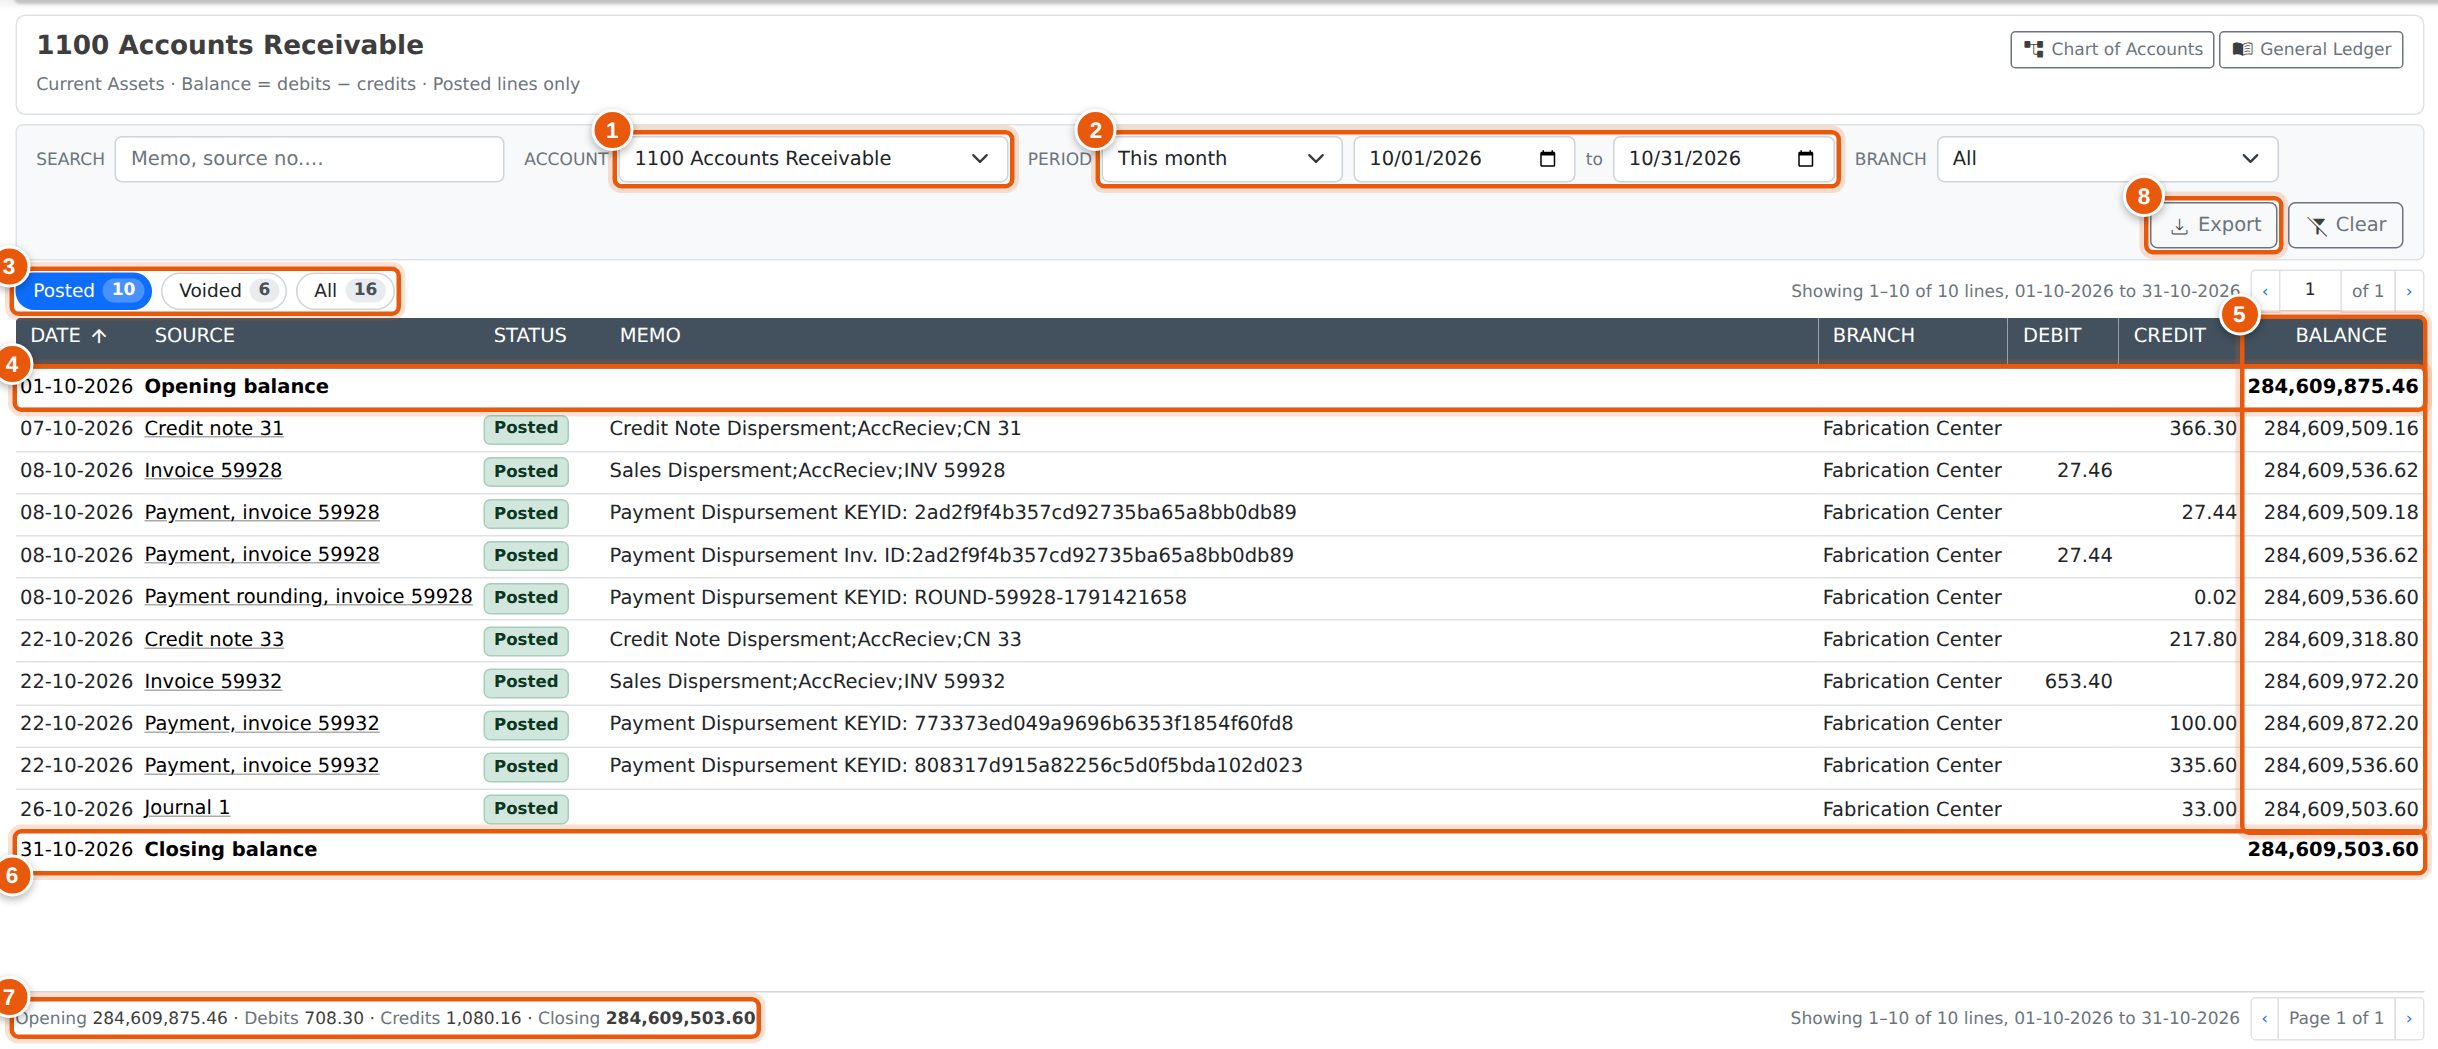
Account history shows one account like a bank statement: an opening balance, each line with the balance after it, and a closing balance. Open it from the Account history link next to the Account filter, or from the Chart of Accounts: click an account’s balance, or View history when you edit it. It needs the same access as the General Ledger.
- Account: the account shown. Switching it keeps the period and branch. The panel at the top names the account and gives its category and which way its balance reads, with a Disabled flag if the account is no longer in use. General Ledger opens the ledger filtered to this account, and Chart of Accounts goes back to the account list.
- Period: pick a period, or set the dates by hand. It opens on this financial year. The page remembers the period and branch for next time.
- Posted, Voided and All. Posted is the default. Voided lines never count in the balance, so the Balance column only shows on Posted.
- Opening balance: the account’s balance before the first date.
- Balance: the balance after each line. It carries over from page to page.
- Closing balance: the balance at the end of the period.
- The period’s opening, total debits, total credits and closing.
- Export downloads the statement as a CSV file, with the balance column and the opening and closing rows.
Balances read the natural way for the account. Assets and expenses show debits minus credits. Liabilities, equity and income show credits minus debits, so a normal balance is positive. A red balance runs the other way.
The list is oldest first. Click Date to put the newest first. The balances stay the same, and the closing balance moves to the top. Search narrows the list to matching lines but keeps each line’s true balance, so you can find one invoice and see where the account stood after it. Clear resets the search and goes back to this financial year; it keeps the account.
Posting a Journal
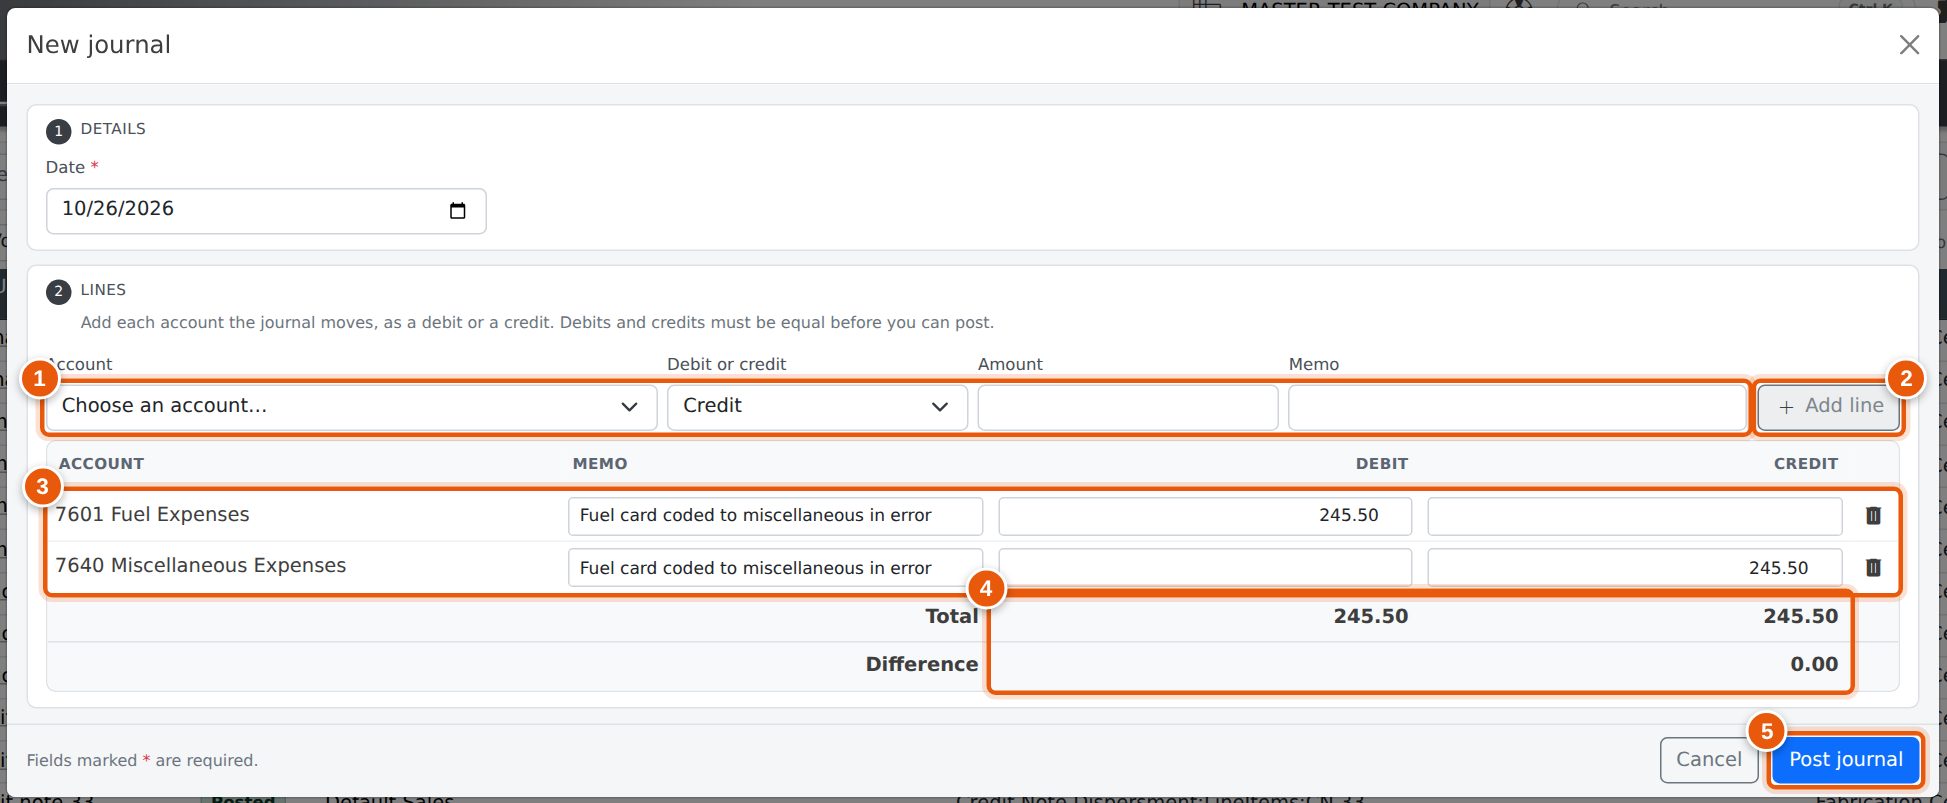
A journal moves amounts between accounts directly, for example to correct a cost coded to the wrong account. Click the add_circle_outline button at the top right of the page to open New journal. The button only shows if you have General Ledger at Admin level.
- Set the journal Date. Then, for each line, choose the Account, whether it is a Debit or credit, the Amount and an optional Memo (1).
- Click Add line, or press Enter in the Amount or Memo box (2). The next line is set up as the balancing side for the amount still needed.
- The lines appear in the table (3). You can still change a line's memo or amount there, or remove it with the bin.
- The totals and Difference (4) update as you go. The difference shows in red until debits equal credits.
- Post journal (5) unlocks once there are at least two lines and they balance. If you hover over it while it is locked, it tells you what is missing.
When it posts, the journal gets the next journal number, the lines appear in the ledger as Journal N, and the account balances update. The journal is posted against the branch you are working in, and recorded in the audit log with your name.
If you close the window with lines entered, Evolution asks before discarding them. Only active accounts can be used on a journal.
Common Questions
Why do I see the same invoice twice, with the amounts reversed?
The invoice was changed after it was committed. Its first set of lines was voided and a new set posted. Use the Posted button to see only the current lines.
The totals do not balance. Is something wrong?
Not necessarily. Filters such as Account, Search or an amount range pick out some lines of a transaction and not others. With only a date range set, posted debits and credits normally match. If a single transaction opened from its Source link does not balance, raise a support ticket with the source number.
Why doesn't the account history balance match the Balance Sheet?
Check the branch and the dates. The closing balance counts posted lines up to the To date, on the chosen branch only. Set Branch to All and the To date to the Balance Sheet date to compare like with like.
Why is an account on the wrong tab?
The tab comes from the account’s type. Change the type to move it. An account listed only on All accounts with a No type flag has no valid type yet; edit it and choose one.
I can see the ledger but there is no button to add a journal.
Posting journals needs General Ledger at Admin level. Ask your administrator.
Related Pages
- Financial Reports: Profit & Loss and the other reports built from the ledger.
- Control Accounts & Tax Accounts: the accounts invoices, bills and payments post to.
- Credit Notes (AR & AP): committing a credit note posts to the ledger.
- Setting Permissions: the General Ledger access levels.