Evolution ERP is the master of your catalogue. Inventory categories are published to Shopify as collections, inventory items become products, and item variations become product variations. Prices, costs, SKUs and hero images travel with them. Once an item is published, editing it in Evolution keeps the matching Shopify product up to date.
The publishing order
Because products can only live inside a published collection, work top-down:
- Publish categories → collections first.
- Publish items → products under those collections.
- Optionally set up variations and hero images.
Both steps are launched from the Shopify Plugin page, or from the Inventory registers (see Search Registers).
Step 1 — Categories to Collections
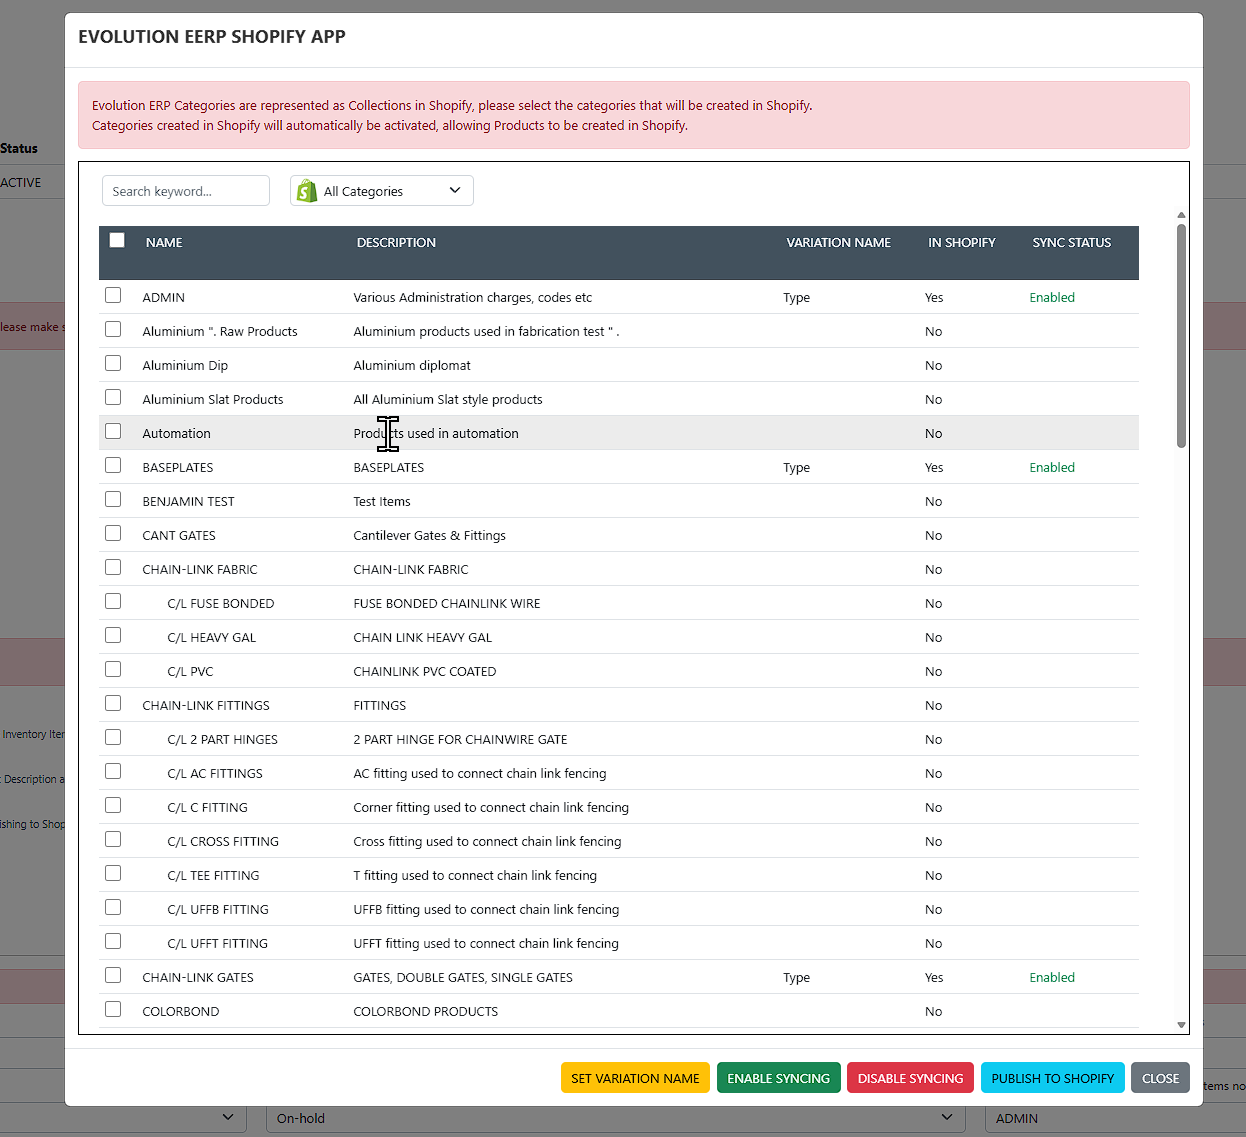
Open Inventory Categories to Shopify Collections from the plugin page (the category configurator). Select the categories you want to appear online and publish them.
- Each selected category is created in Shopify as a collection. The collection title, description and SEO fields come from the Evolution category.
- Categories published to Shopify are activated automatically, which is what allows their items to be published as products.
- You can start (publish) or stop a category individually or in bulk.
Opening the collection from Evolution
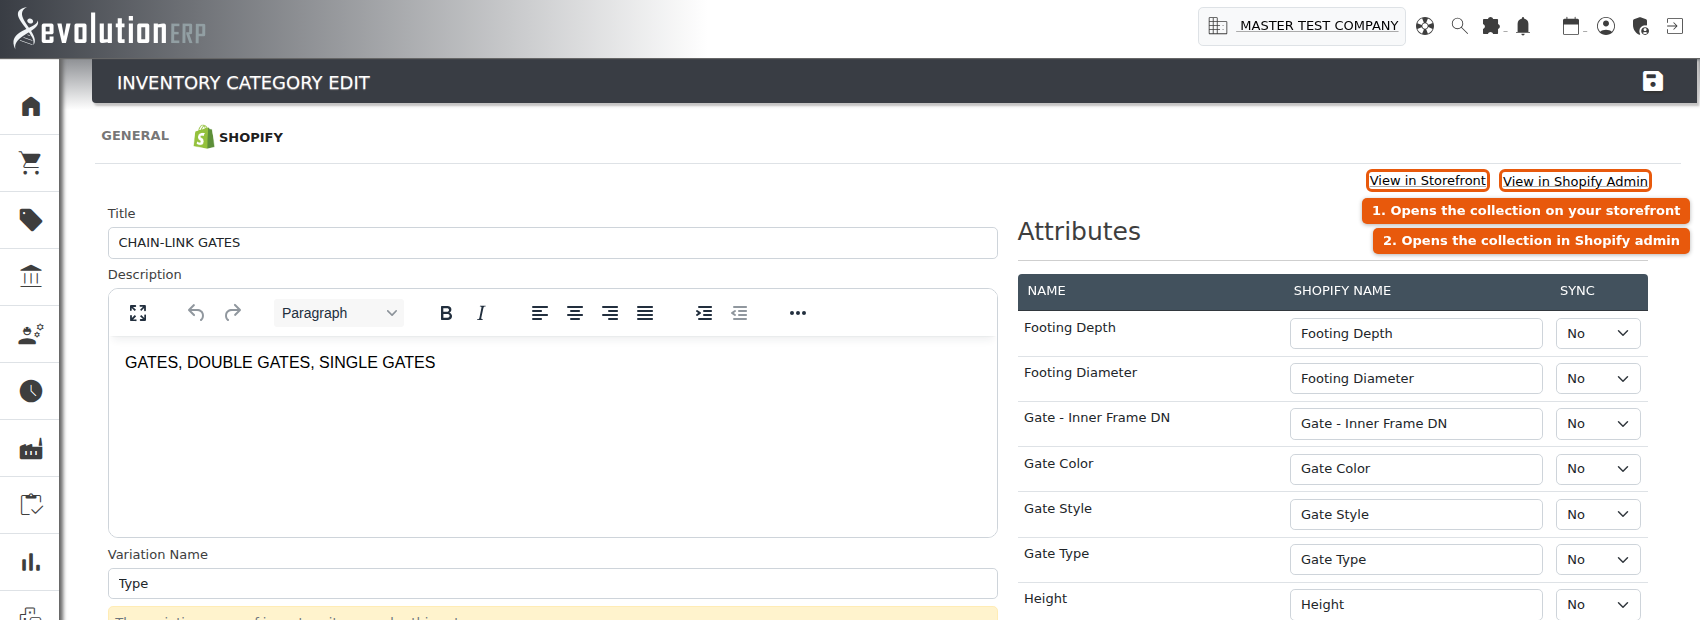
Once a category has been published, open it in Inventory → Categories and pick the Shopify tab. Two links sit at the top of that tab:
- View in Storefront — the collection page as a customer sees it.
- View in Shopify Admin — the collection record in your Shopify admin, where products, sort order and publishing channels are managed.
Both open in a new tab. They appear only where the category actually exists in Shopify — a category you have not published yet shows neither link, which is a quick way to confirm at a glance whether a category has made it across.
Step 2 — Items to Products
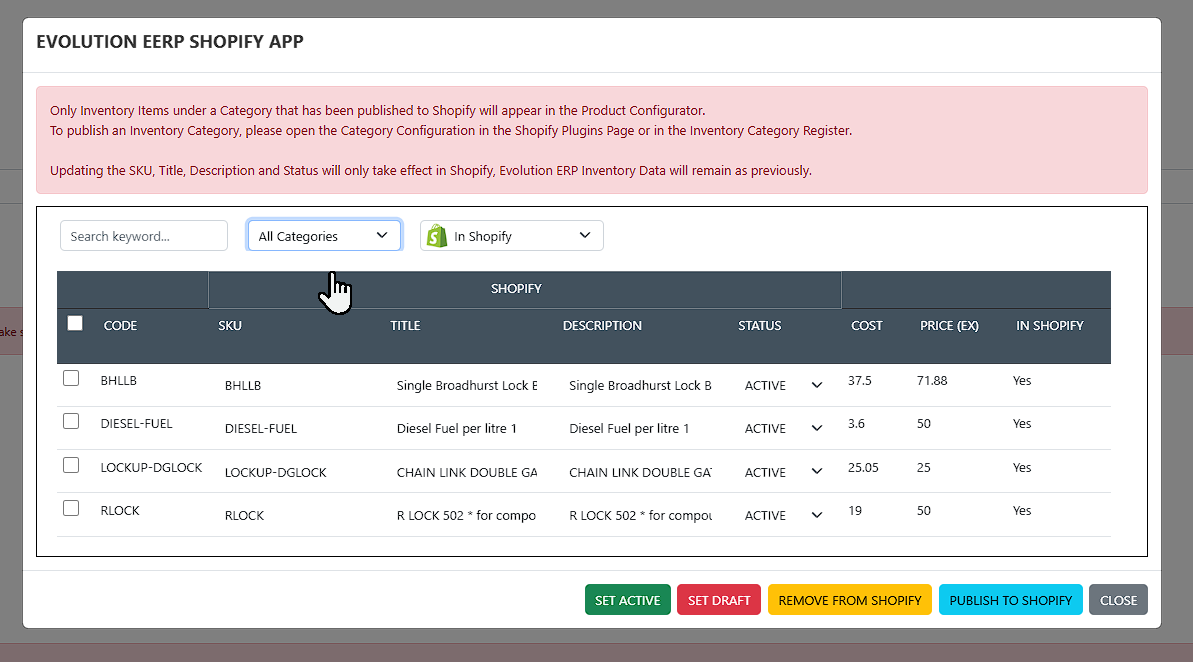
Open Inventory Items to Shopify Products (the Product Configurator). This is a grid of the items under your published categories, with tools to filter, edit and publish them.
Filtering the list
- Search keyword — matches code, title, SKU and description.
- Category — “All Categories”, or a single published category (parents and their sub-categories are listed).
- Shopify status — “All Products”, “In Shopify”, “Not in Shopify”, “With Hero Image”, “With No Hero Image”.
The columns
| Column | Meaning |
|---|---|
| Code | Evolution item code (read-only) |
| SKU | SKU sent to Shopify (defaults to the item code) |
| Title | Product title shown online |
| Description | Product description shown online |
| Status | Shopify status (see below) |
| Cost | Item cost, sent to the Shopify product |
| Price (ex) | Selling price, excluding GST |
| In Shopify | Whether the item is already published |
Publishing
Tick the items you want (there is a select-all checkbox) and use the publish/update actions. You can:
- Publish new items as products.
- Update items already in Shopify (title, description, SKU, price, status).
- Set items Active or Draft in bulk.
- Delete a product from Shopify (this does not delete the Evolution item).
Every bulk action is written to the activity log for audit.
Product status: Draft vs Active
Shopify products carry a status that controls whether they are visible online:
- Active — visible and available for sale.
- Draft — hidden; use while you finish setting up the product.
- Unlisted / Archived — also available where offered by the editor.
A common pattern is to publish new items as Draft, review the titles, descriptions and images, then switch them to Active.
Variations
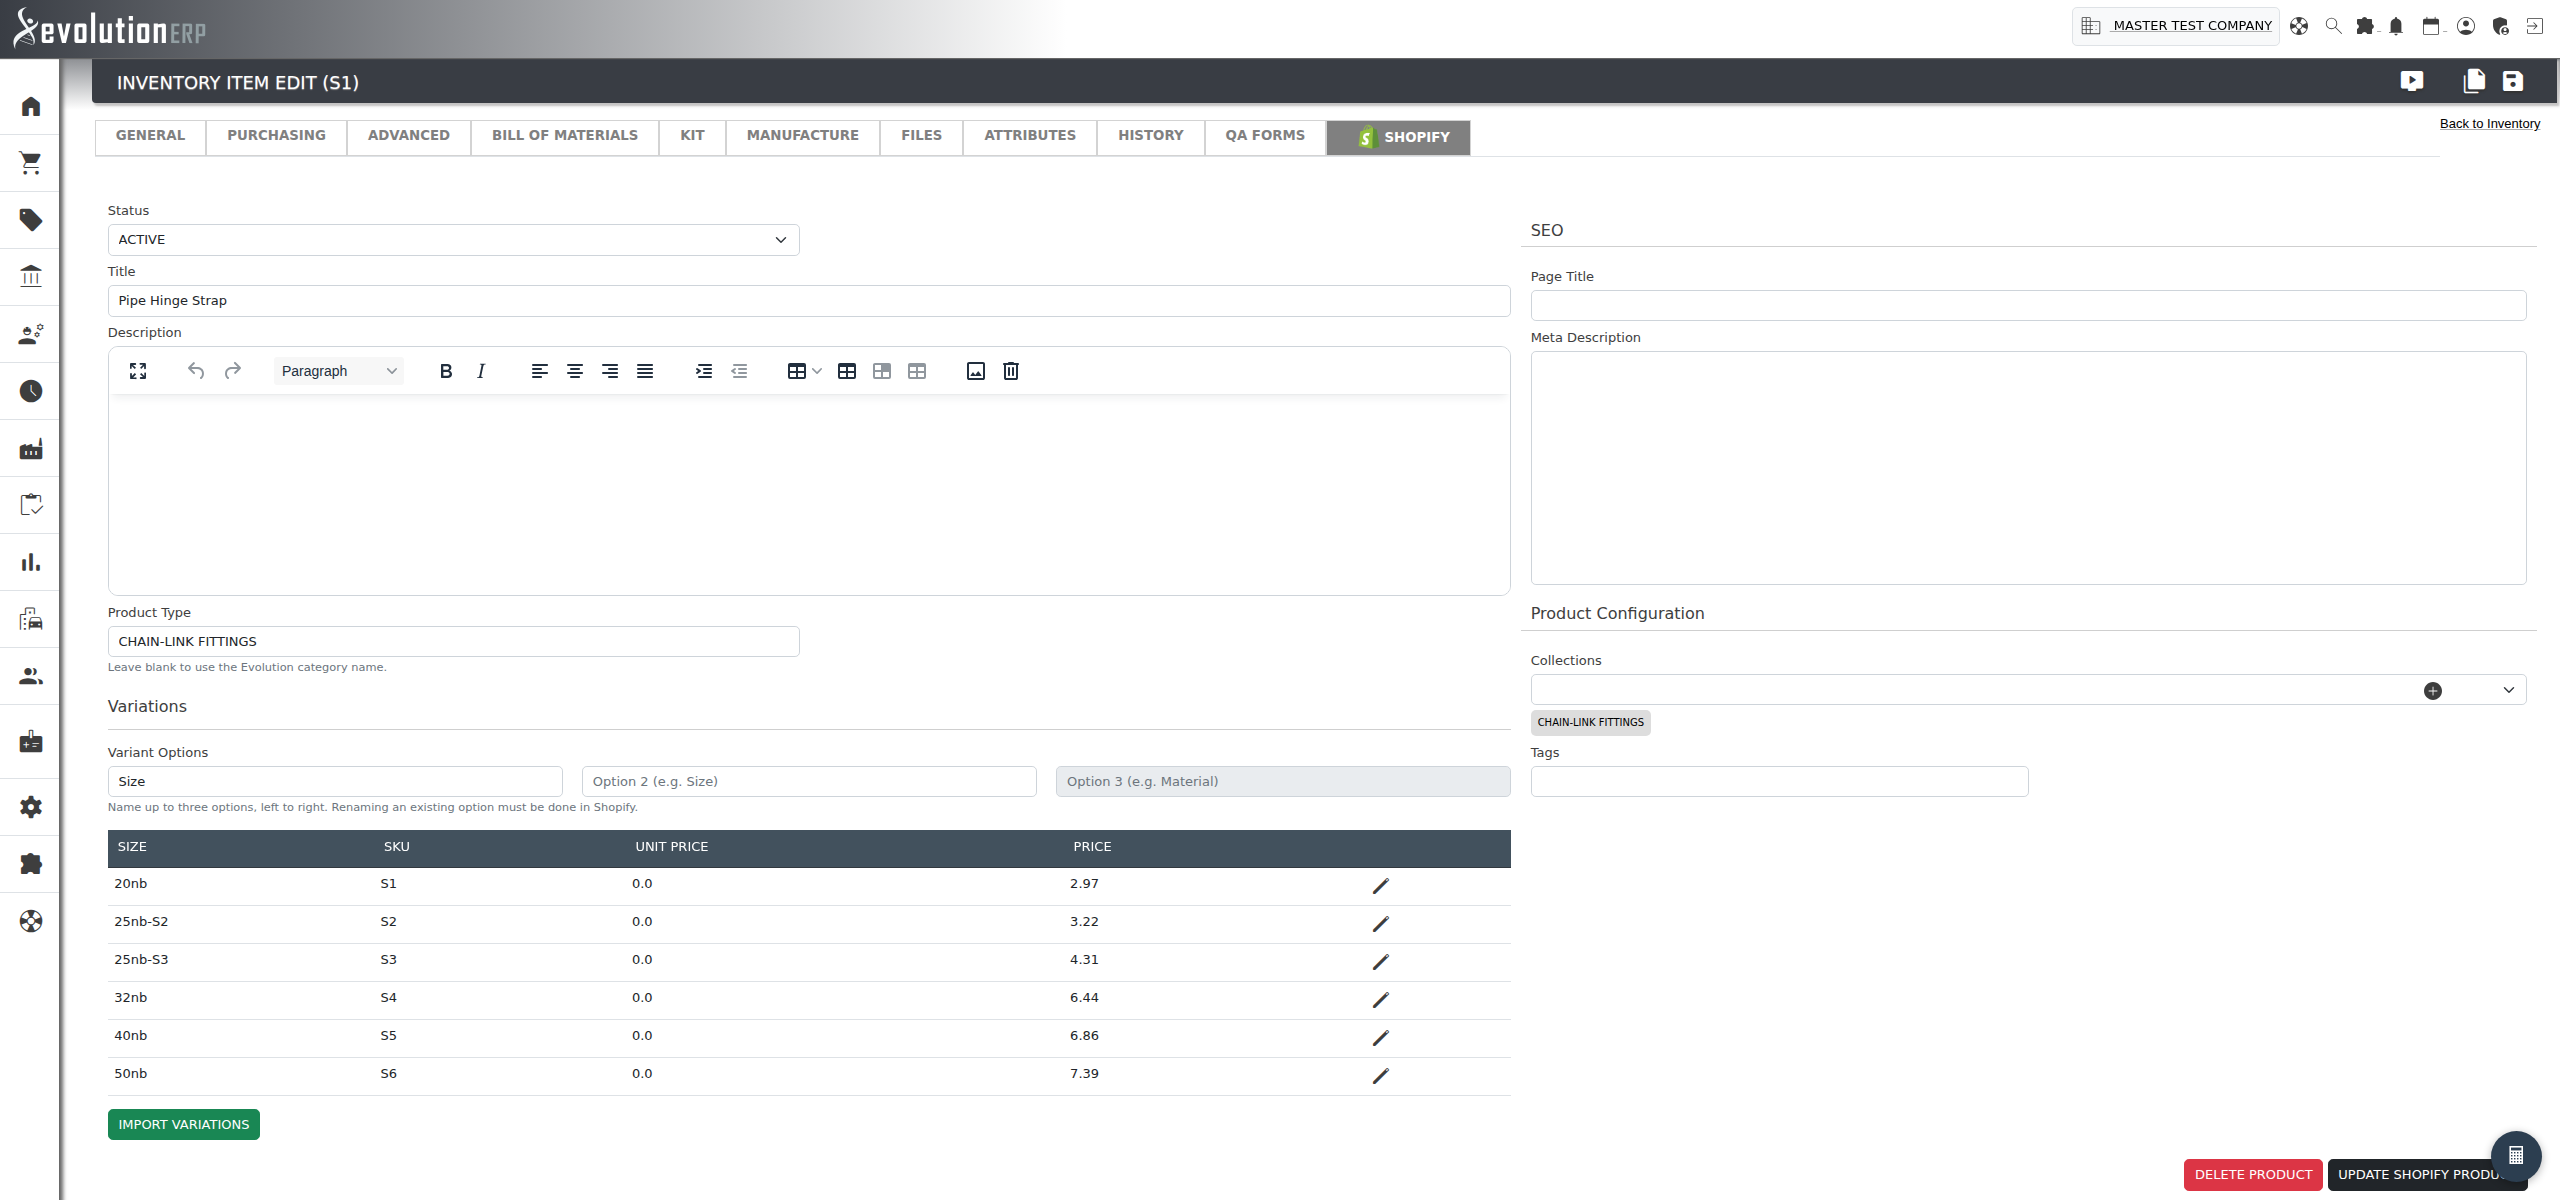
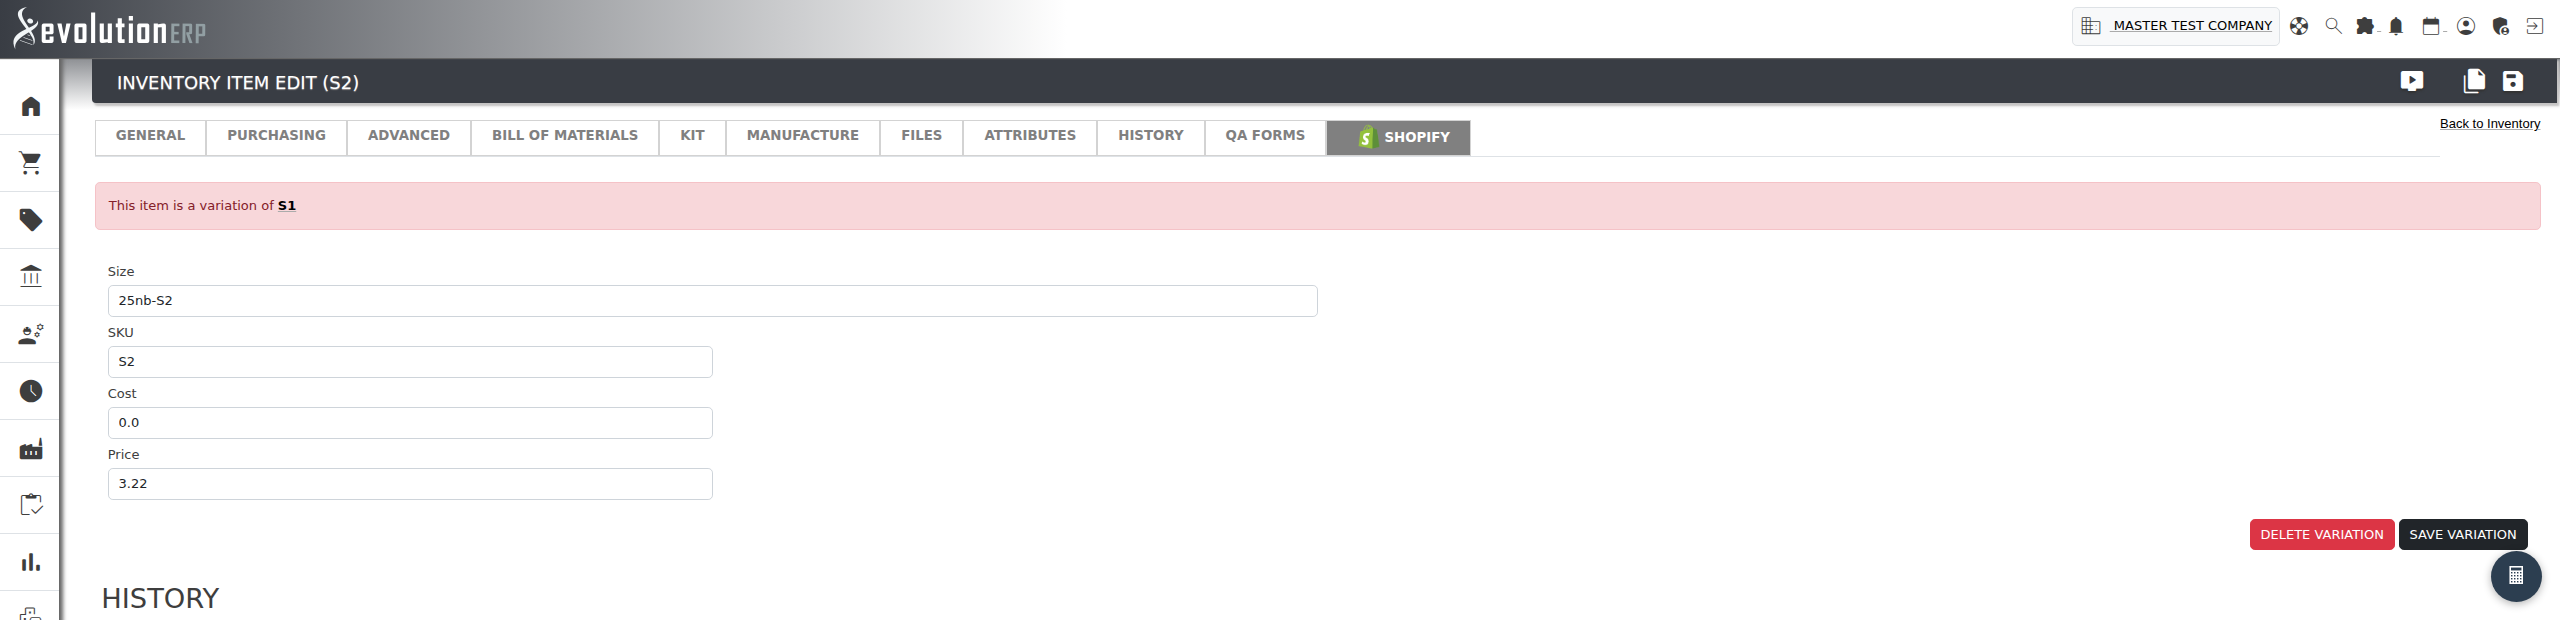
An Evolution item can be published as a variation of another item (for example size or colour). Variations map to Shopify product variations, and a product can be split by up to three options — Colour and Size, say.
- Name the options in the Variant Options row on the Product Manager, left to right. Position matters: option 1 is the first column in Shopify. A product that uses only one option behaves exactly as it always has.
- Where no option name is set, the variation option is named “Type”. You can change that default per category using Set Variation Name in the category configurator — this updates every already-published product in that category.
- Use the variation import picker to add existing items as variations, filtering by
keyword (e.g.
CLD%to match codes starting with CLD) and by published category. - Each variation carries its own SKU, cost and price, plus its own value for every option the product defines. Shopify will not accept a variation that is missing one, so Evolution names any empty option before it sends the change rather than letting the save fail.
- The variations list on the Product Manager shows one column per option, headed with that option's name, so you can read each variation's Colour and Size separately instead of reading them out of a joined title. A product with one option shows the one column it always did, now named after the option.
- Removing all of a product's variations restores its single default variant.
- Renaming an existing option must be done in Shopify.
Hero images
An item's hero image in Evolution is pushed to Shopify as the product image. If you change the hero image on an item that is already published, the new image is re-sent to Shopify automatically the next time the item is saved.
Coming the other way, images already in Shopify can be pulled into Evolution with the Store Import tool. An image Shopify has assigned to a particular variant is imported into that variation's own Evolution item, and each item's hero is filled from its own images — only where the item has no hero yet.
Product attributes (metafields)
Evolution item specifications can be published to Shopify as product metafields, so attribute data (for example material or dimensions) is available on the storefront. Attributes are enabled per category — flag which specifications should sync when you publish the category, and only those are sent.
Setting an attribute up
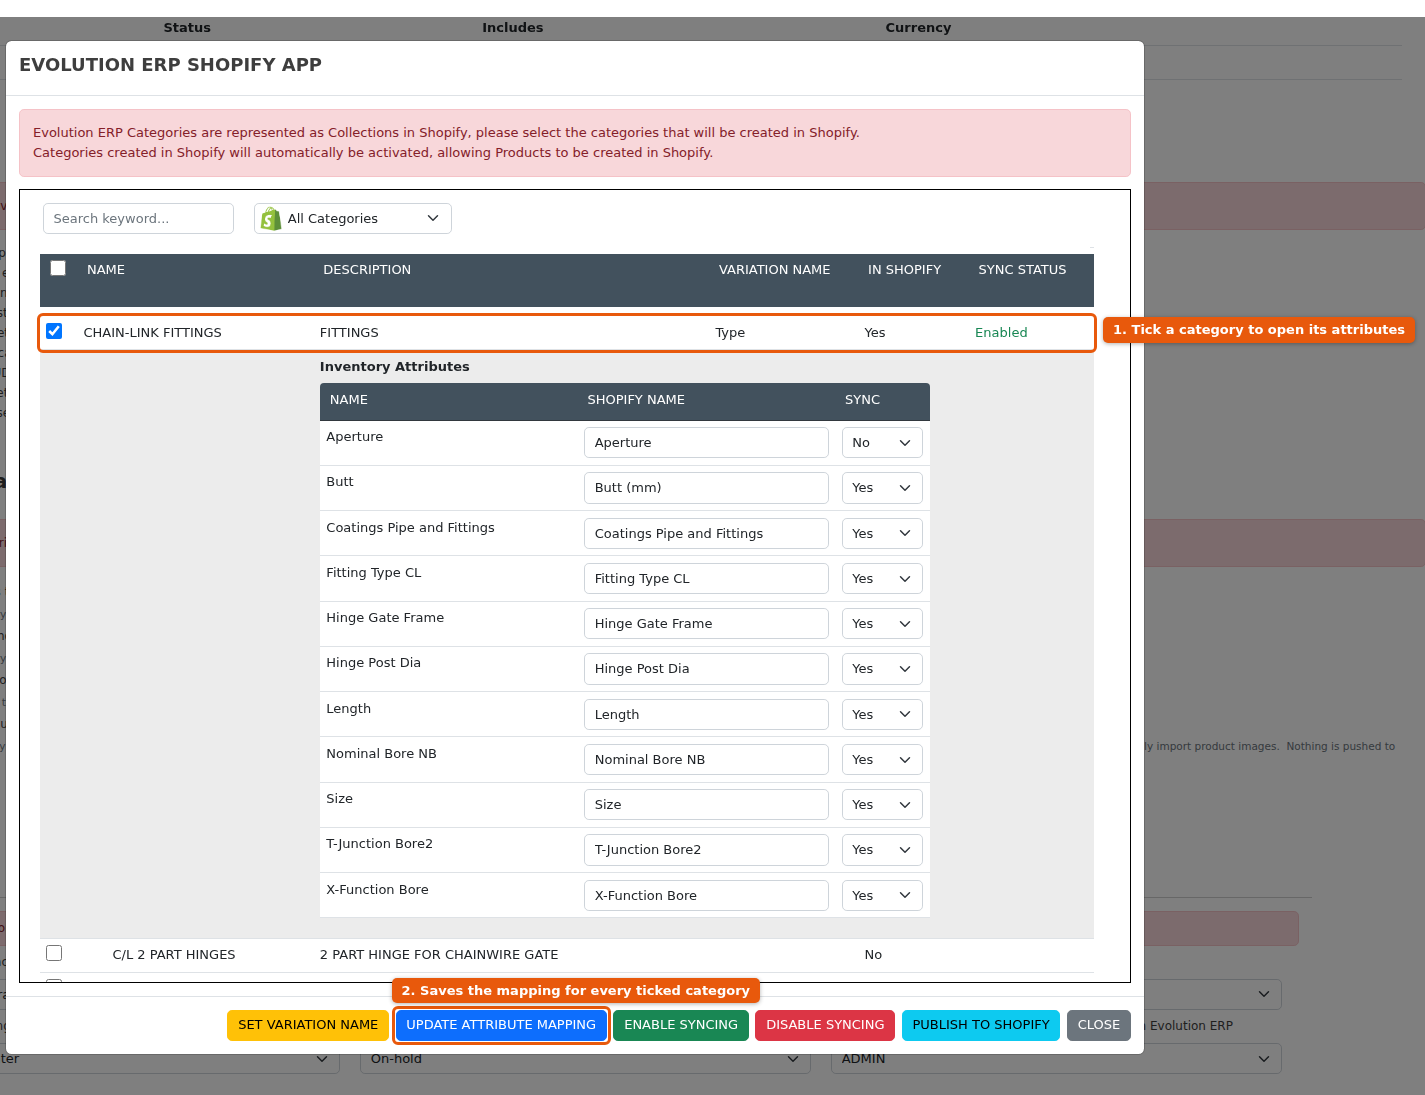
The mapping is authored on the category, not on the attribute. Open Inventory → Categories, choose a category, and go to its Shopify tab. The Attributes table there lists every attribute on that category with two things you control:
- Shopify Name — what the field is called in Shopify. Leave it as the Evolution name unless the store needs something different. This name is shared: changing it changes the field everywhere it is used.
- Sync — Yes sends this attribute's value for products in this category; No clears it in Shopify. The setting is per category, so the same attribute can be published for one category and left alone for another.
Seeing where an attribute is published
Because the mapping lives on the category, it used to be invisible from the attribute itself. Inventory → Attributes now shows it both ways round.
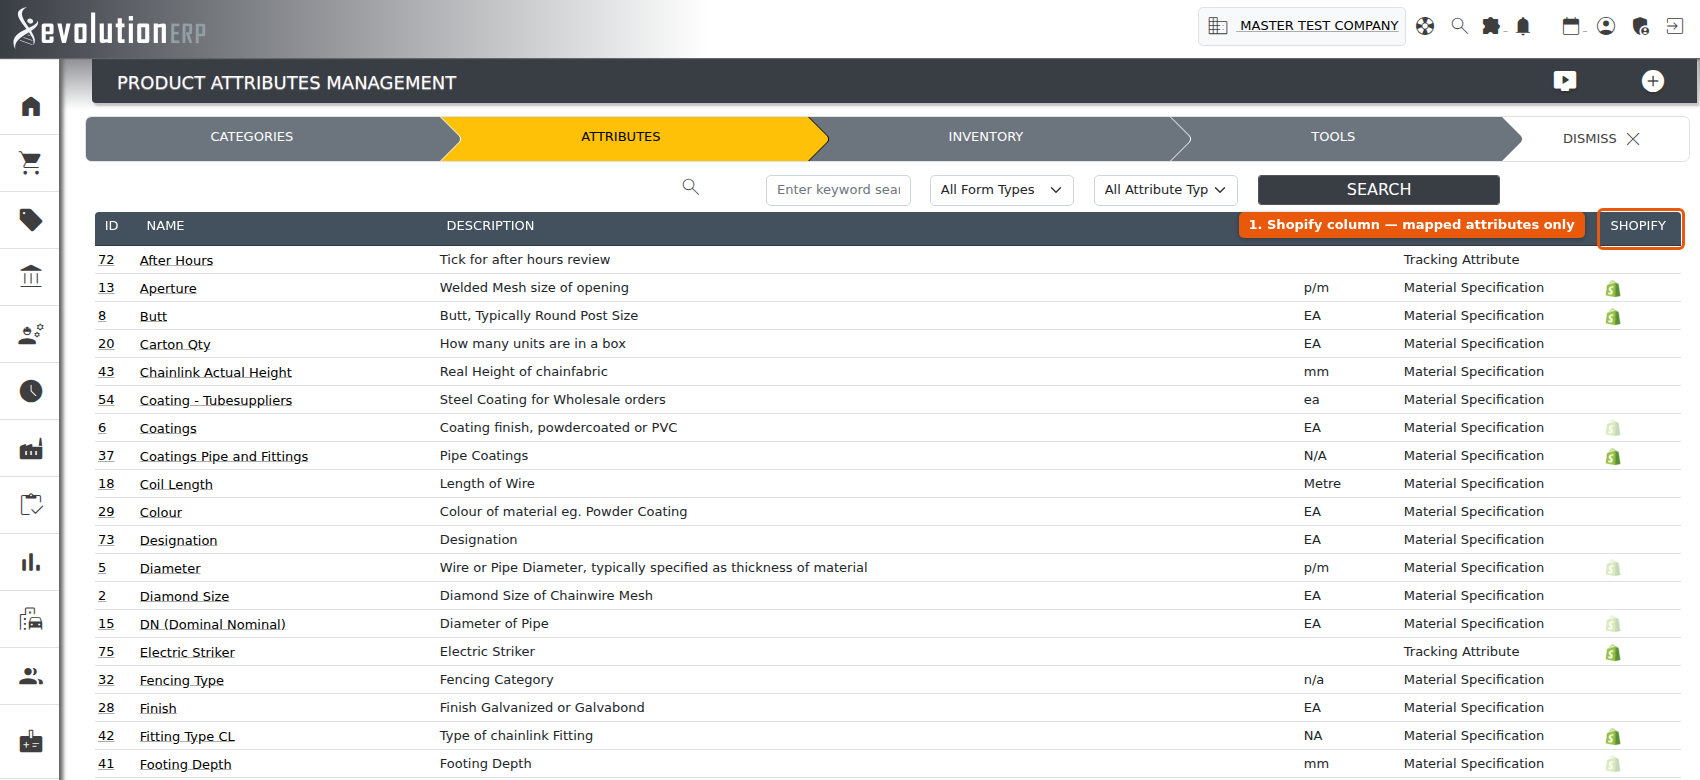
In the attribute register, a Shopify icon in the last column marks every attribute that is mapped to your store. Attributes with no mapping show nothing, and the column is hidden entirely if you do not use Shopify.
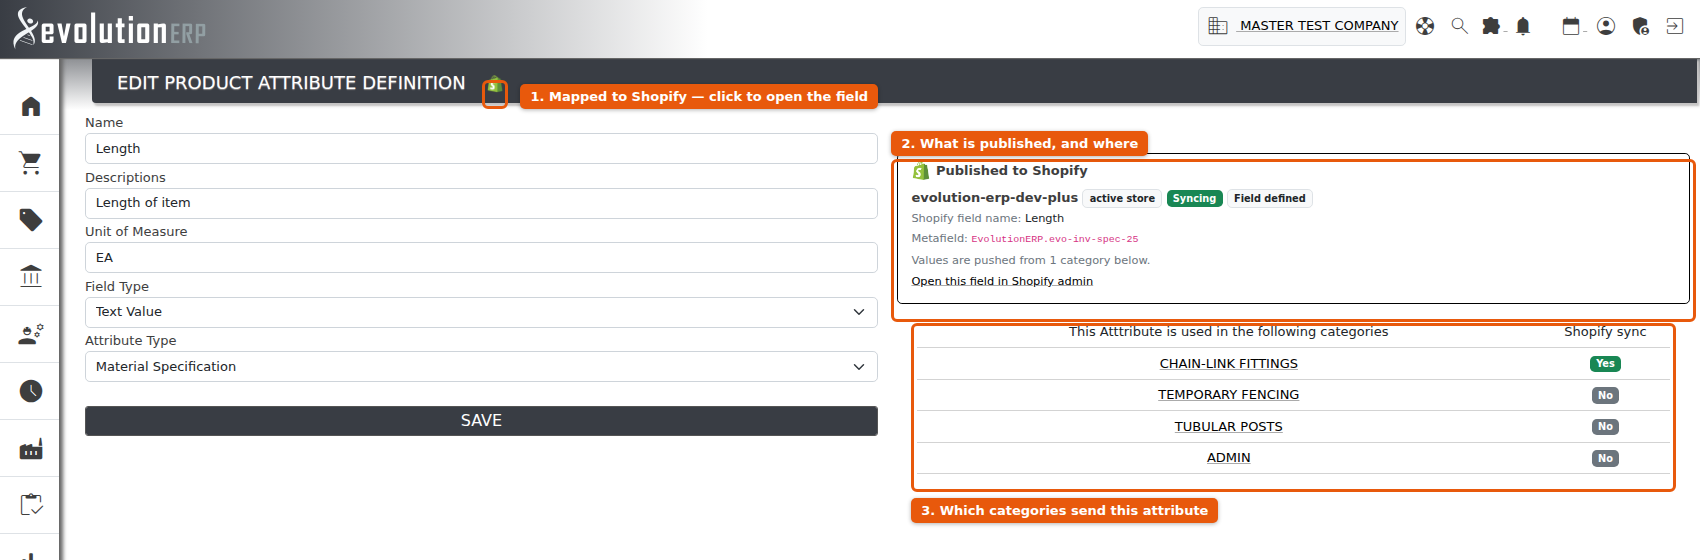
Opening one of those attributes shows the detail — the same icon beside the page title, and a Published to Shopify panel giving:
- the store the attribute is published to (and, where more than one store is connected, one line per store);
- Syncing or Not syncing — whether any category is currently set to send this attribute's values;
- Field defined or No field definition — whether Shopify holds a metafield definition for the field. Values are sent either way, but without a definition the field is not pinned or filterable in Shopify. Saving the Shopify tab on any category that uses the attribute creates it;
- the Shopify field name and the full metafield key, for anyone working in Shopify directly;
- a link that opens that field in your Shopify admin.
The list of categories underneath gains a Shopify sync column, so you can see in one place which categories send this attribute and which do not — the same Yes/No you set on each category's Shopify tab.
Changing the mapping for several categories at once
The Attributes table also appears in the Category Configurator. Tick a category and its attributes open underneath, ready to edit. Update Attribute Mapping saves the Shopify Name and Sync setting for every ticked category in one go — useful when the same attribute is used across a group of categories and you want it named or published consistently.
Seeing an item's attributes on the item itself
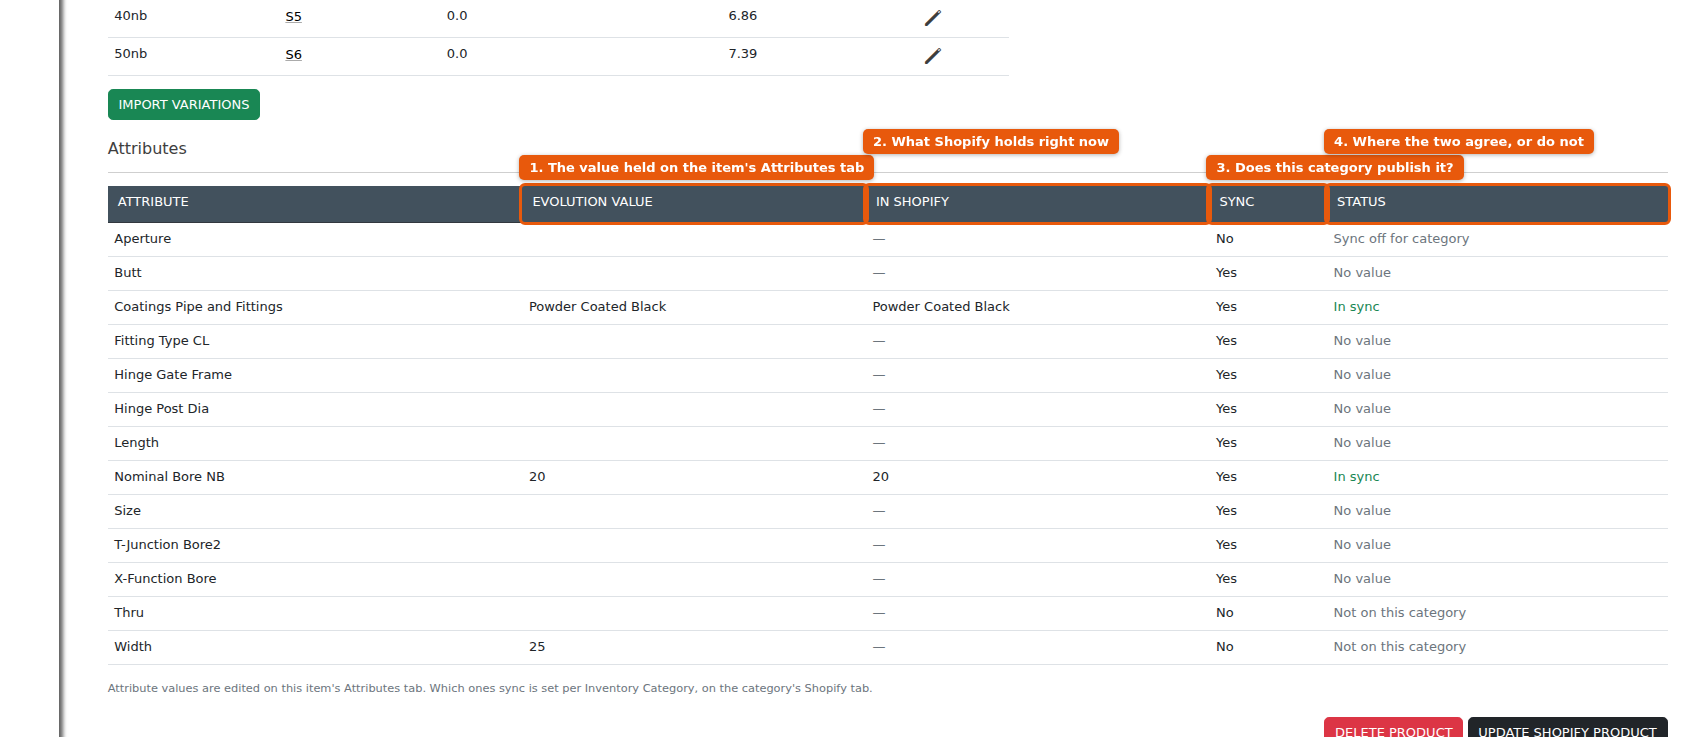
The category tells you what can be published. To see what has actually reached the store for one item, open the item and go to its Shopify tab. An Attributes table now sits under the product details, listing every attribute on the item's category side by side with Shopify:
- Evolution Value — the value held on the item's own Attributes tab.
- In Shopify — what the store holds for that field right now, or a dash if it holds nothing.
- Sync — whether the item's Inventory Category publishes this attribute.
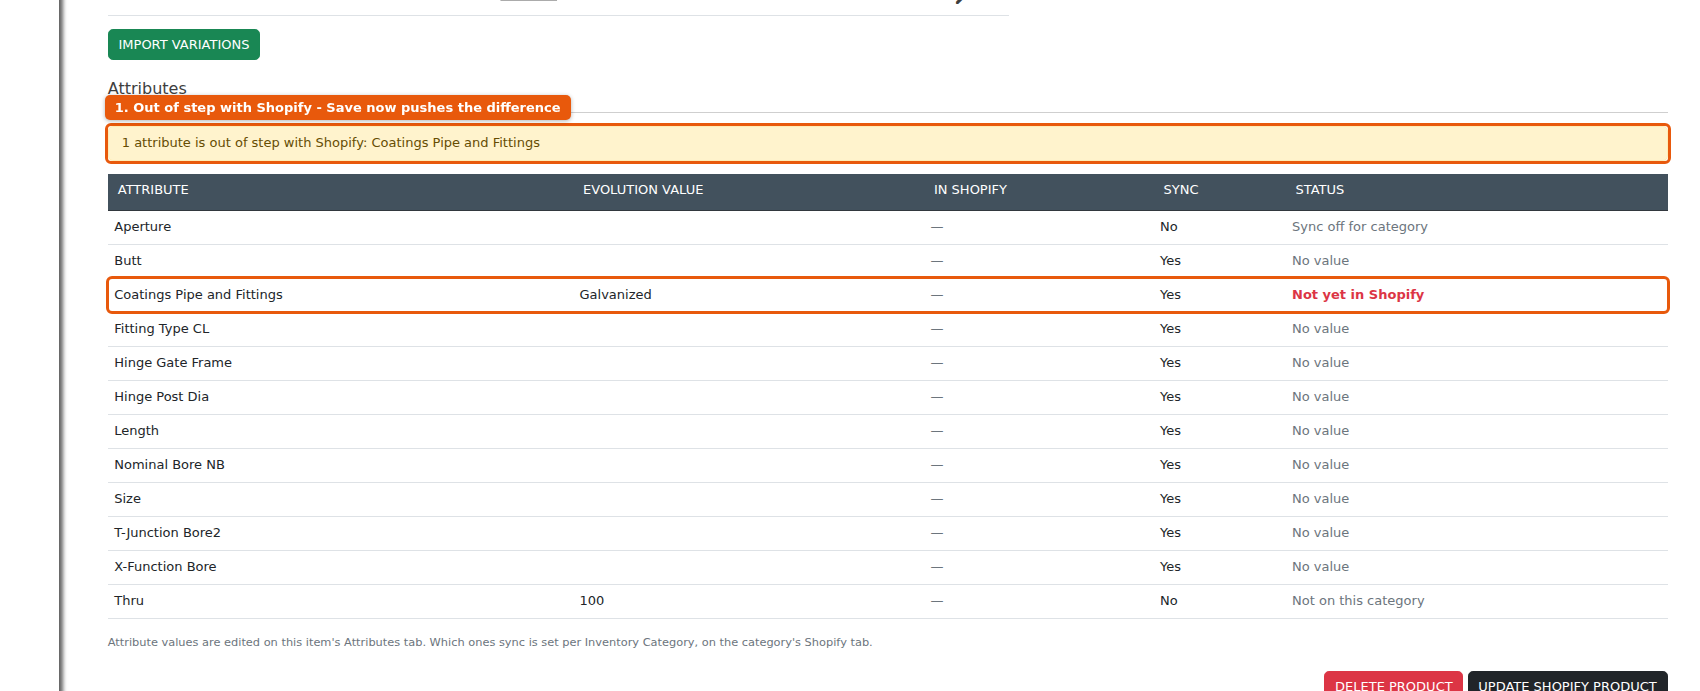
- Status — the two read together: In sync, Not yet in Shopify, Differs from Shopify, To be removed, or a muted note explaining why nothing will be sent — No value, Sync off for category, or Not on this category.
Where the two sides disagree, a banner names the attributes that are out of step and the editor treats the item as changed — so Update Shopify Product is live even if you have not typed anything. Previously an attribute change made on the category could not be pushed from the item at all: with no edit to the product fields themselves, saving reported “No changes were made, nothing to push to Shopify” and stopped. Saving now sends the attribute values, and clears any that the category has stopped publishing.
Attributes on variations
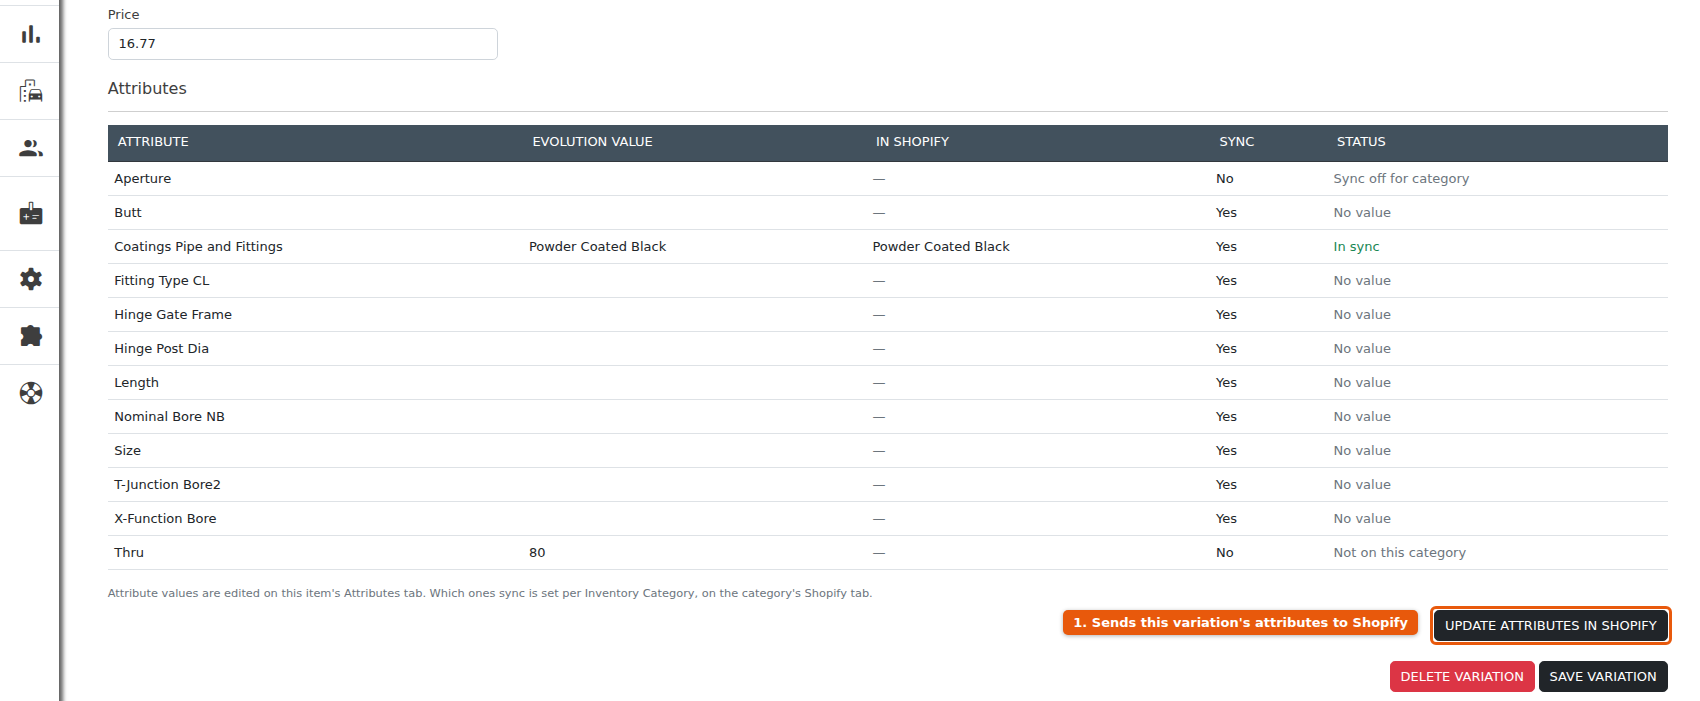
A variation is its own inventory item with its own attribute values, so it gets its own Attributes table on the Variation editor, plus an Update Attributes in Shopify button. Use it to send that one variation's attributes without touching the parent product or any of its other variations.
Where the values land: products and variants
Shopify holds attribute values against either a product or a single variant, and Evolution now works out which is correct for each item rather than always writing to the product:
- An ordinary item with no variations is published as a product on its own, so its values go on the product.
- A variation item's values go on its own variant.
- A master item that is published as the first variant of a multi-variant product — the item whose SKU appears in the Variations list on its Shopify tab — has its values written to that variant, matched on SKU.
Keeping products in sync
When you edit an inventory item in Evolution, the plugin updates Shopify if:
- the item's category is published to Shopify, and
- the item already exists as a Shopify product.
A changed hero image is re-pushed, and a changed price is pushed to Shopify — to the product's default variant for an ordinary item, or to that variation for an item that is published as a variation of another. Either way the result is recorded in the item's history — including whether the figure was sent with GST or without, so you can confirm both that the change reached Shopify and that it went across in the basis your store expects, without leaving Evolution. Attribute values travel with the same save: anything the item's category publishes is sent, and anything it has stopped publishing is cleared — see Product attributes above for how to check that before you save. Deleting the product from the configurator removes it from Shopify while leaving the Evolution item intact.
Editing a single product
The Product Manager screen edits one product directly: SKU, Status, Title, Description, Cost, Price, its variation options and variations table, SEO (Page Title and Meta Description), collections and tags. The Variation editor edits a single variation — SKU, Cost, Price, and one box per option, each labelled with that option's real name — and shows which parent item it belongs to. A product with one option shows the single name box it always did.