
Each branch is a location your business works from: a workshop, a showroom, a trade centre. Documents raised against a branch use its address, bank and accounting details, and now each branch can also have its own default print template for each kind of document.
Go to Settings → Branches to see every branch, and click a branch to open it. The top of the branch page shows the branch at a glance. Under that are four tabs: Details, Default print templates, Staff and Map.
The Branch Register
Settings → Branches lists every branch with its status, address, phone and email, and how much is still attached to it. Click anywhere on a row to open the branch.
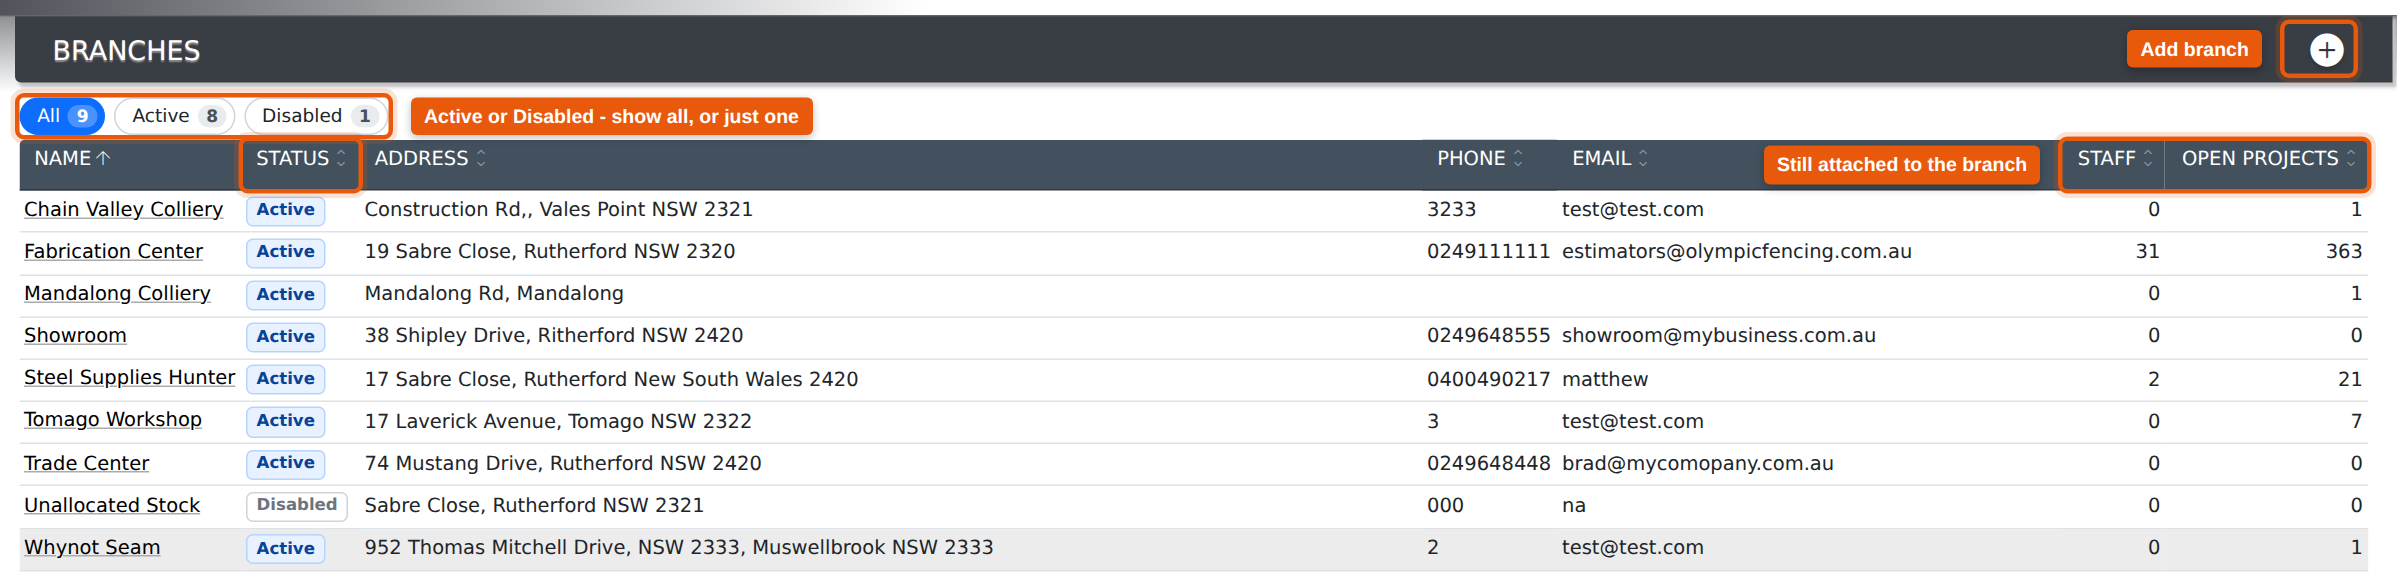
| Column | What it shows |
|---|---|
| Status | Active or Disabled. Your branch marks the branch you are signed in to. |
| Address | The street address, suburb, state and postcode. |
| Staff | Active staff assigned to the branch. |
| Open projects | Projects on the branch that aren’t closed. |
| Xero organisation | Shown only when your company is connected to more than one Xero organisation: the organisation the branch posts to. |
- Click a column heading to sort by it. Click it again to reverse the order. Staff and Open projects sort largest first.
- Once a branch has been disabled, All, Active and Disabled buttons appear above the list, each with a count. Click one to show only those branches, and click it again to go back to all of them.
Adding a Branch
Click the add_circle_outline button at the top of the register. Fill in the branch name, address and contact details, then click Add branch. Name, Address 1, Suburb, State, Postcode, Country, Telephone and Email are required. Country starts on the country most of your branches use.
The new branch opens straight away, so you can add its bank details, Xero organisation and default print templates.
At a Glance
The band at the top shows the branch name, its number, address, phone and email. Your branch marks the branch you are signed in to. When your company uses more than one Xero organisation, the Xero organisation the branch posts to is shown too. The buttons on the right open the branch in Google Maps and list its Projects, Bins and Stock on hand.
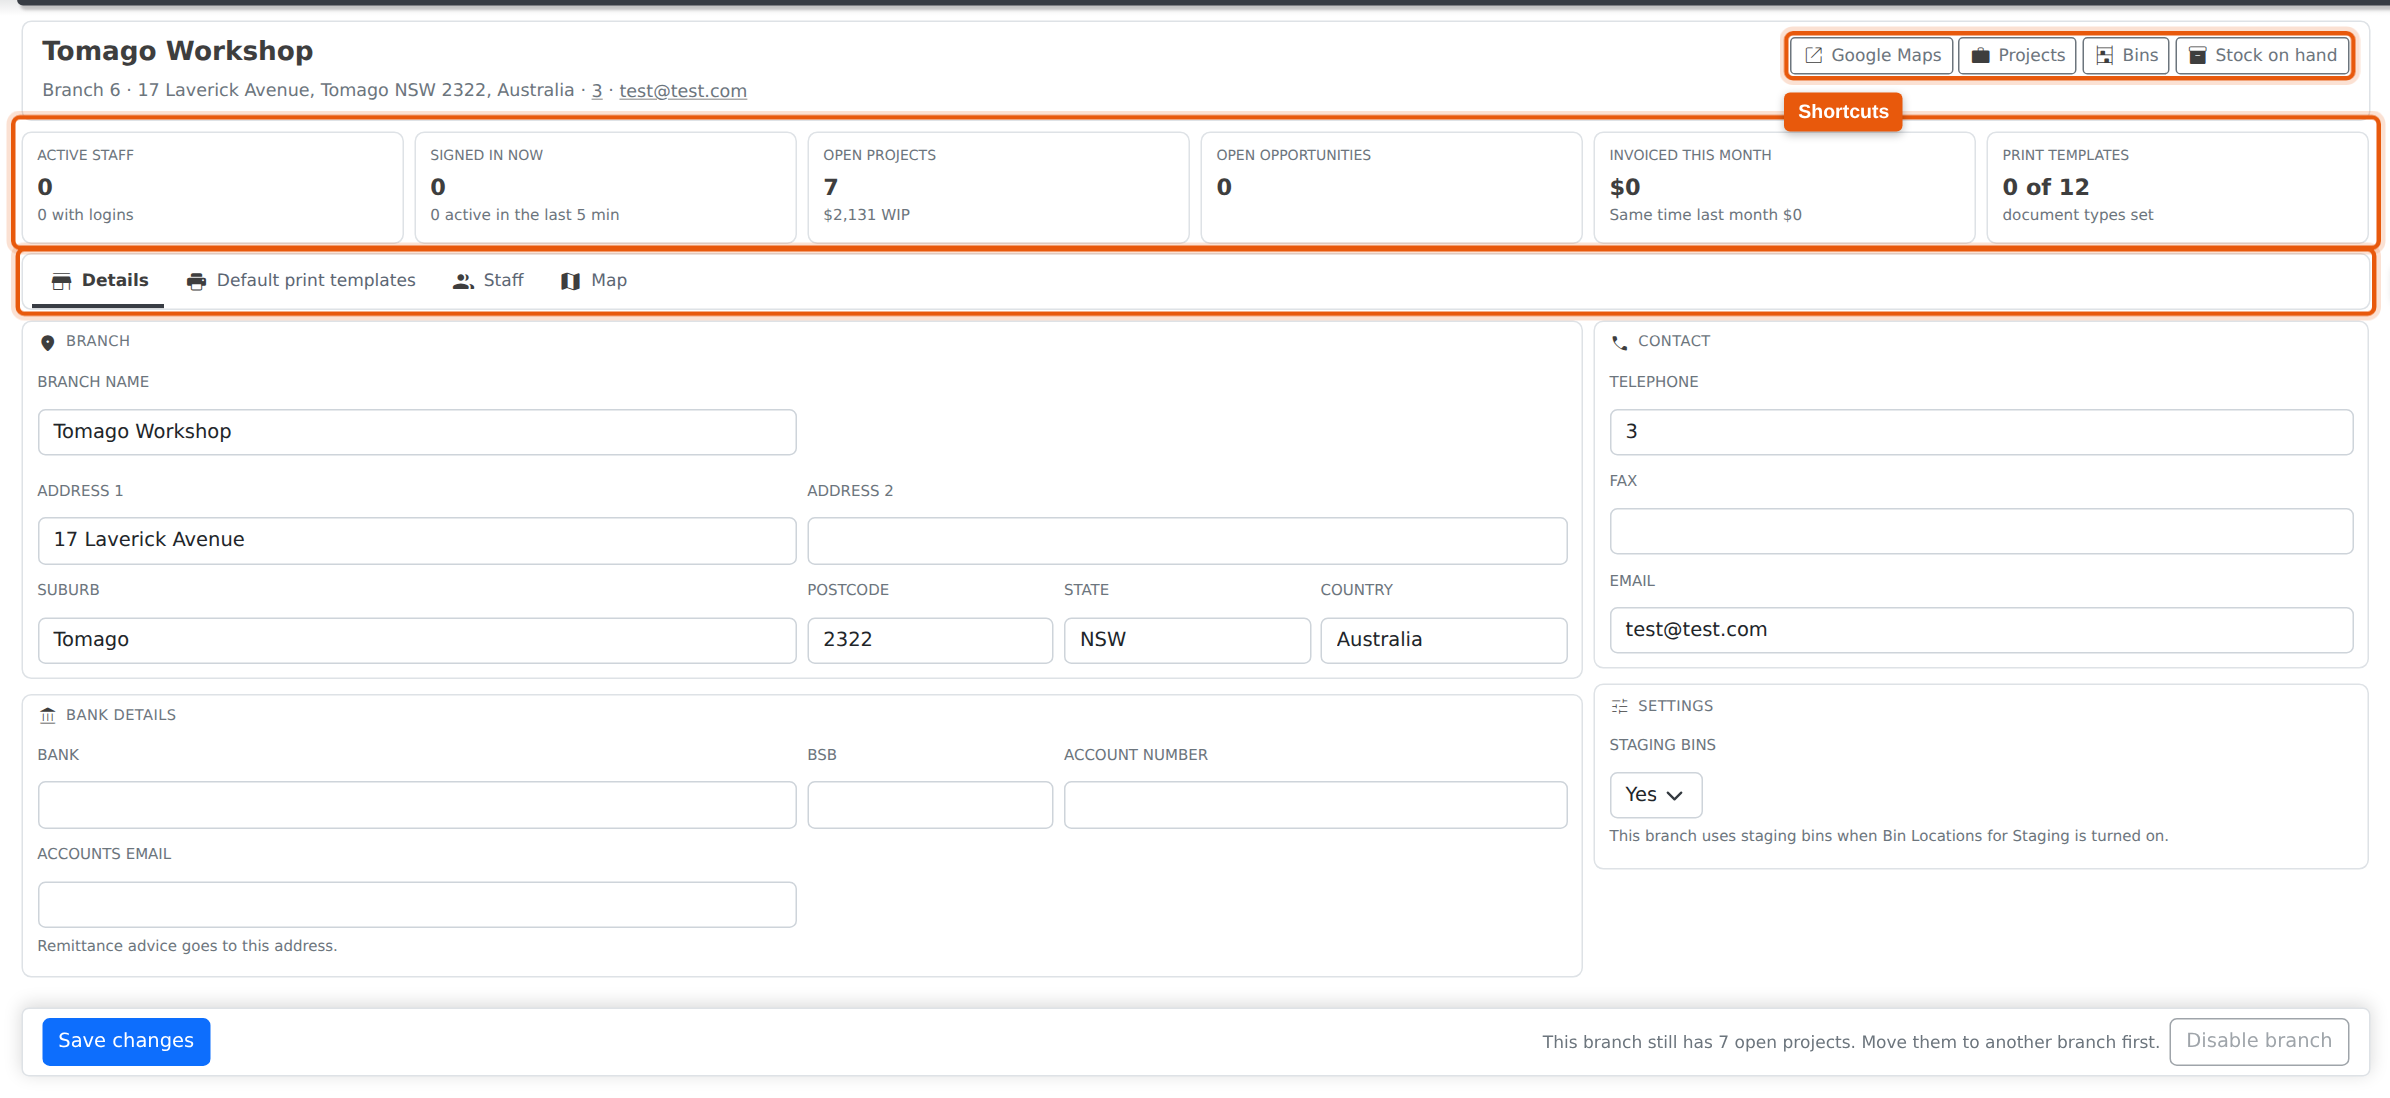
Under the band, six tiles sum up the branch:
| Tile | What it counts |
|---|---|
| Active staff | Active staff assigned to the branch, and how many of them can sign in to Evolution. Click it to open the Staff tab, which also lists inactive staff. |
| Signed in now | The branch’s staff signed in to Evolution right now, and how many have used it in the last 5 minutes. If you can see Active Users, click it to see who. |
| Open projects | Projects on the branch that aren’t closed, with their uninvoiced work in progress (WIP) and how many are on hold. |
| Open opportunities | Opportunities on the branch that are still open, and the total value of that pipeline. |
| Invoiced this month | Committed invoices on the branch this month, excluding GST, compared with the same days last month. Draft and deleted invoices aren’t counted, and credit notes aren’t taken off. Only administrators and users with Accounts Receivable access see this tile. |
| Print templates | How many document types have a branch default print template. Click it to open the Default print templates tab. |
Branch Details
| Panel | What it holds |
|---|---|
| Branch | The branch name and street address. Name, Address 1, Suburb, Postcode, State and Country are required. |
| Contact | Telephone, fax and email. Telephone and email are required. |
| Bank details | The branch’s bank, BSB and account number, and the Accounts email that remittance advice goes to. |
| Settings | Xero organisation appears only when your company is connected to more than one Xero organisation. Invoices, bills and credit notes raised against the branch default to it. Staging bins sets whether this branch uses staging bins when Bin Locations for Staging is turned on. |
Click Save changes at the bottom of the page. Every change is recorded in the audit log.
Default Print Templates
When someone clicks Print or Email on a quote, invoice, purchase order, delivery docket or other document, the dialog opens with a template already chosen. On the Default print templates tab you choose that template for documents raised against this branch. One branch can print delivery dockets with its own letterhead while another keeps the company standard.
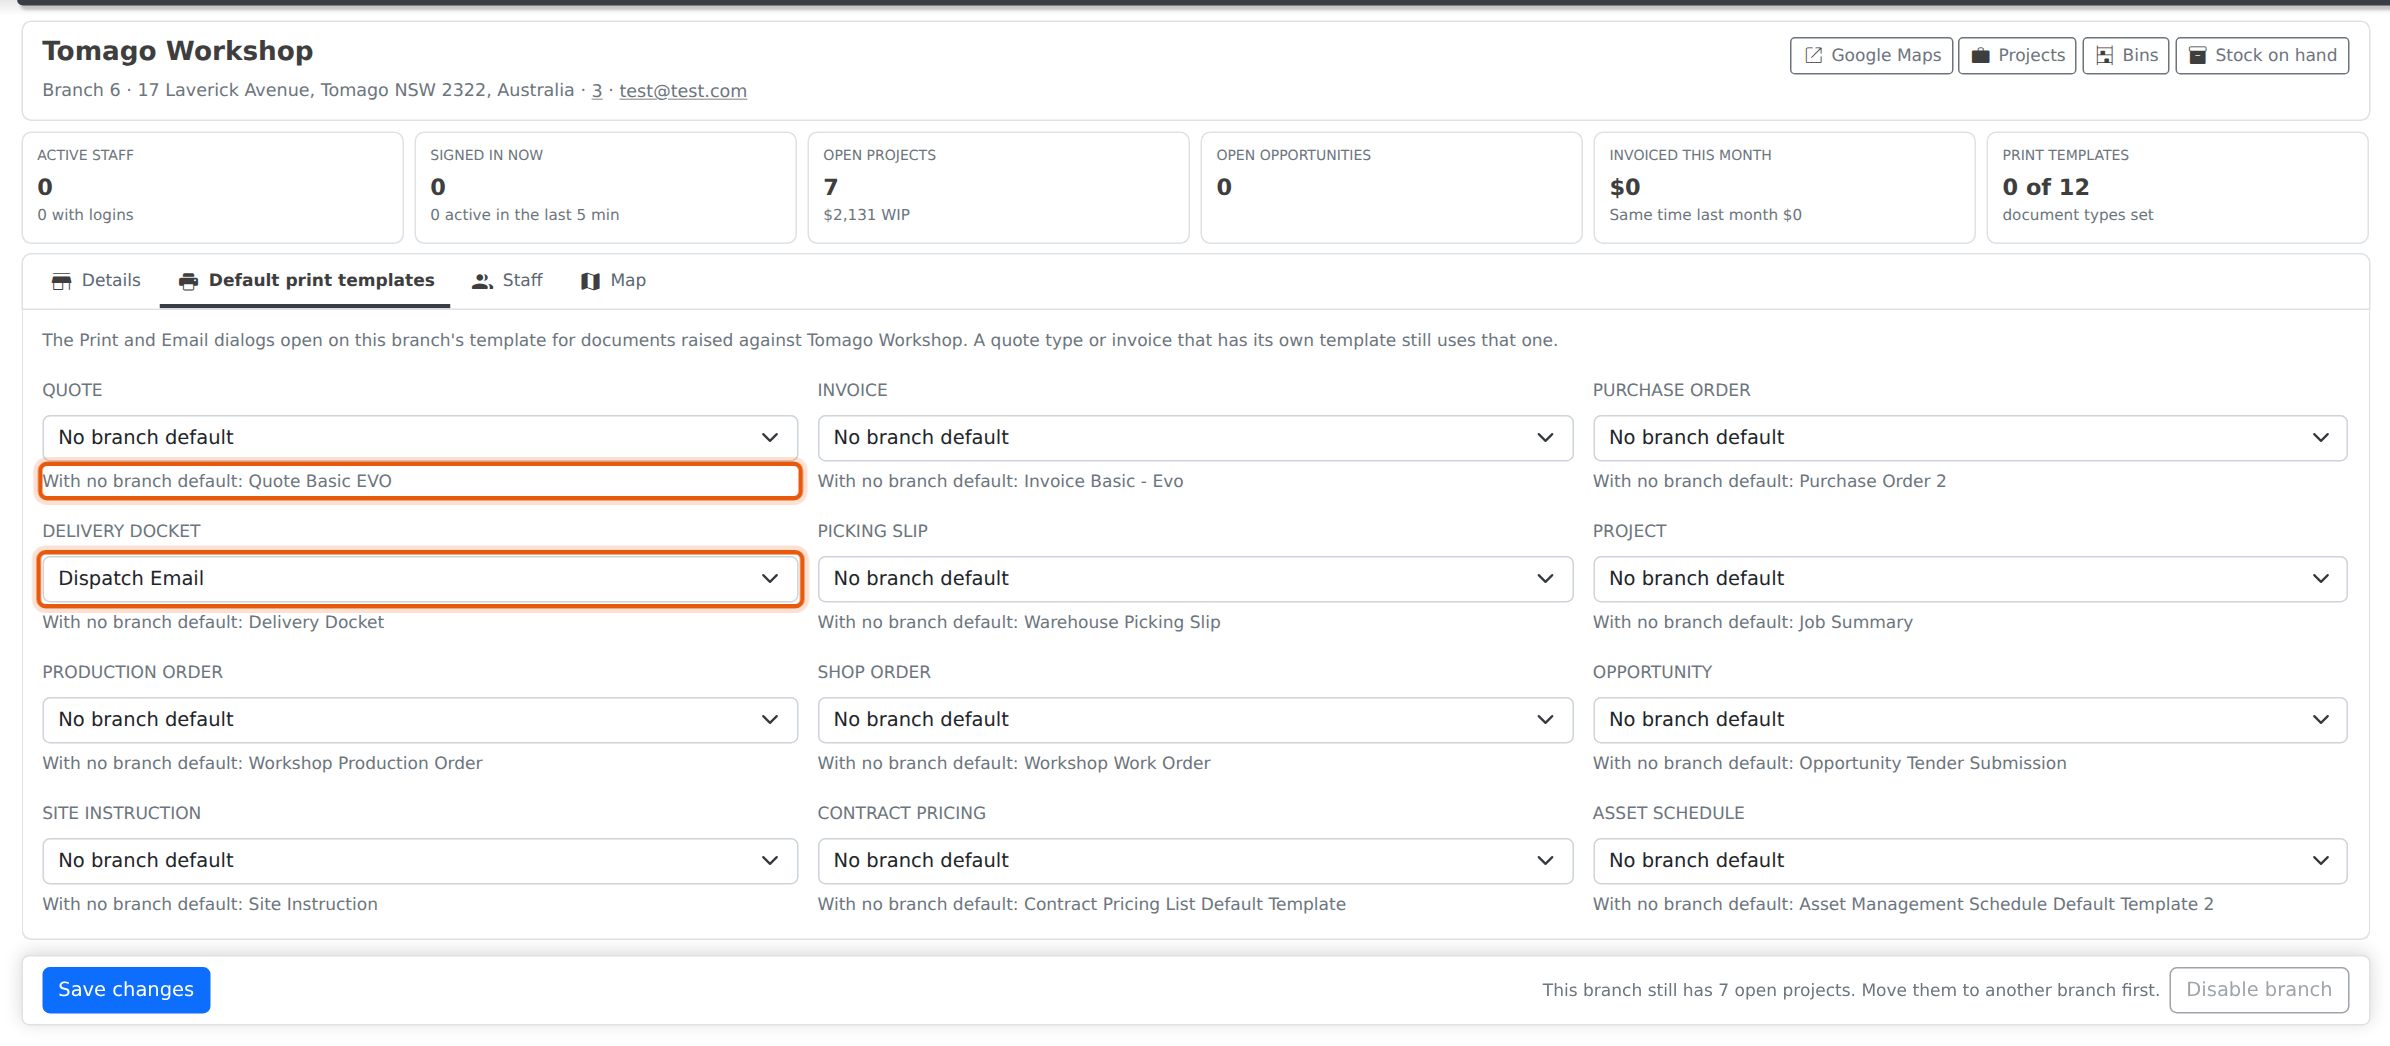
- There is one list for each type of document that has templates to choose from. A type with no templates isn’t shown.
- Choose No branch default to leave that type on the company default. The note under each list (With no branch default: …) names the template that opens in that case.
- Only enabled templates of the right type are offered. If a template chosen here is later disabled or deleted, it stays selected in red and marked (no longer available). The Print dialog skips it and uses the company default until you choose another one.
Templates themselves are added and edited under Settings → Files, in the Forms and Templates category.
Which Template Opens
The Print and Email dialogs pick the first of these that applies:
- The document’s own template. A quote whose quote type has a template, or an invoice with its own template, always opens on that one.
- The branch default for the branch the document belongs to.
- The company default: the Default Quote Template and Default Invoice Template settings, or the template marked as the default for that type.
The dialog only chooses the starting template. Anyone printing can still pick a different template from the list.
The supplier purchase order confirmation page also uses the purchase order’s branch default.
Seeing It From the Template
Defaults are no longer set on the template itself. When you edit a print template, a note at the top links to Branches and lists the branches that use this template as their default.

Staff
The Staff tab lists everyone assigned to the branch, with their status, role and mobile. Staff are moved between branches on their own staff record. If you can manage staff, click a row to open it.
Map
The Map tab shows where the branch is, with its open projects and open opportunities around it. It opens on the area near the branch.
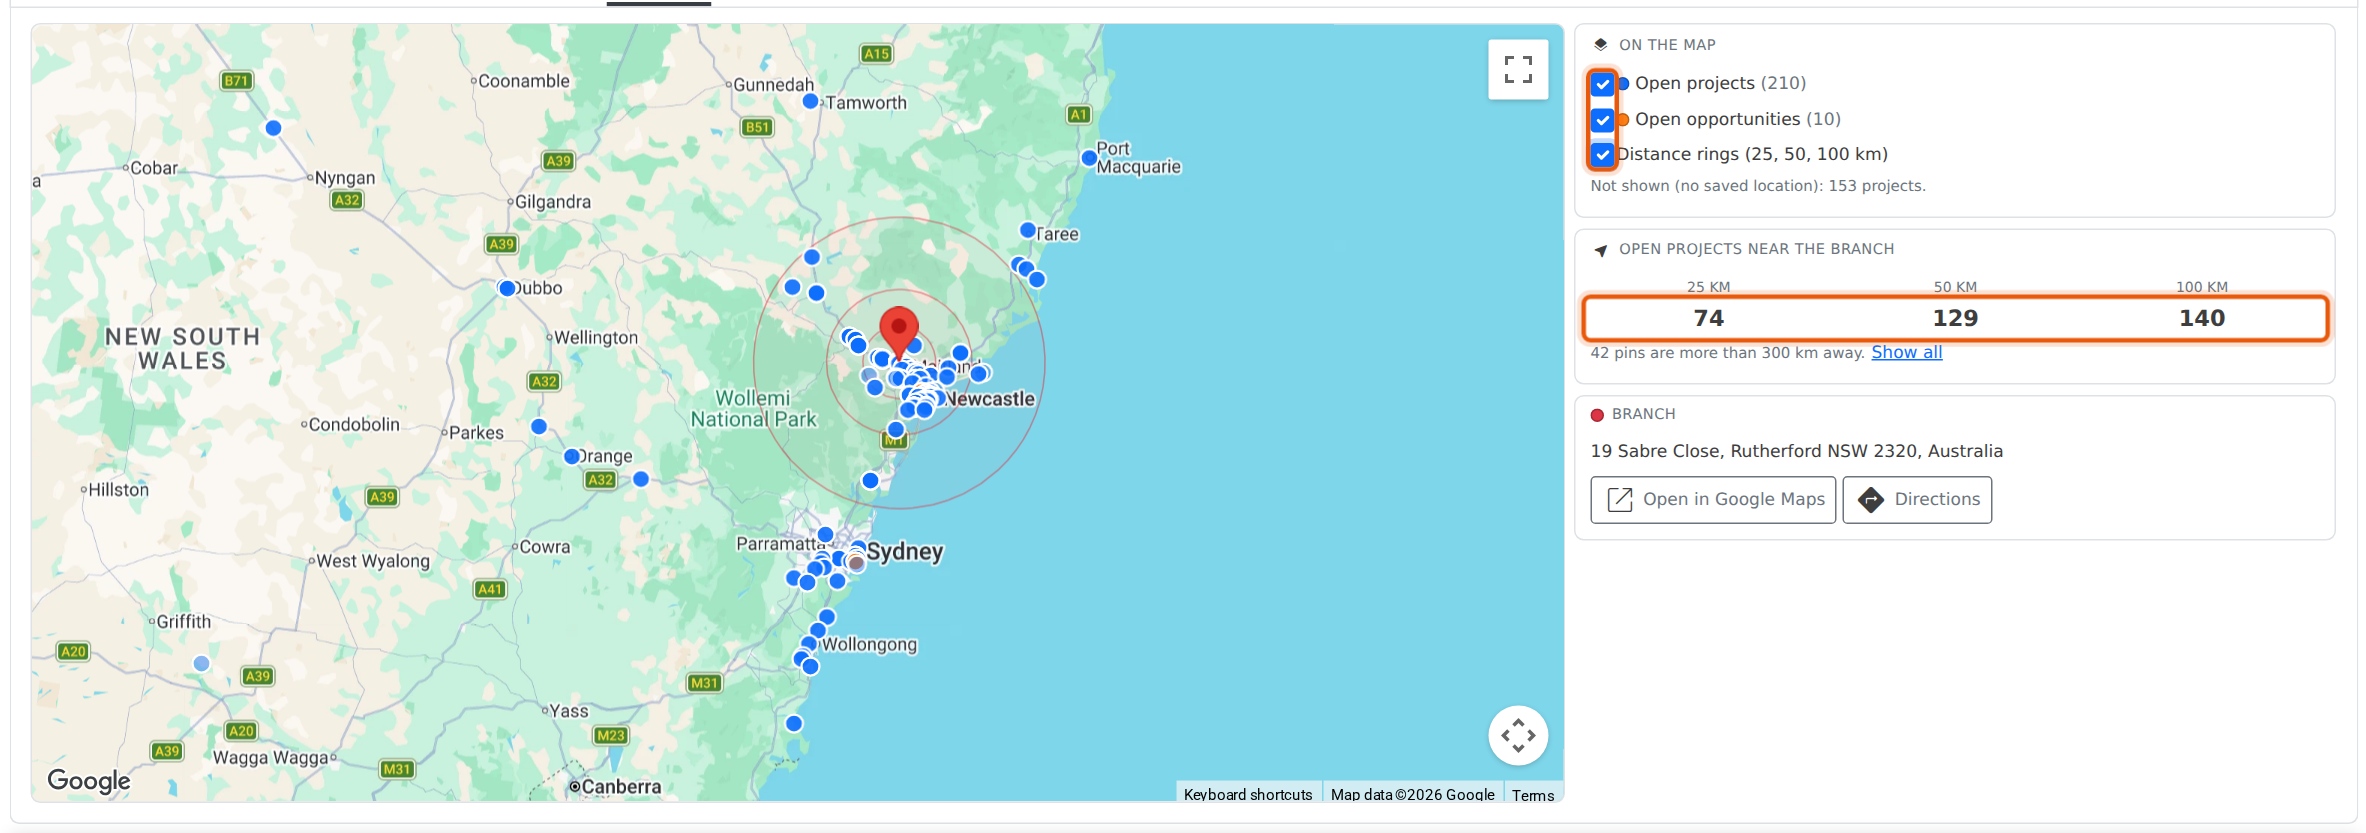
- The red pin is the branch. Blue dots are open projects (paler when on hold) and orange dots are open opportunities. Click a dot to see the project or opportunity, its customer and suburb, with a link to open it.
- Use the On the map ticks to show or hide projects, opportunities and distance rings (25, 50 and 100 km from the branch).
- Open projects near the branch counts the open projects within 25, 50 and 100 km.
- Pins more than 300 km away are left out of the first view, so one far-off address doesn’t zoom the map out to the whole country. The panel says how many there are. Click Show all to fit every pin.
- A project appears only once its site has a saved map location, and an opportunity once its address has one. Those without a location are counted under Not shown (no saved location).
- Open in Google Maps and Directions open the branch address in Google Maps.
- If the address can’t be found, or Google Maps can’t be loaded, the map says so and offers to open the address in Google Maps instead.
Disabling a Branch
A branch you no longer use can be disabled, but not deleted. Staff, projects, quotes, invoices and stock all point at their branch, so the branch stays on those records.
To disable a branch, open it and click Disable branch next to Save changes, then confirm. A disabled branch:
- is marked Disabled on the register and on its branch page;
- can’t be chosen for new staff, projects or documents;
- stays on the records that already use it. Their branch list still shows it, as Name (disabled), so saving one of those records keeps its branch;
- is still listed, last, in the branch filters on registers and reports, so you can look back at its history.
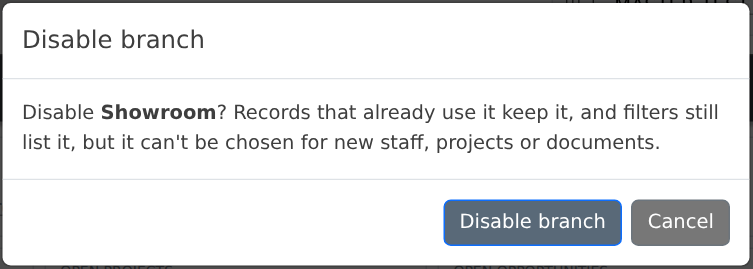
A branch that still has active staff or open projects can’t be disabled. The button is greyed out, and the message beside it says what is left. Move those staff to another branch on their staff records, and move or close the projects, then come back.
To bring a disabled branch back, open it and click Reactivate branch.
Who Can Change This
Only administrators can add, change, disable or reactivate a branch. Anyone else sees the register and the branch pages read-only, without the add button, Save changes or Disable branch.
Related Pages
- PDF Print Delivery: whether printed documents open in the browser or download.
- Xero Integration: connecting Xero organisations.
- Setting Permissions: who is an administrator.