
A defect is a fault on work you have delivered or installed: a gate that drags, a missing bracket, a panel in the wrong colour. You record what is wrong, give it to whoever fixes it with a date, and check the fix before you close it. Every step is kept on the defect’s History tab.
Defects are under Projects › Defects, which opens on a board of the open defects. You can also raise one from a project. Open a defect from the board or the list to work it.
The Defects Board and List
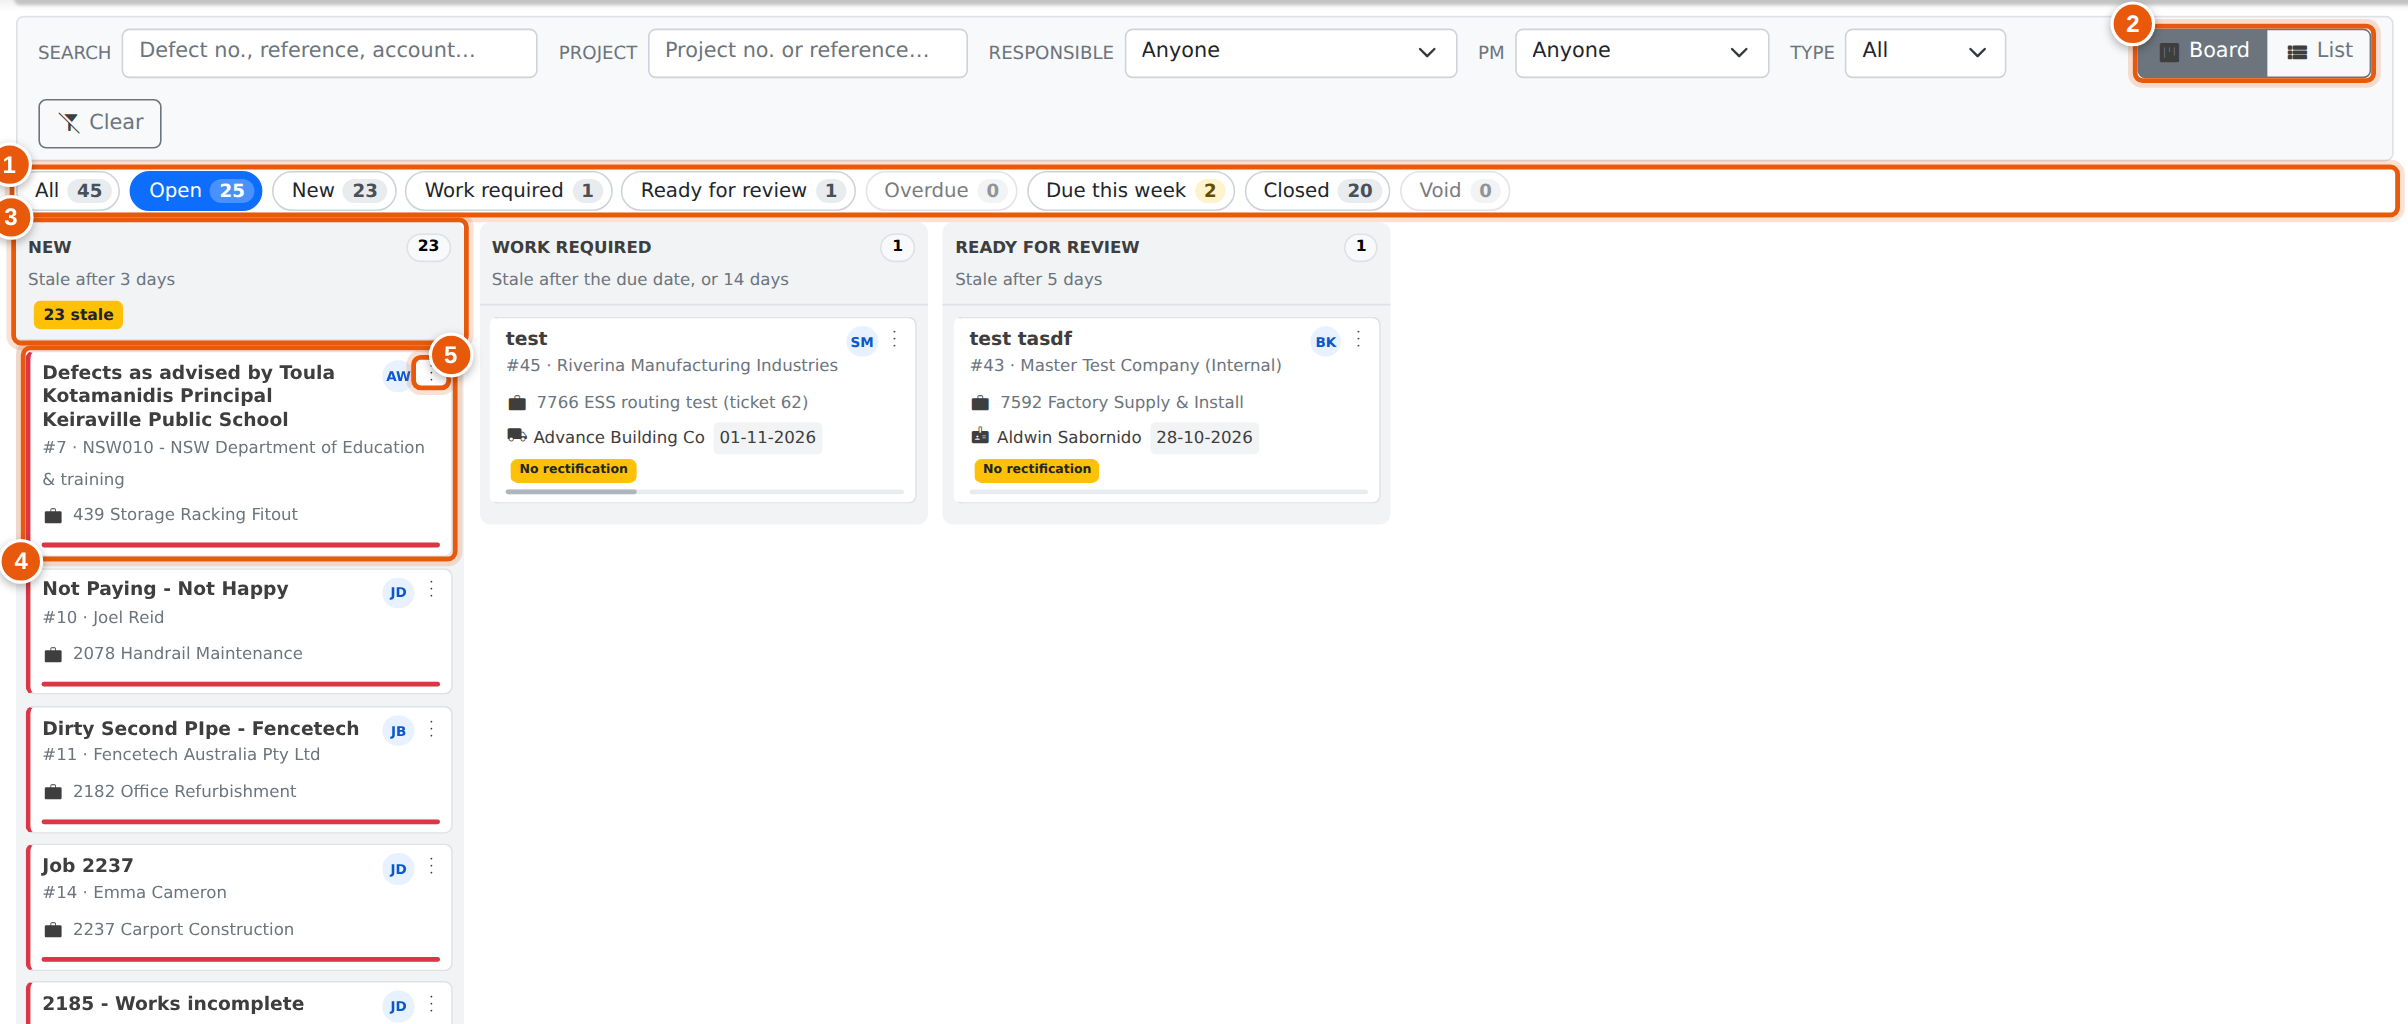
- Status buttons. Open (New, Work required and Ready for review) is where the page starts. Overdue and Due this week pick out the defects whose fix date is near. Closed, Void and All always show the list. Each button shows how many defects it holds with your other filters applied.
- Board or List. The board has a column for each open status. The list has a row per defect and can be sorted by any column. Evolution remembers which you used last.
- Columns. New, Work required and Ready for review, with a count. Under each is how long a defect should wait there: 3 days in New, until its due date (or 14 days) in Work required, and 5 days in Ready for review. A red flag counts the defects that have waited longer, and their cards are marked in red.
- Cards. The title, number, customer and project, who is fixing it and when it is due. The initials are the project manager’s. The bar along the bottom shows how long the defect has been in its column. Click a card to open the defect.
- The card menu (⋮) has the next steps for that defect, such as Assess & issue, Mark rectified, Verify & close, Not accepted or Change responsible, plus Void and Open. They open the same windows as on the defect page.
Drag a card to move it on. Dragging from New to Work required opens Assess & issue, dragging from Work required to Ready for review marks it rectified, and dragging from Ready for review back to Work required means the fix was not accepted. A New defect cannot go straight to Ready for review: assess and issue it first. A card marked No rectification was issued without saying what fix will be accepted; open it and add one. While you drag, Verify & close and Void appear at the bottom of the board; drop the card on one of them. Every drop opens the window for that step, so nothing changes until you press its button. A defect cannot be dragged back to New.
Filter by Search (number, reference or customer), Project, Responsible (anyone, you, or not issued yet), PM, Category and Type. Clear goes back to Open defects. On a phone the board shows one column at a time; pick it with the buttons above, and use the card menu instead of dragging. On the project register, a Defect flag shows on any project with an open defect.
Raising a Defect
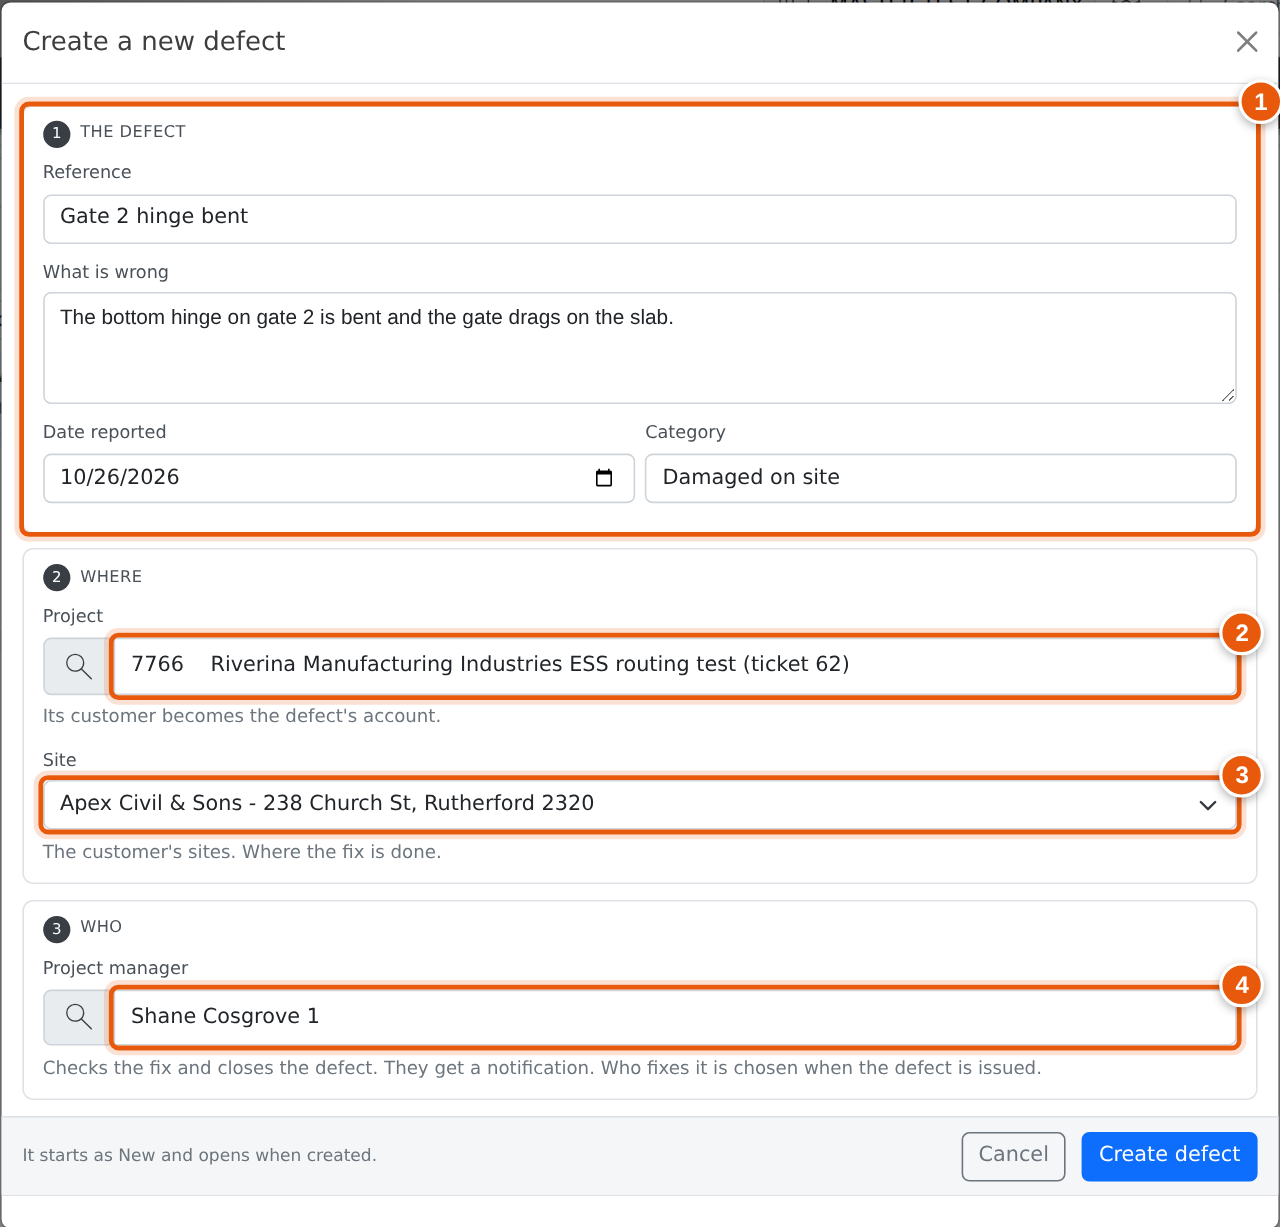
Press + at the top of the Defects page, or + on the Defects heading of a project’s WHS/Quality tab.
- The defect. A short Reference, What is wrong, the Date reported (today, unless you were told earlier) and, once your administrator has turned it on, a Category. Pick one you have used before or type a new one.
- Project. Type to find it. Its customer becomes the defect’s account. From a project, it is already filled in.
- Site. Lists the customer’s sites once the project is picked, with the project’s site chosen.
- Project manager. Filled in from the project. They check the fix and are told the defect was raised. What fix is needed, and who does it, is decided later, when you assess and issue the defect.
Press Create defect. The defect starts as New and opens so you can add photos on its Files tab.
The Defect Page

- Status. New, Work required, Ready for review, Closed or Void. Flags beside it show when the fix is Overdue or Due soon, how many times a fix was Not accepted, and whether the cost is being Back-charged.
- The line under the title. The defect number, who raised it and when, the customer and project (click them to open), and who is fixing it.
- The next step. One blue button for what happens next: Assess & issue, Mark rectified or Verify & close. See How a Defect Moves.
- Add task and Log call add to the Activity tab. They are the same windows you use on projects.
- Send notification emails the defect, with its photos. See Sending a Notification.
- More opens the project or the Defects register, and holds Void (or Reopen on a closed defect).
- Progress bar. Where the defect is: Raised, Assess & issue, Work required, Ready for review and Closed. Green steps are done and the highlighted step is the one to do next. Hover over a step to see who did it and when. Click a step to do it.
- Figure tiles. How old the defect is, when the fix is due, who is responsible (click to change), the next task or call, the files attached and how many notification emails have been sent.
Below the tiles are tabs for Details, Activity (tasks, calls, meetings and notes), Contacts, Files (photos and documents), Map (the site, with drive time from your branch) and History (every change, with who made it).
How a Defect Moves
| Status | What it means | The next step |
|---|---|---|
| New | Raised, but not yet assessed. | Assess & issue…: how it is dealt with, the required rectification, and who fixes it by when |
| Work required | Someone is fixing it, to the required rectification. | Mark rectified… when the fix is done, saying what was done |
| Ready for review | The fix is done and waiting to be checked against the required rectification. | Verify & close…, or Not accepted… to send it back |
| Closed | The fix was checked and accepted. The defect is locked. | Reopen… under More, if it comes back |
| Void | Raised by mistake, a duplicate, or not a defect after all. It is locked. | Reopen… under More |
A defect is always assessed before anyone marks it rectified. A small fix you do on the spot can go straight from New to Verify & close; when you click a step on the progress bar that skips one, Evolution asks first. When the assessment is Accept as is or Not a defect, Assess & issue closes or voids the defect instead of issuing it.
Assessing and Issuing a Defect
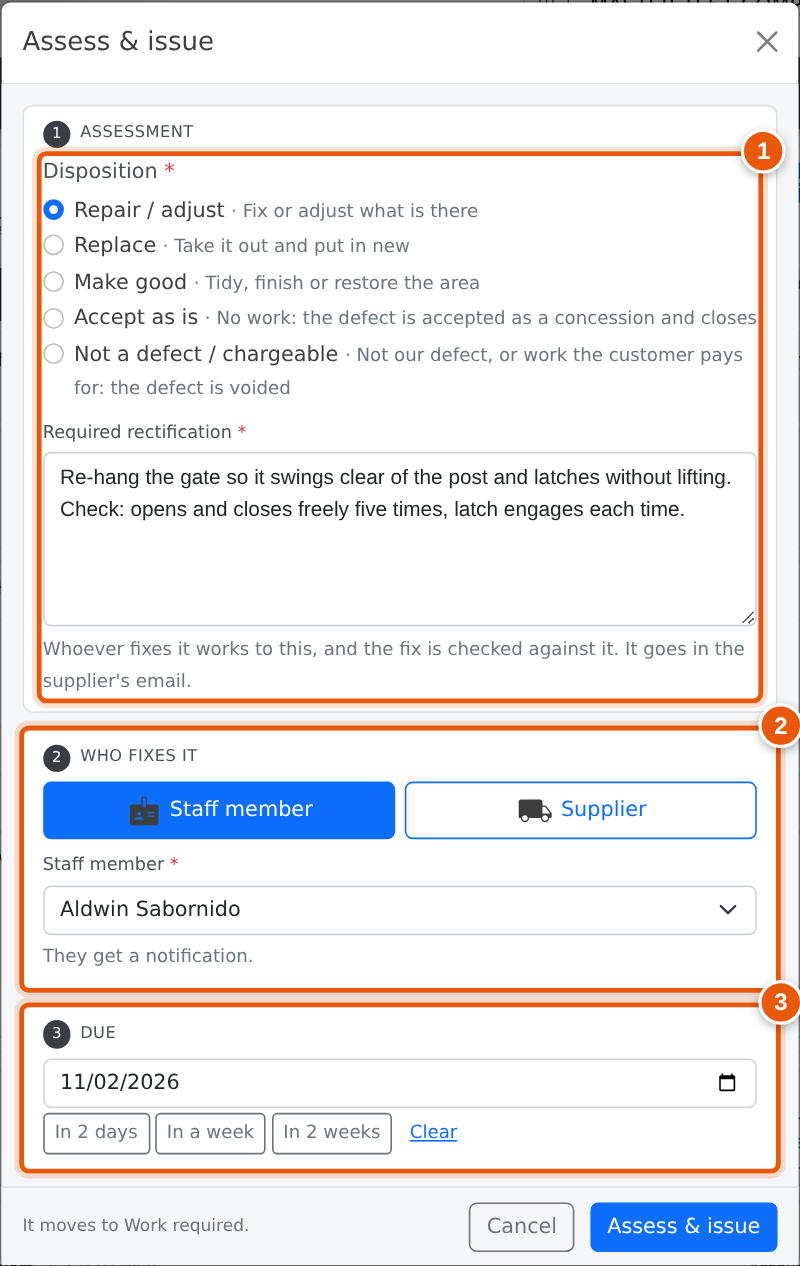
Before anyone is sent to fix a defect, decide how it is dealt with and what fix will be accepted. Press Assess & issue.
- Assessment. Pick the Disposition:
- Repair / adjust: fix or adjust what is there.
- Replace: take it out and put in new.
- Make good: tidy, finish or restore the area.
- Accept as is: no work. The defect is accepted as a concession and closes. Say why.
- Not a defect / chargeable: not your defect, or work the customer pays for. The defect is voided. Say why.
- Who fixes it. Choose Staff member or Supplier and pick who. A staff member gets a notification straight away. For a supplier, leave Email the supplier the defect and its photos next ticked and the Send notification window opens with their address filled in, so they get the details, the required rectification and the photos.
- Due. Set the due date, with quick picks for In 2 days, In a week and In 2 weeks.
The defect moves to Work required. The disposition and required rectification show in the Rectification panel on the Details tab, where you can change them; each change is logged and whoever is fixing it is told. To give it to someone else later, click the Responsible tile or Change on the Details tab. That does not change the status.
Checking the Fix and Closing
When the fix is done, press Mark rectified. The window shows the required rectification; say What was done (it is required), and add photos of the fix on the Files tab. The defect moves to Ready for review and the project manager is told it is ready to check.
Whoever checks the fix then presses one of. Both windows show the required rectification and what was done, so the fix is checked against what was asked for.
- Verify & close. Say what was done; this is kept as the defect’s resolution. Tick Back-charge the responsible party if the cost goes back to them. The defect is closed and locked, and whoever raised it is told.
- Not accepted. Say What is still wrong. You can change the required rectification here if the fix needs more, or different, work; the change is logged. It goes back to Work required and whoever is fixing it is told. Each time a fix is not accepted, the count on the Not accepted flag goes up.
Void and Reopen

Void (under More) closes a defect that should not have been raised, such as a duplicate. To void it because it is not a defect, or is chargeable work, use Not a defect on Assess & issue instead, so the reason is kept as its assessment. It needs a reason, which shows on the progress bar’s Void step and when you hover over the status. Use it instead of deleting: the defect and its history stay.
Reopen (under More on a closed or void defect) puts it back to Work required with a reason, and whoever was fixing it is told.
The Details Tab
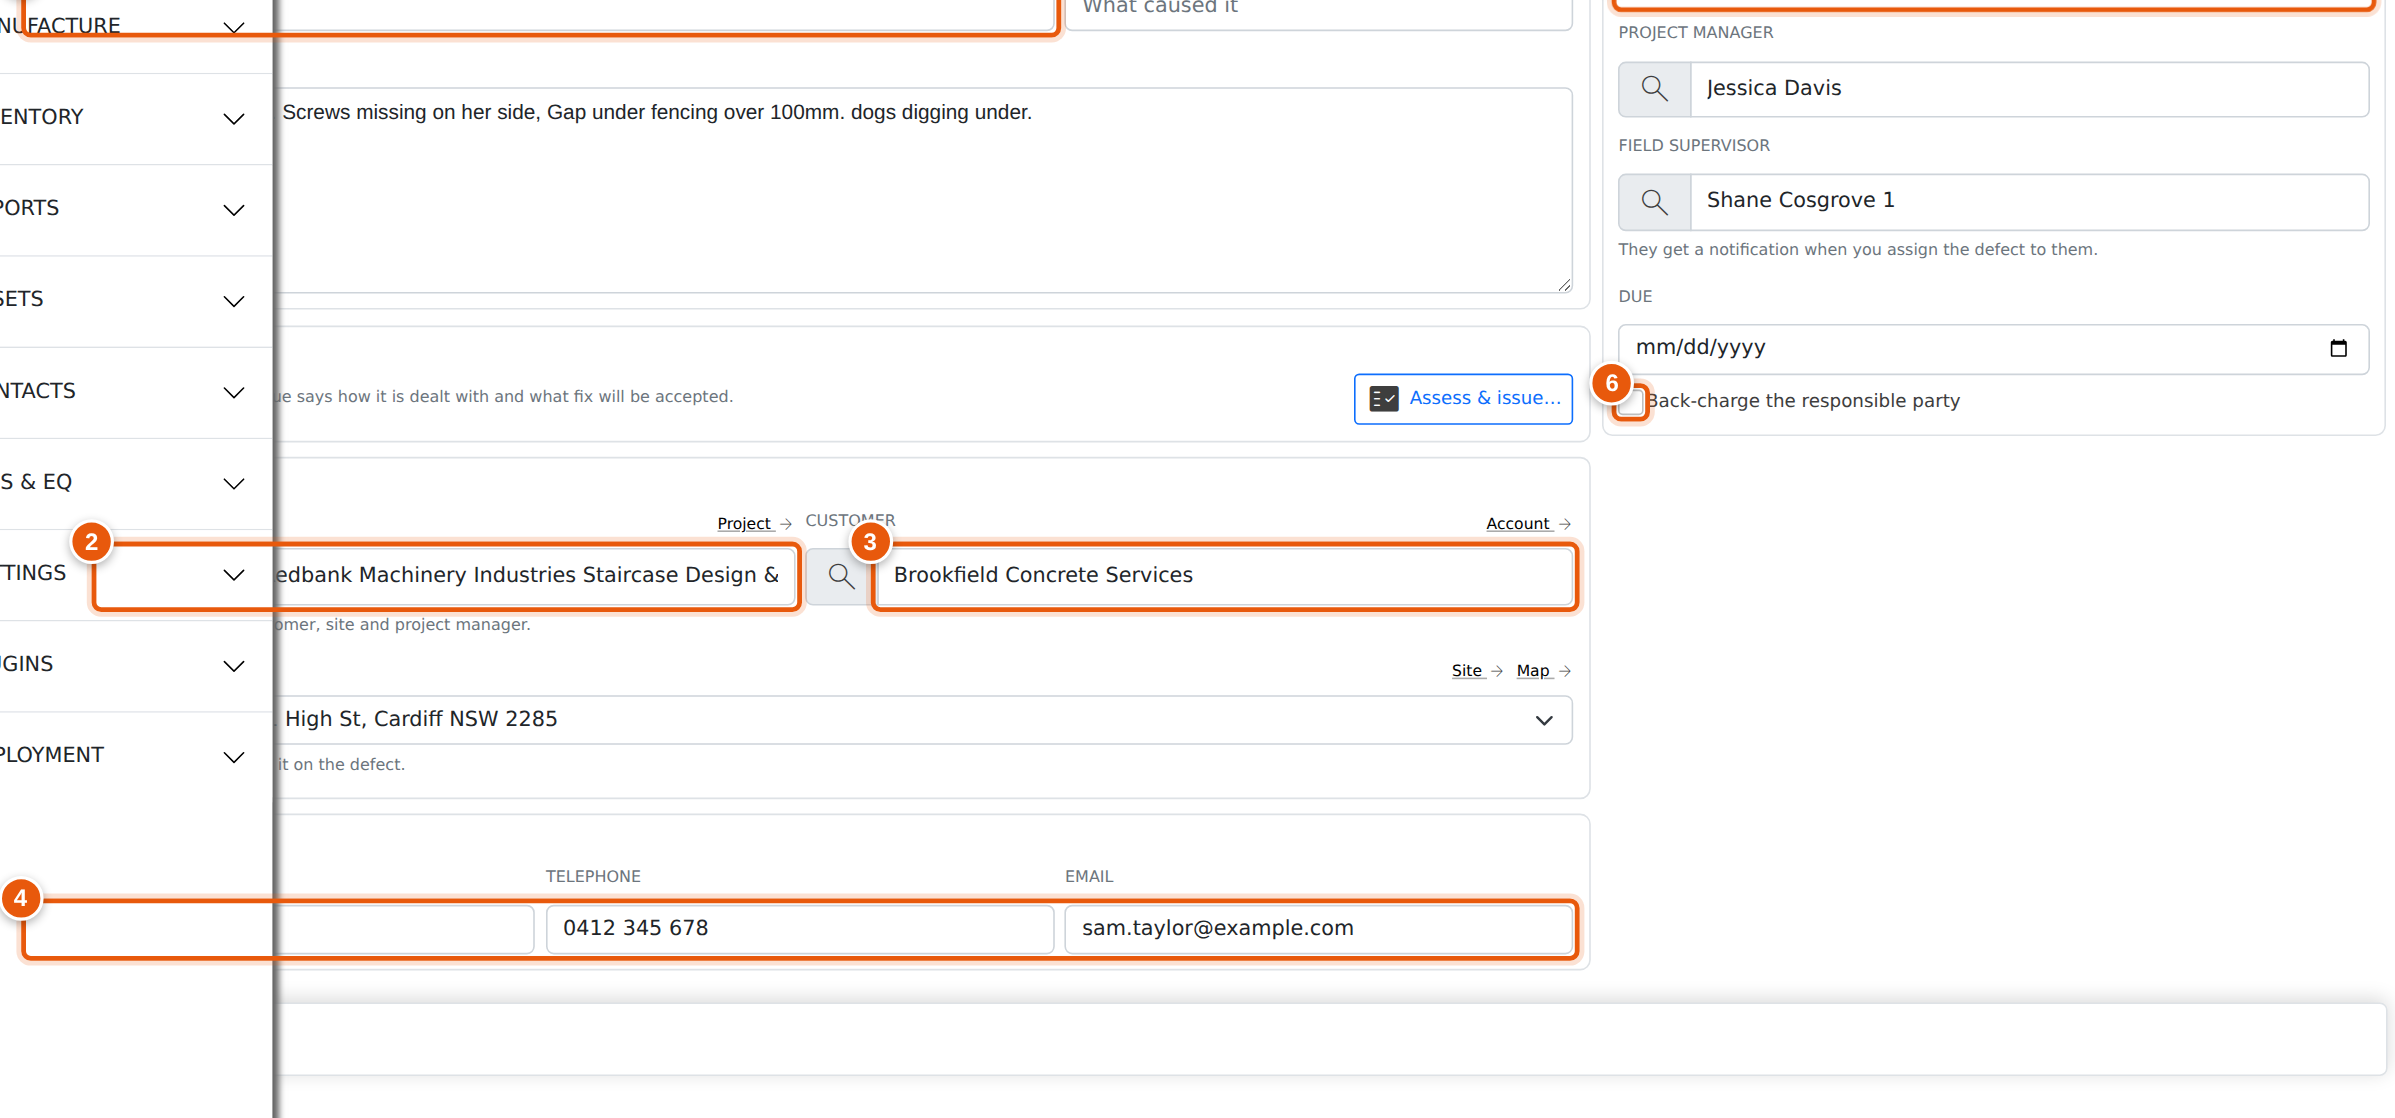
- Title and Description of the defect. Say what is wrong and where.
- Project. Picking a project fills in its customer, site and project manager.
- Customer. Use Account to open the customer.
- Site contact. Who to talk to on site, with Copy links for the number and email.
- Responsible. Who is fixing it. Use Assess & issue or Change to set it. Their phone, mobile and email show under the name, each with Call or Email and Copy links. A supplier also shows their contact person and address, with a Map link. The project manager and field supervisor are below. Each gets a notification when you assign the defect to them.
- Back-charge the responsible party marks that the cost goes back to whoever caused it.
Under the description, the Rectification panel holds the assessment: the Disposition, the Required rectification and, once it is marked rectified, What was done. On a New defect it has an Assess & issue button instead. A defect issued before assessments were recorded shows No rectification: add one so the fix can be checked against it.
Once your administrator has turned them on, the Details tab also has a Category (what caused it), the Site the fix is at (used by the Map tab), the Due date and, on a closed defect, the Resolution.
Press Save changes when you are done. If you leave with changes that are not saved, Evolution asks first. A closed or void defect cannot be changed until it is reopened.
Sending a Notification
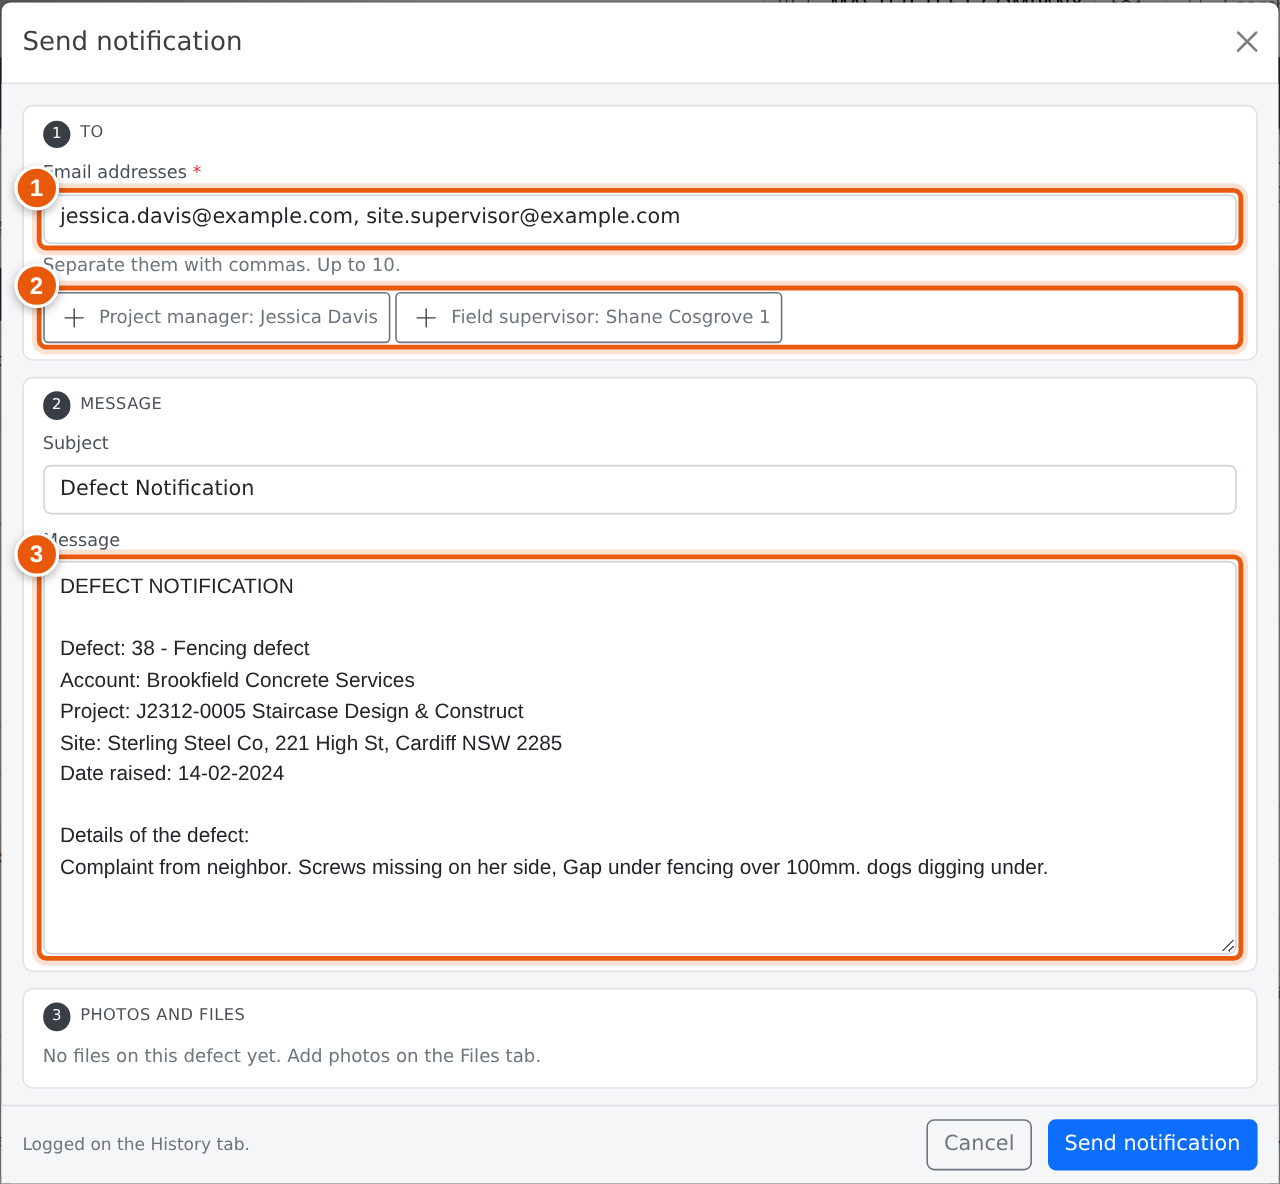
- To. Filled in with the project manager (or your quote team address if there is none) and the field supervisor. When you have just issued the defect to a supplier, it is the supplier. Separate addresses with commas, up to 10.
- Quick-add. Click a person to add them: the project manager, field supervisor, site contact, whoever is fixing it and anyone on the Contacts tab with an email address.
- Message. Filled in with the defect, customer, project, date, description and the required rectification. Change it as you need.
Under Photos and files, tick the files from the Files tab to attach, or use Tick all. Attachments can total up to 15 MB; see the questions below if you go over. Each email is kept on the History tab, with who it went to and how many files were attached.
Who Is Told
Notifications appear in Evolution and in the hourly email digest, and link straight to the defect. You are never told about your own changes.
| When | Who is told |
|---|---|
| A defect is raised | The project manager. |
| It is issued to a staff member | That staff member. |
| The required rectification changes | The staff member fixing it. |
| It is issued to a supplier | Nobody automatically. The Send notification window opens so you can email them. |
| You change the project manager or field supervisor | The new person. |
| Mark rectified | The project manager (or the field supervisor if there is no project manager). |
| Verify & close | Whoever raised the defect. |
| Not accepted, or Reopen | The staff member fixing it (or the field supervisor, then the project manager). |
Who Can Use Defects
| Permission | What they can do |
|---|---|
| Projects Allowed or Admin | Raise, work, assess and issue, verify, close, void and reopen defects. |
| A company administrator | The same. |
| Anyone else | Cannot open defects. |
Permissions are set on each staff member. See Setting Permissions.
Frequently Asked Questions
Can I close a defect without issuing it first?
Yes, when it was fixed on the spot. Press Verify & close, or click Closed on the progress bar. Evolution asks first because you are skipping steps. To close it with no work at all, use Assess & issue and pick Accept as is, so the reason is kept as its assessment.
Why can’t I mark a New defect rectified?
Nobody has said what fix will be accepted yet. Assess & issue it first; then whoever fixes it works to the required rectification, and the fix can be checked against it.
I closed a defect by mistake.
Open More and press Reopen. Say why. It goes back to Work required.
Why can’t I edit a closed defect?
A closed defect is a record of what was wrong and how it was fixed, so it is locked. Reopen it to change it.
The photos did not attach to the email.
Files that are missing from storage show greyed out and cannot be ticked. If the files you ticked total more than 15 MB, the email is still sent, without the files that would go over the limit, and Evolution tells you which ones were left off. Send those in a second email.
Where do I add my own fields to a defect?
Use Custom fields on the defect. Your administrator sets them up. See Custom Fields.