
Asset Management is where you keep track of everything your business owns and services — plant, vehicles, tools, site equipment and electrical gear. Each asset has its own record holding its details and photos, who currently has it, when it is next due for a service, and a full history of every service that has ever been carried out on it.
You’ll use it to answer questions like “when was the compressor last serviced?”, “who has the site generator right now?” and “what is due for maintenance this month?” — and to prove the answer later, because the maintenance history is never thrown away.
Video Tutorial
A short walkthrough of the Asset Register:
The Asset Register
The register is the list of every asset on file. Click any row to open that asset for editing.
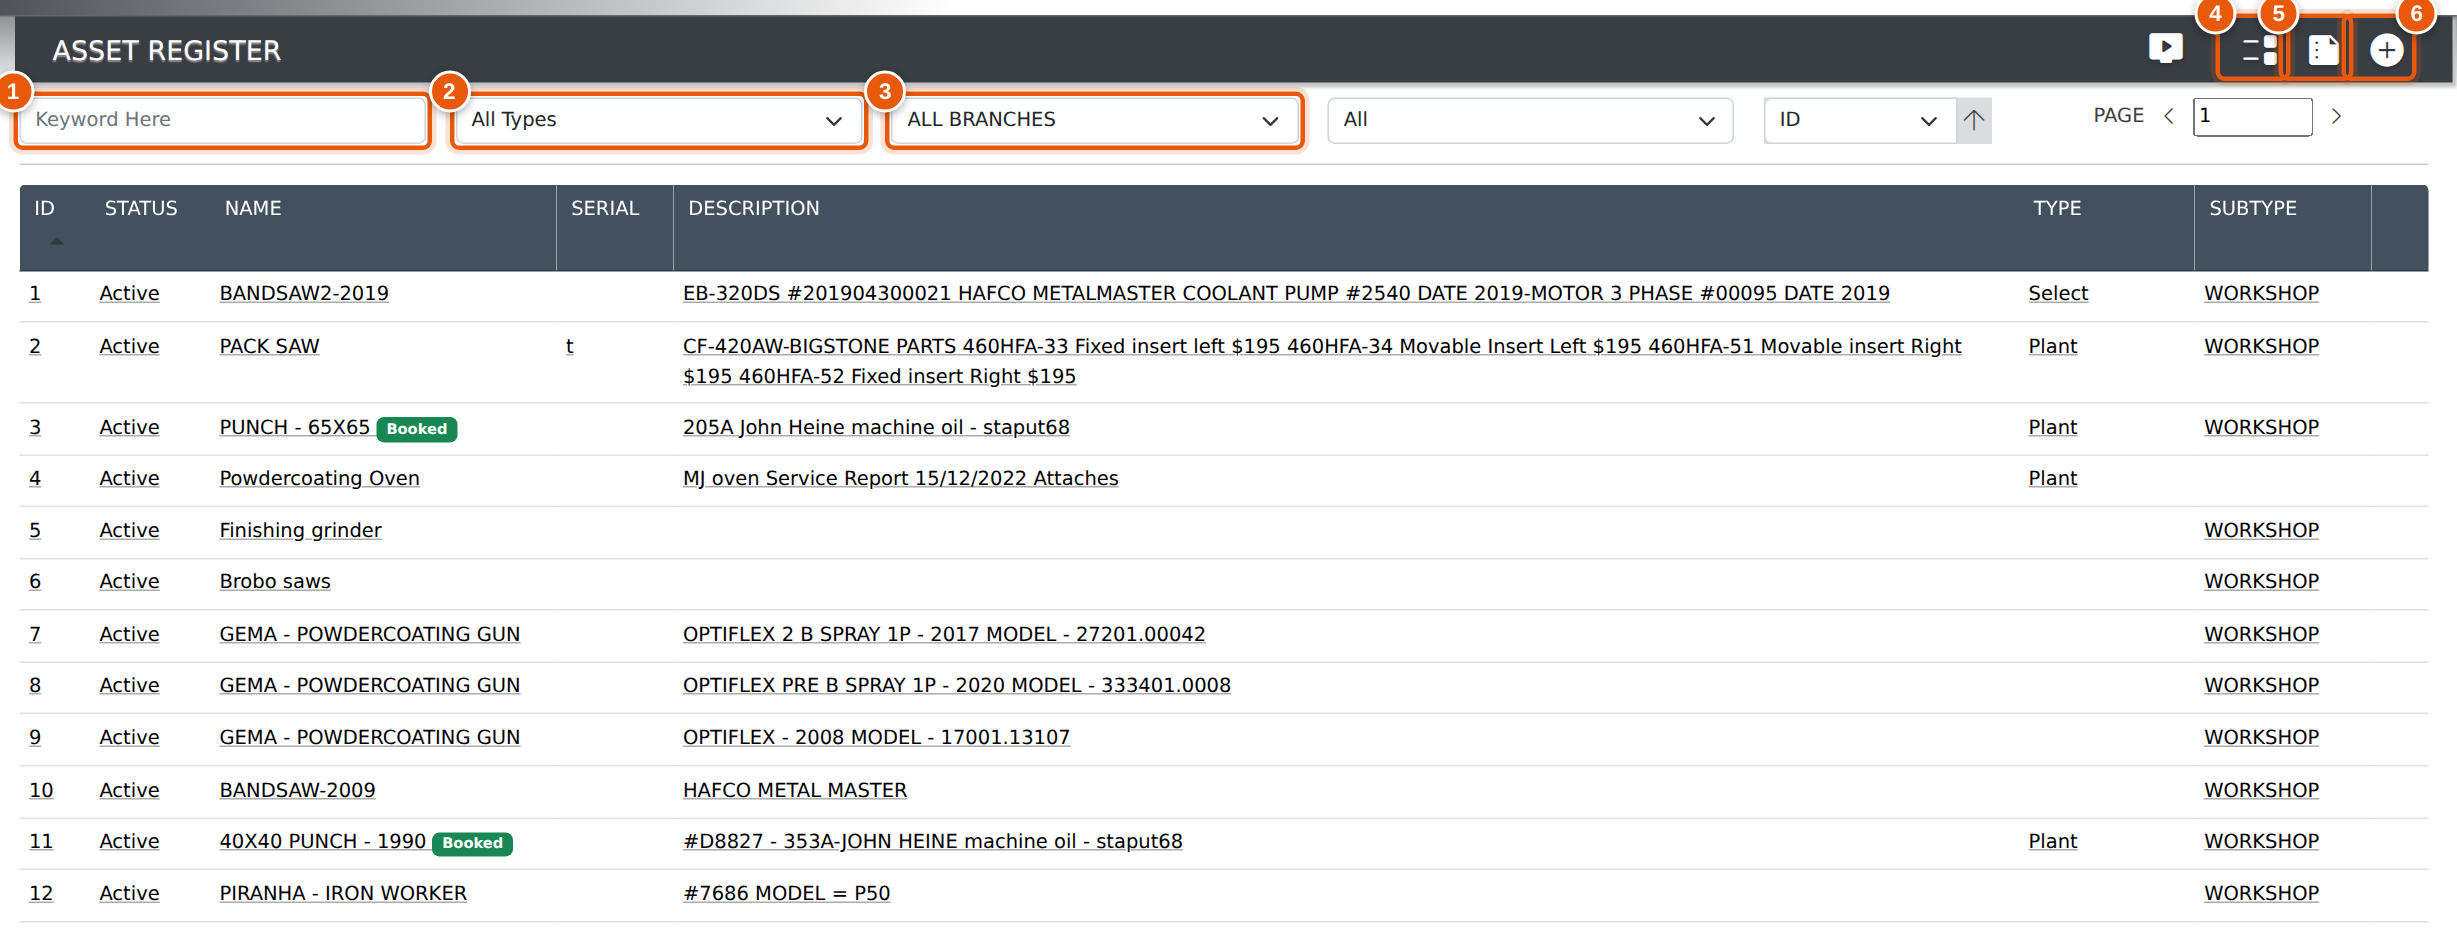
- Keyword — type any part of a name, serial / registration number or description. The list narrows as you type; there is no Search button to press.
- Type — restrict the list to one asset type: Delivery Vehicle, Electrical, Fleet, Plant, Site Equipment, Tools or Other.
- Branch / Location — show only the assets held at one branch.
- Asset Maintenance Schedule Report — opens the servicing report and e-mail alert generator (see below).
- Asset Assign Report — the Currently Assigned Asset Report, listing what is booked out and to whom.
- Add Asset — creates a new asset (see below).
Two further controls sit beside the filters: a Status drop-down (Active, Disabled or All — it defaults to Active, so retired assets are hidden until you ask for them) and a sort selector with an ascending / descending arrow. Long lists are paged; use the arrows either side of the PAGE box to move through them.
An asset that is currently booked out shows a green Booked tag beside its name in the list.
Adding an Asset
Click the + icon at the top right of the register. Give the asset a name and save — you are taken straight into the asset editor, where you can fill in the rest of the detail.
The Asset Editor
The asset editor is split into four tabs across the top: General, Bookings, Files & Uploads and Maintenance.
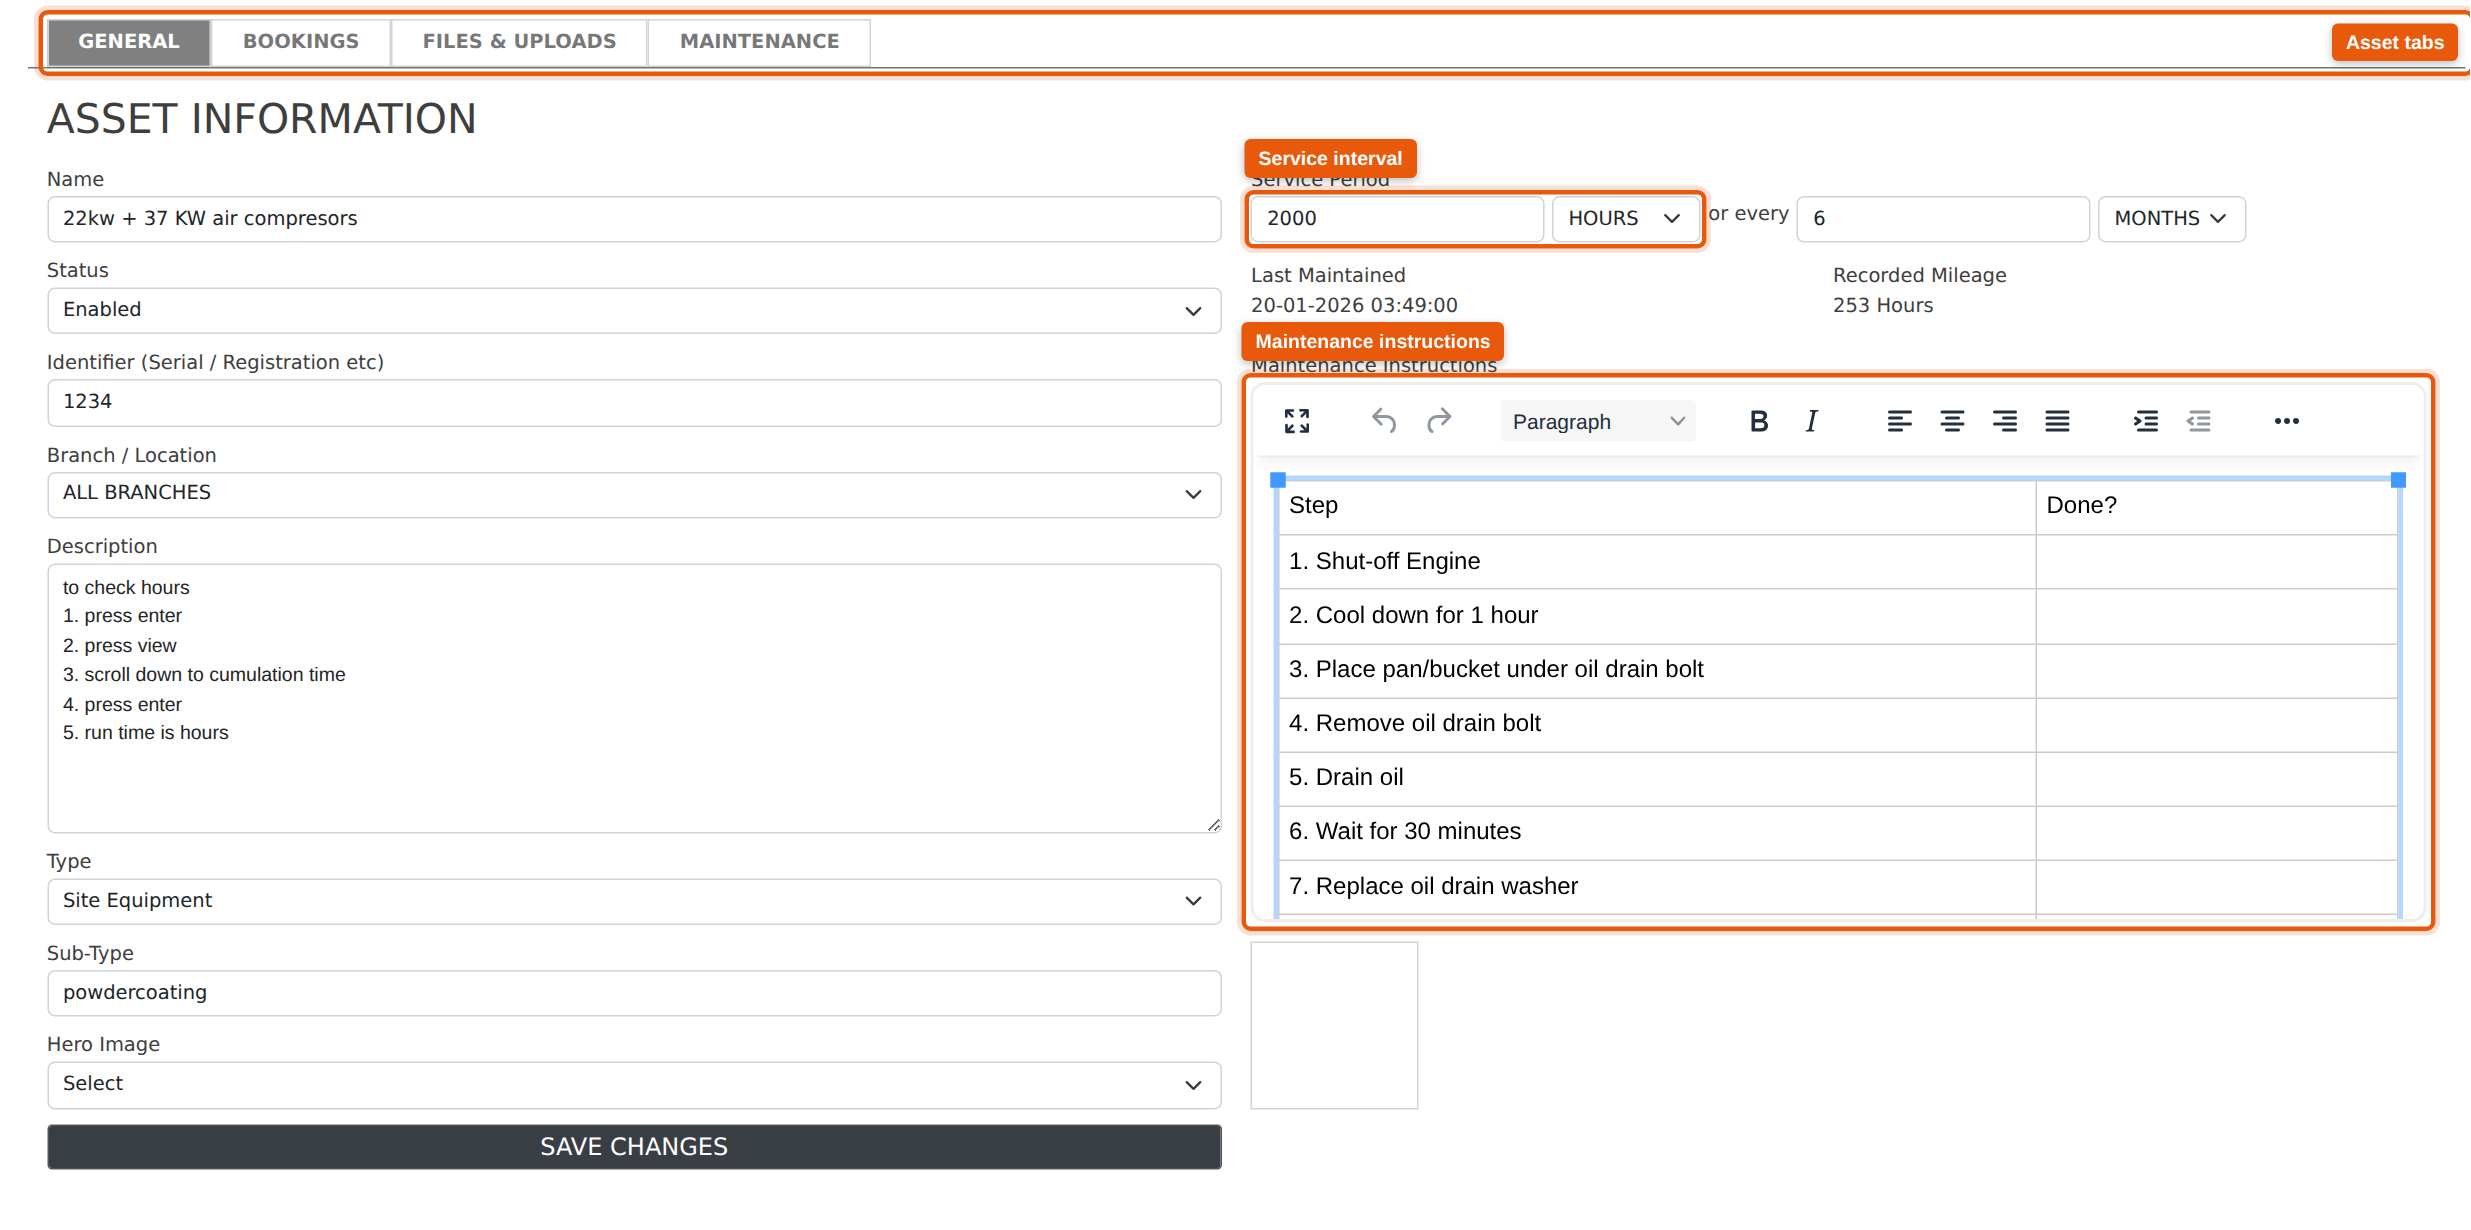
On the General tab you record:
- Name — what people call this asset.
- Status — Enabled or Disabled. Disable an asset when it is sold or scrapped rather than deleting it, so its history survives.
- Identifier — serial number, registration, plant number or asset tag.
- Branch / Location — where the asset lives. Leave it on All Branches if it moves around.
- Description — free text; anything useful about the machine.
- Type and Sub-Type — Type is the fixed list used by the filters and reports; Sub-Type is your own free-text grouping (for example powdercoating).
- Hero Image — pick one of the images already uploaded on the Files & Uploads tab to act as the asset’s main photo.
Press Save Changes (or the save icon in the page header) to store your edits. Every change is recorded in the History panel at the foot of the tab, showing who changed what and when.
Service Scheduling
The right-hand side of the General tab is what drives the maintenance schedule report and the e-mail alerts.
-
Service Period — how much use the asset may have between services, and
the unit it is counted in: Days, Hours, KLMS or
Months. For example
2000 Hoursfor a compressor, or10000 KLMSfor a vehicle. -
… or every — an optional time-based interval that runs alongside
the usage one, in Days or Months. Set
6 Monthsand the asset falls due at 2000 hours or six months, whichever arrives first. - Last Maintained and Recorded Mileage — read-only. They are taken from the most recent maintenance record on the asset and update when you add, edit, delete or restore one.
- Maintenance Instructions — a rich-text field for the service procedure itself. Whatever you put here (a numbered list, or a table with a Done? column to tick off) is printed onto the maintenance schedule report, so the person doing the work gets the steps with the project.
Booking an Asset Out
The Bookings tab tracks who has the asset. When an asset is available the tab shows a “This is Available to book out” message and a Book Out button; when it is already out, you get a Return button instead.
Booking one out asks for:
- Issue to — a Staff Member or a Contractor.
- Start date and Estimated Return Due Date.
Returning it records the Returned date. Every pick-up and return is listed in the History panel underneath, and the same information feeds the Currently Assigned Asset Report and the Assignment Schedule page.
Asset Files & Uploads
The Files & Uploads tab holds documents and photos for the asset — manuals, compliance certificates, purchase invoices, condition photos and so on. It is the standard Evolution attachment area, so it behaves exactly like the file areas on projects, quotes and invoices: drag files onto the upload box or click it to browse, then give each file a name, category and description.
See the Attachments page for the full detail on categories, previews and reusing an existing file.
Maintenance Records
The Maintenance tab is the service history for the asset — one row per service carried out, newest first.
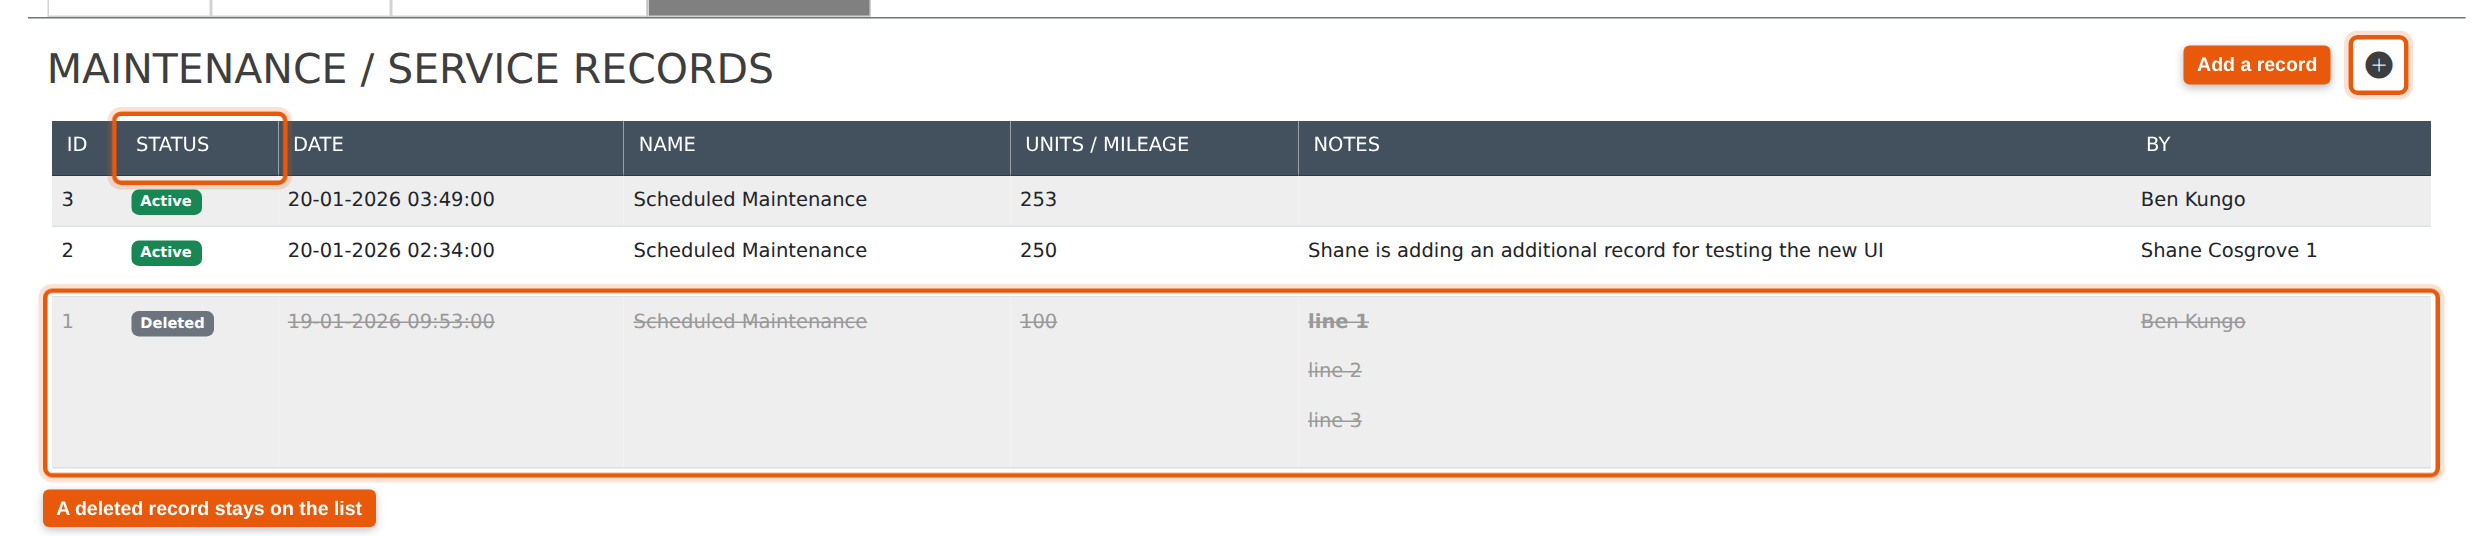
Each row shows:
- ID — the record’s permanent number. It never changes and is never reused.
- Status — Active for a record that counts, or Deleted for one that has been removed. Hover the Deleted badge to see who deleted it and when.
- Date — when the service was carried out.
- Name — what the service was, e.g. Scheduled Maintenance, Repair, Safety Inspection.
- Units / Mileage — the reading on the asset at the time of the service.
- Notes — what was done.
- By — the staff member recorded as having carried out the work.
Click anywhere on a row to open that record. Use the + icon at the top right of the tab to add a new one.
Adding & Editing a Record
Adding a record and editing one use the same window. The heading tells you which you are doing — Add Maintenance Record, or Edit … (ID n).
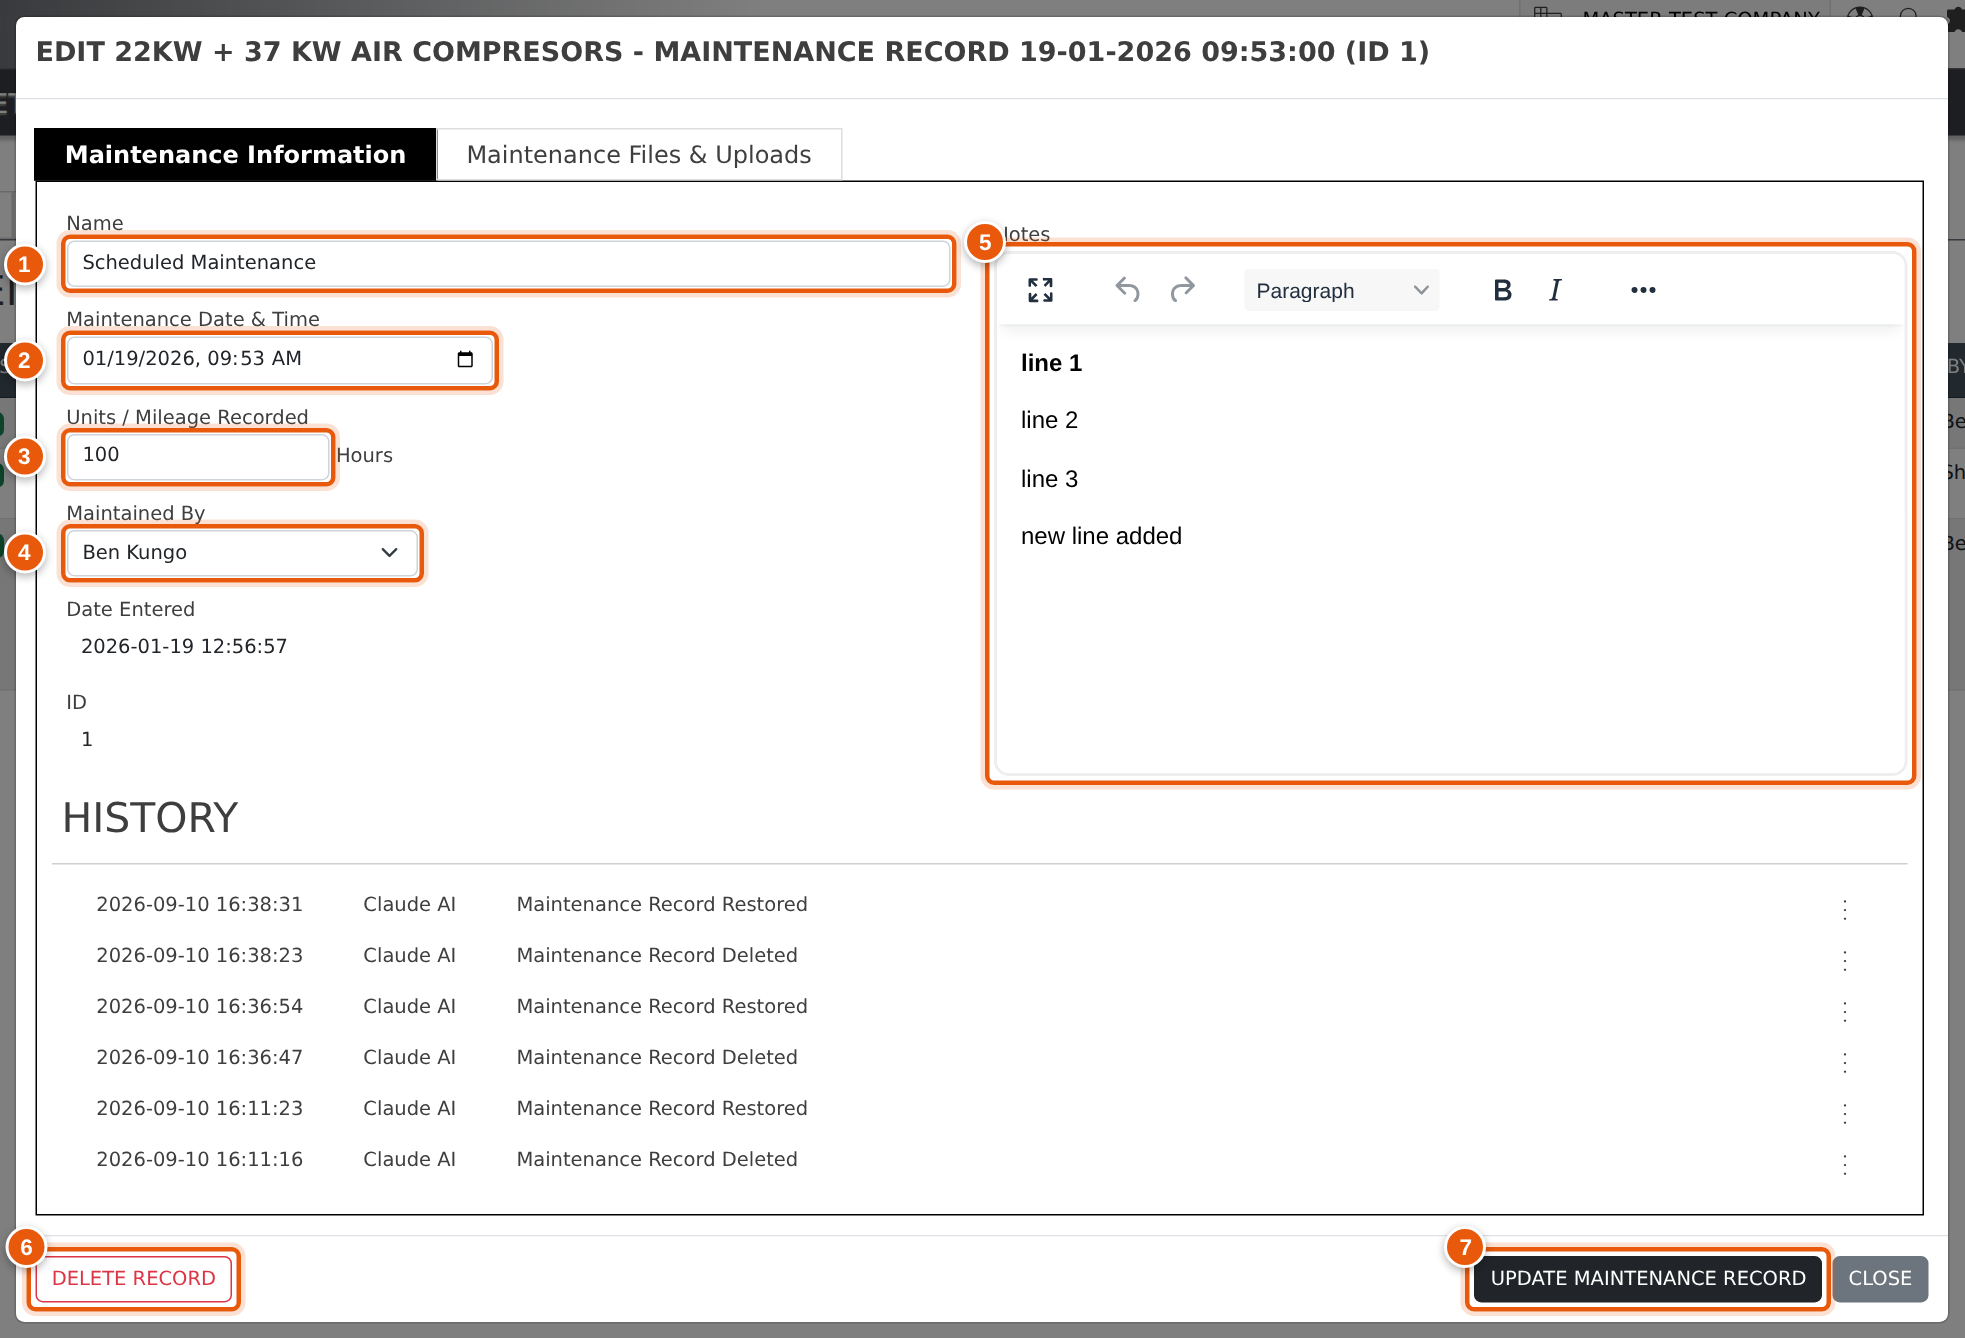
- Name — required. It defaults to Scheduled Maintenance; if you clear it, that default comes back.
- Maintenance Date & Time — required. When the work was actually done, which is not necessarily today. The newest date is what sets Last Maintained on the General tab.
- Units / Mileage Recorded — the reading on the asset (hours, runtime or kilometres). The unit shown beside the box comes from the asset’s Service Period.
- Maintained By — the staff member who carried out the service.
- Notes — a rich-text field for what was done, parts used, faults found and anything to watch next time. These notes print on the maintenance schedule report.
- Delete Record — removes the record (see below). Only shown once the record has been saved.
- Add / Update Maintenance Record — saves. Close beside it discards; if you have unsaved changes you are asked to confirm first.
Below the fields, Date Entered and ID are filled in automatically, and a History panel lists every change made to this record — who edited it, what they changed, and when.
Maintenance Files & Uploads
The second tab inside the maintenance window holds the files for that individual service — the service sheet, the invoice from the mechanic, before-and-after photos, a signed inspection form.
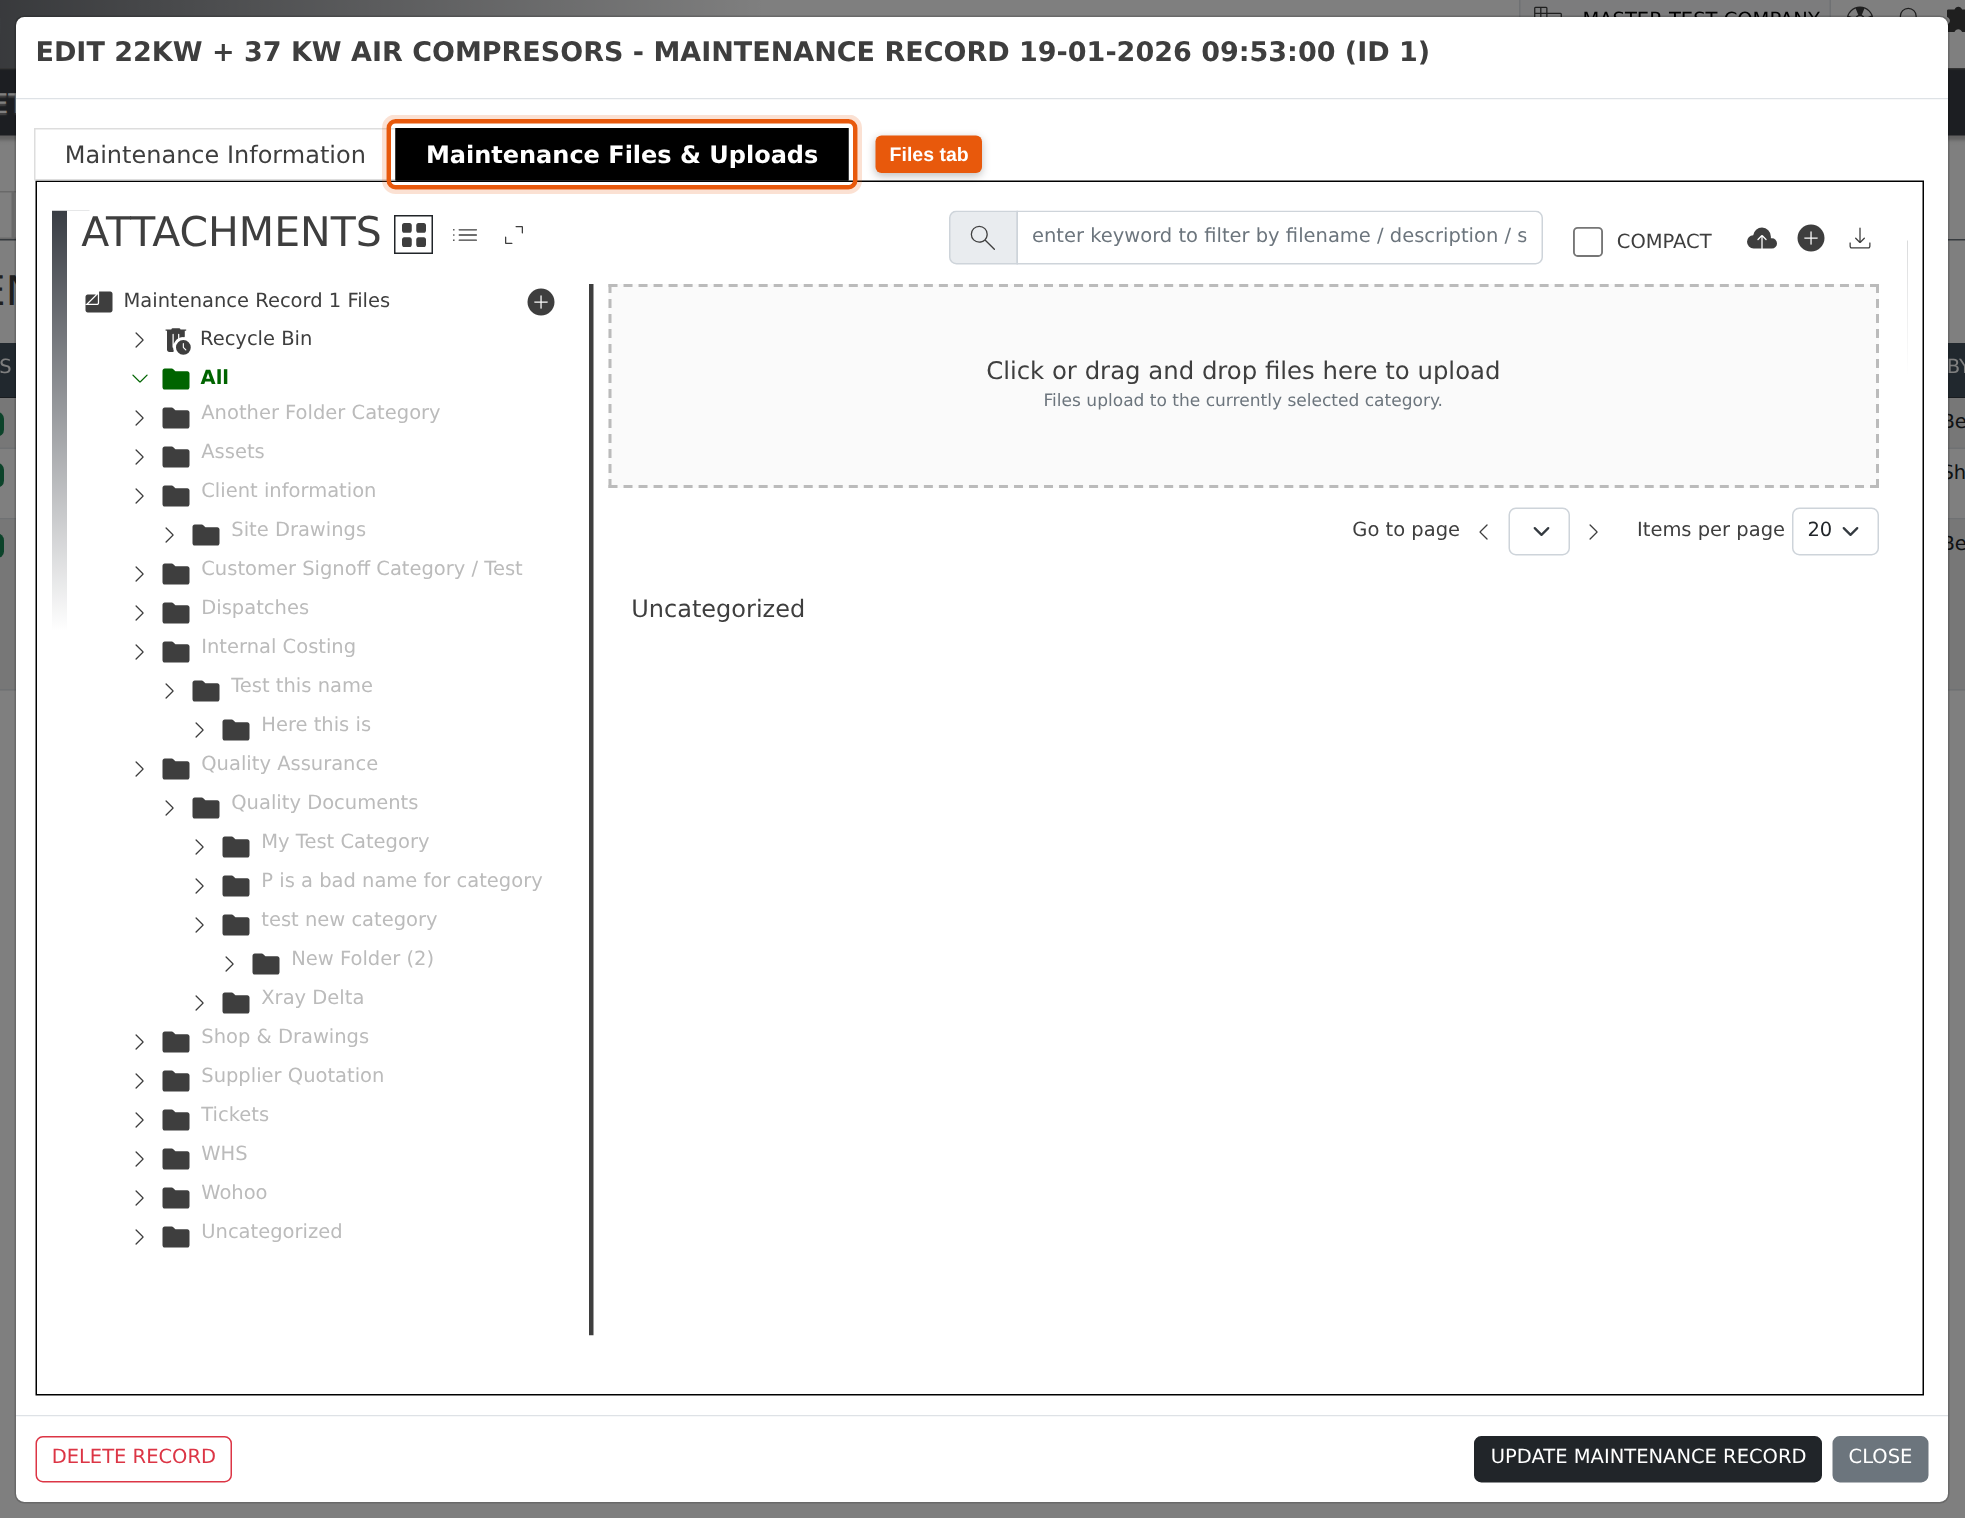
These are separate from the asset’s own Files & Uploads tab: files here belong to one service, files there belong to the asset as a whole. Both use the standard attachment tool, so uploading and categorising works the same way in each.
Deleting & Restoring a Record
Maintenance history is a compliance record, so Evolution never truly throws a service record away. Deleting one is a soft delete: the record stays on the list, clearly marked, and can be brought back.
Open the record and click Delete Record. You are asked to confirm, then:
- The row stays on the maintenance list, struck through and greyed, badged Deleted, and sorted below the active records.
- The badge’s tooltip records who deleted it and when.
- The deletion is written into the record’s History panel, against your name.
- The record stops counting towards Last Maintained and Recorded Mileage, and drops out of the maintenance schedule report — so the asset immediately reads as due again if that was its most recent service.
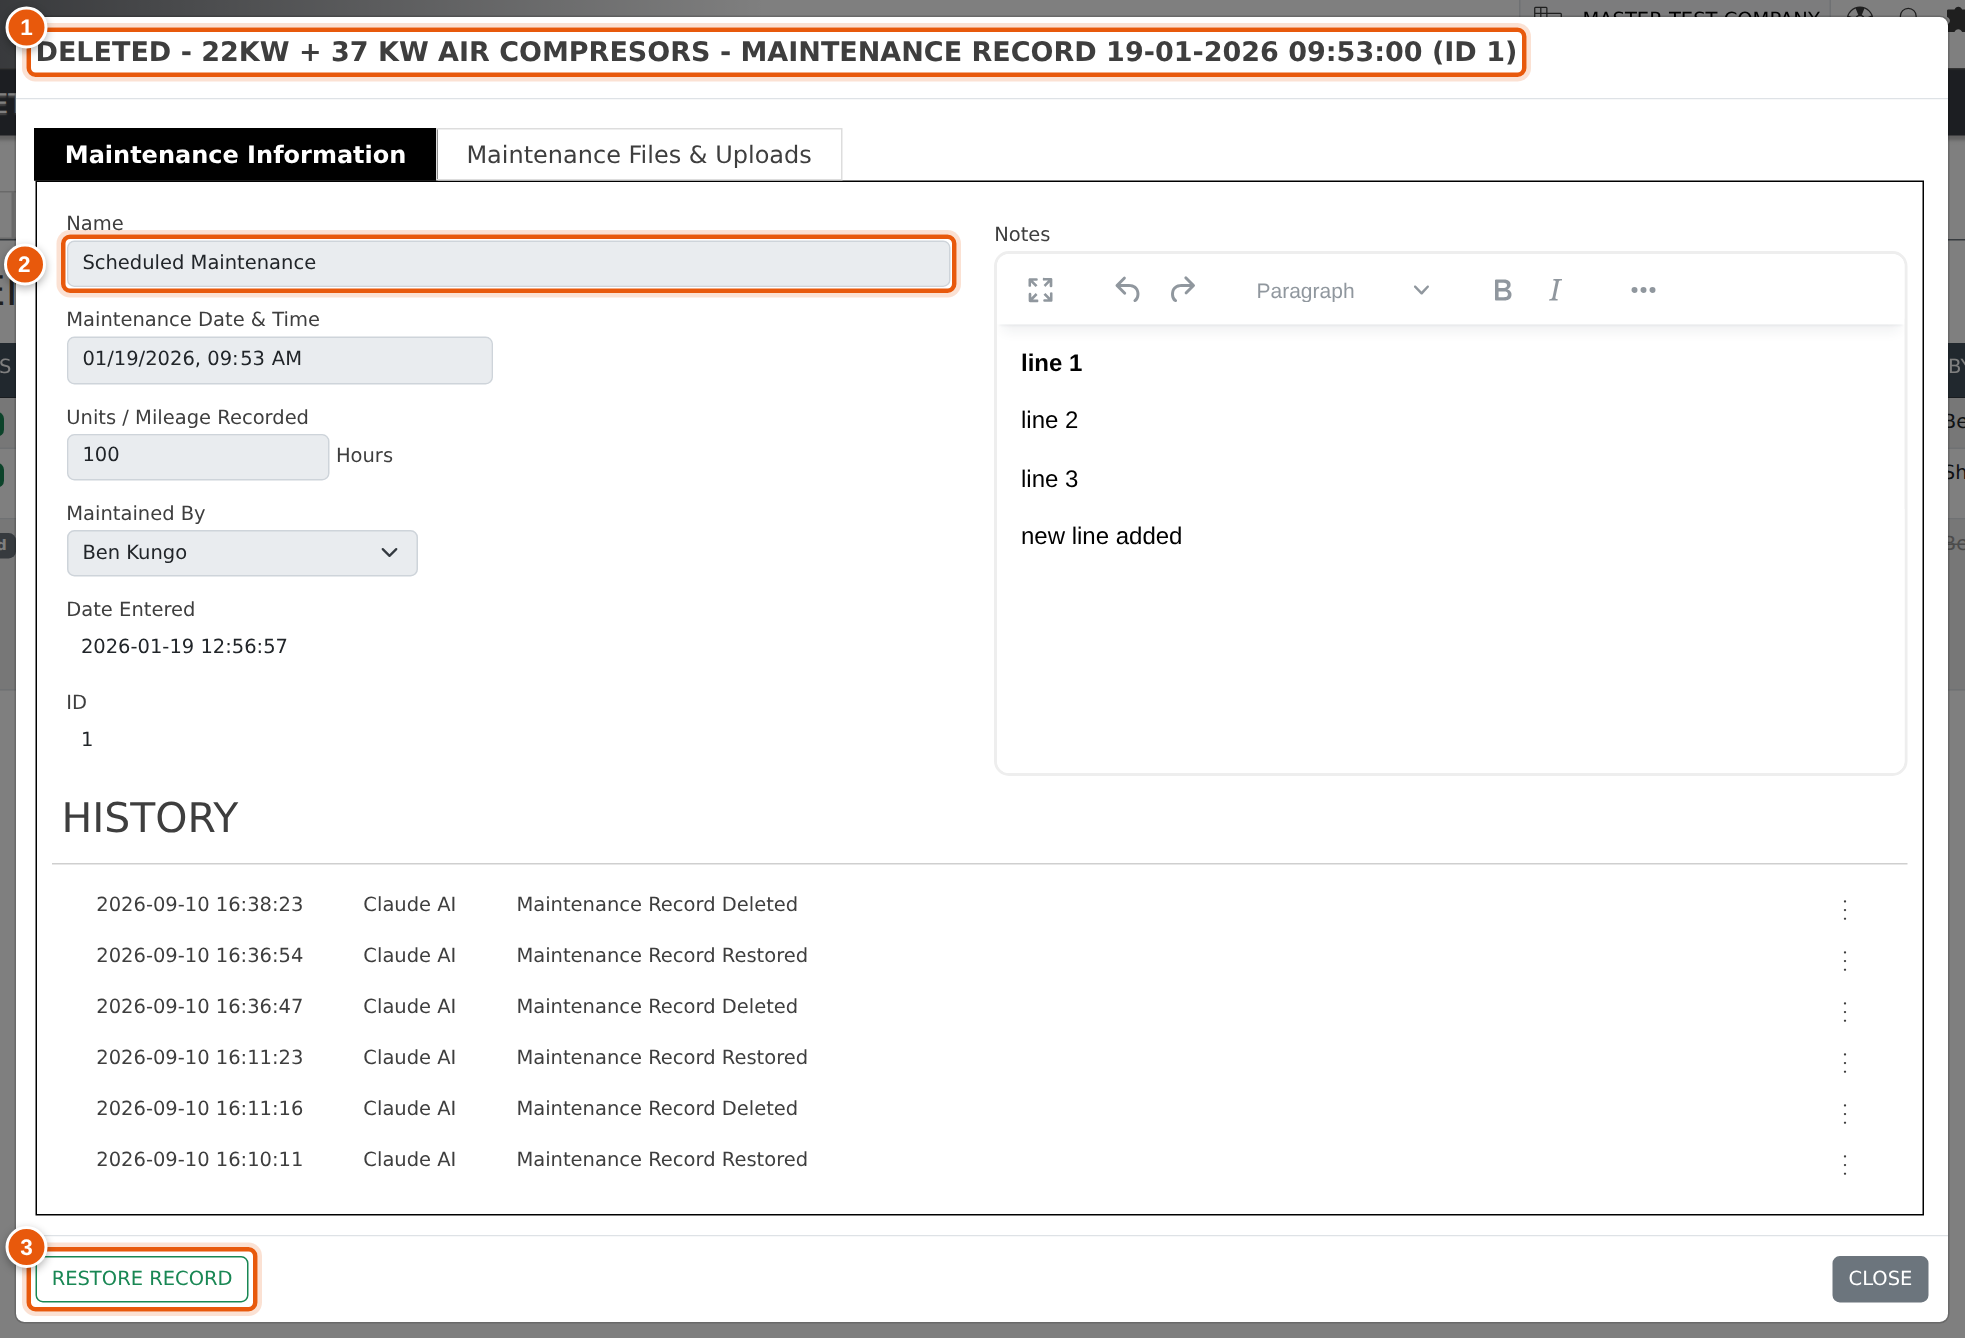
Opening a deleted record shows:
- The heading prefixed DELETED -.
- Every field greyed out and read-only — a record the history says was removed cannot be quietly edited.
- A green Restore Record button in place of Delete, and no Save button.
Restore Record puts it straight back: the strike-through and badge clear, the fields become editable again, and the record counts towards Last Maintained, Recorded Mileage and the schedule report once more. The restore is logged against your name as well, so the record carries the full story of what happened to it.
Asset Maintenance Schedule Report
Reached from the first icon in the Asset Register header, the Asset Maintenance Schedule Report and Alert Generator answers “what needs servicing?” across the whole fleet, and can e-mail that answer to people on a schedule.
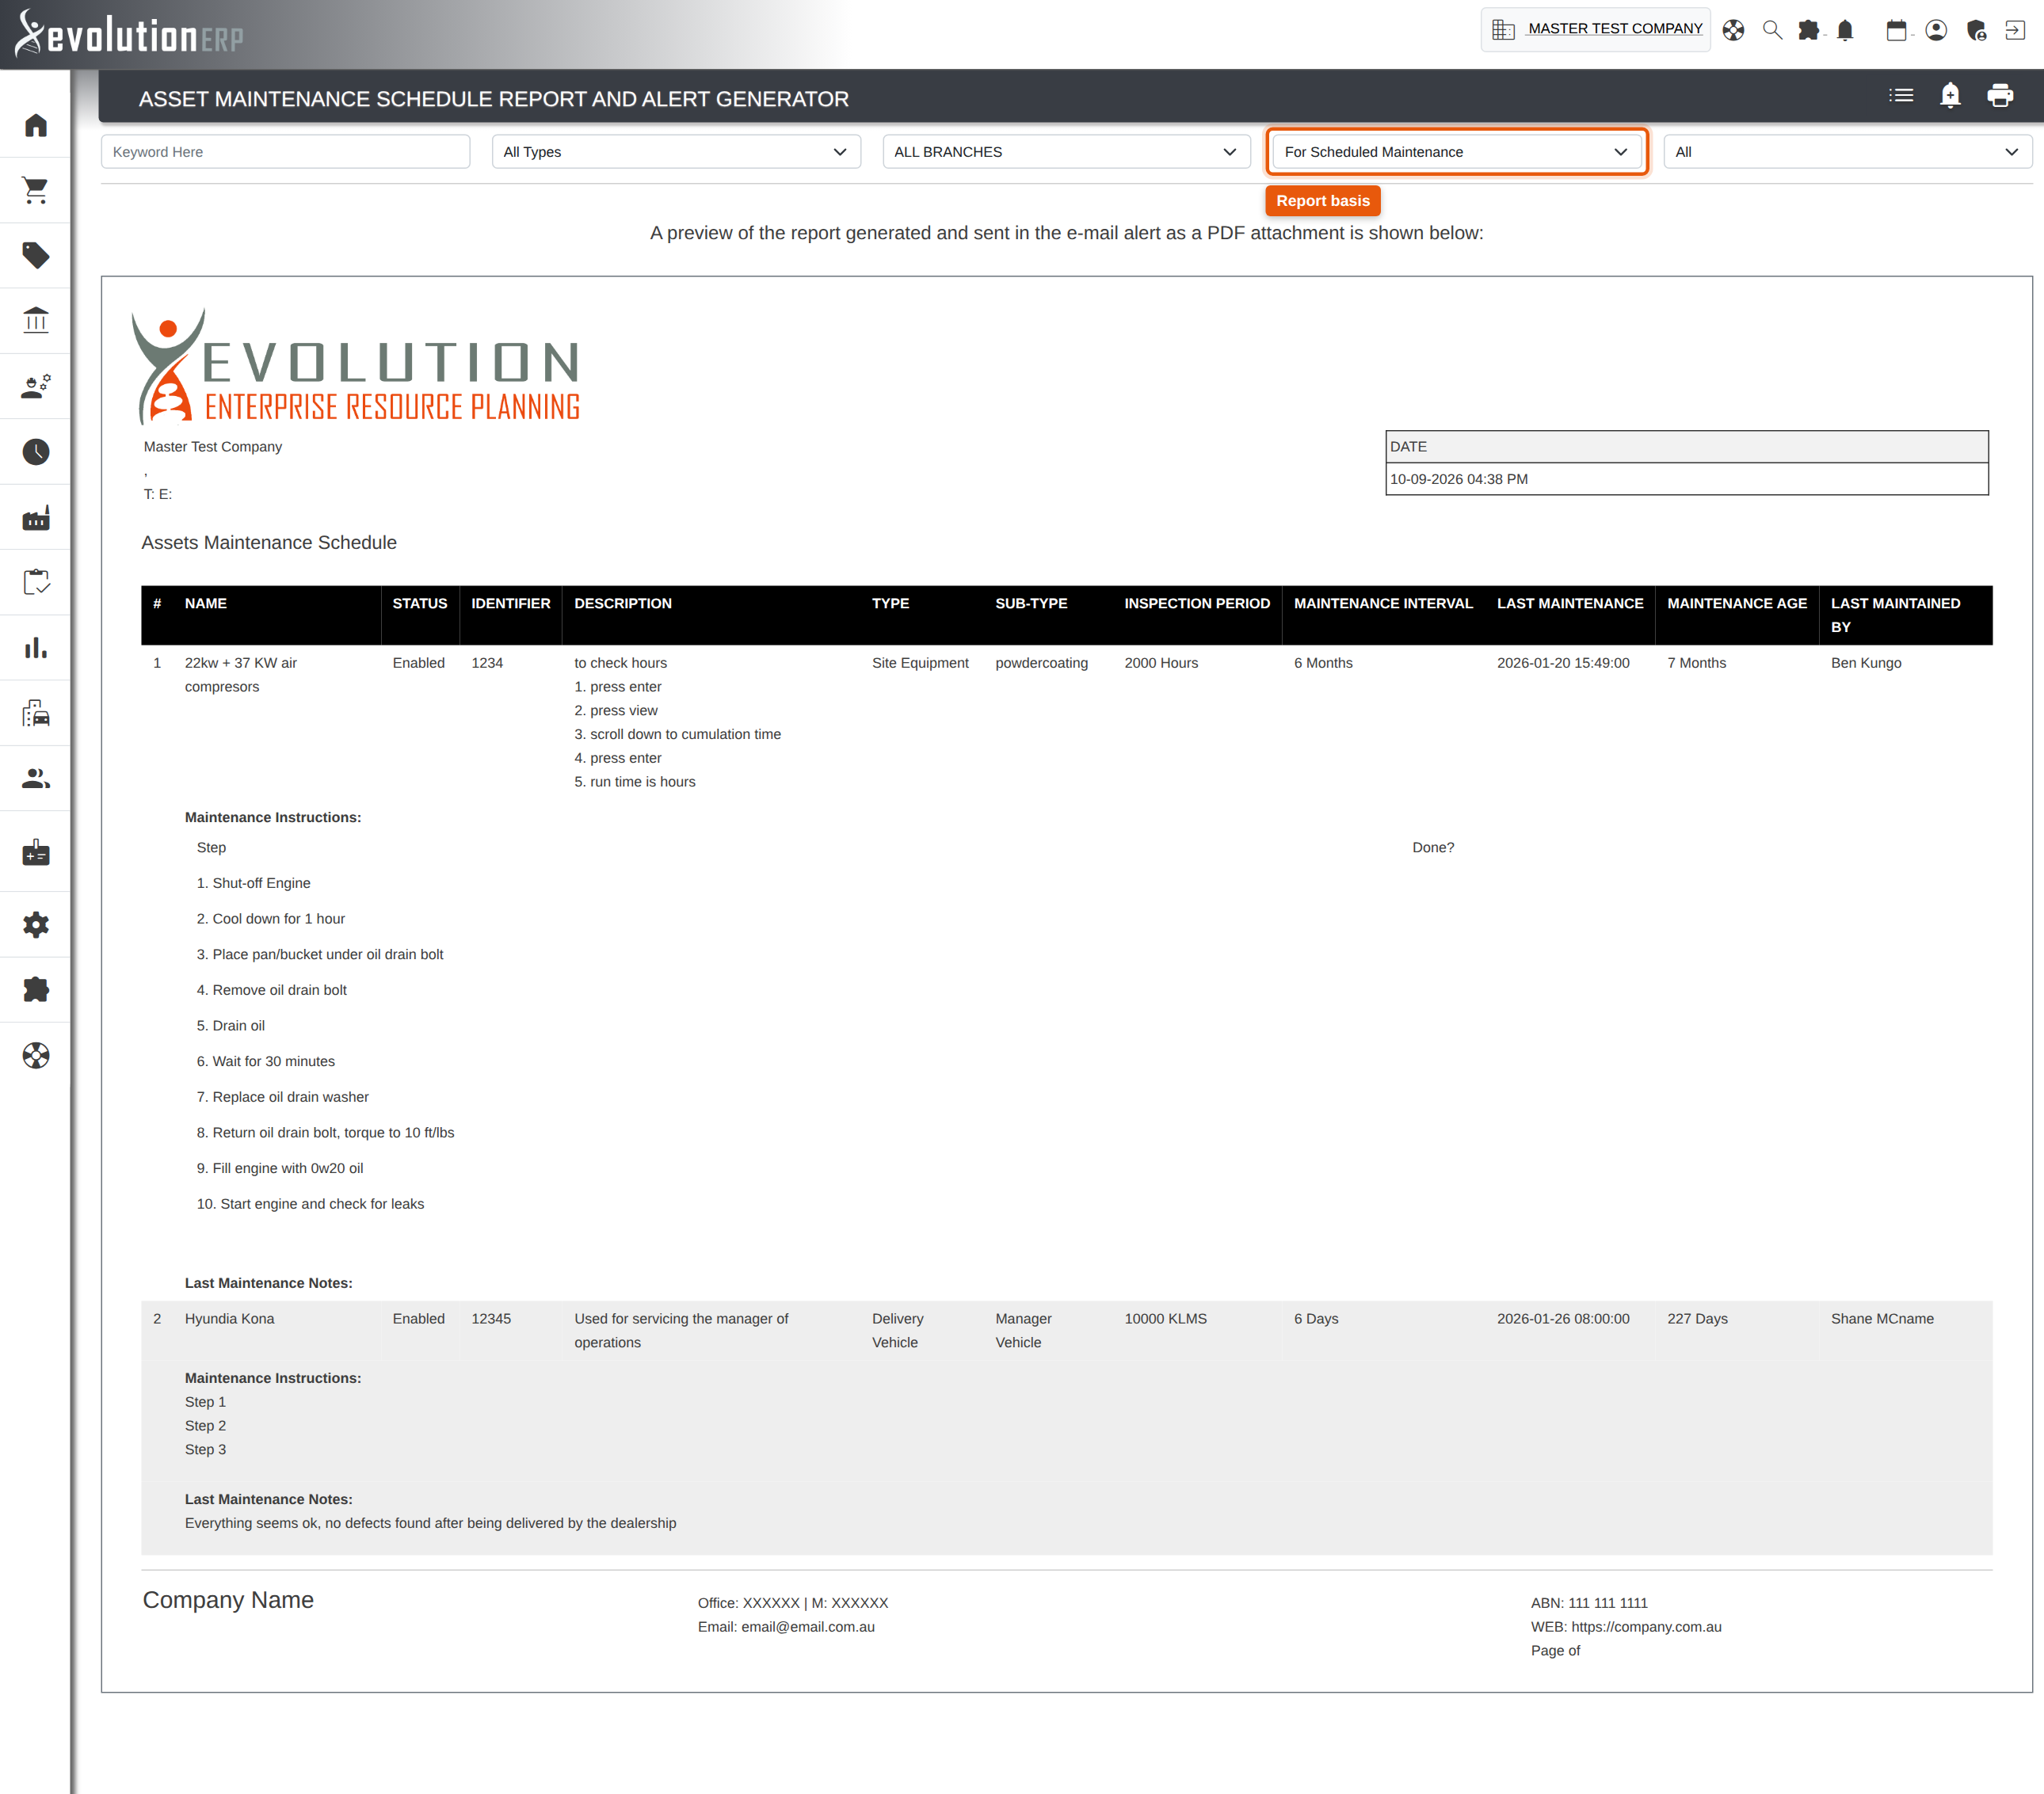
Filter by keyword, type, branch, status, and above all by the report basis:
- For Scheduled Maintenance (the default) — only assets that are now due, judged against each asset’s own Service Period and time interval.
- All Assets — everything, due or not.
- No Maintenance Record — assets that have never been serviced. A good way to find gaps when you first set the module up.
- Custom — reveals an advanced filter where you can combine Service Period, Date Since Last Maintenance and a Last Maintained Between date range with AND / OR.
The preview underneath the filters is the actual report. For each asset it prints the identifier, description, type, inspection period, maintenance interval, last maintenance date, maintenance age and who last maintained it — followed by that asset’s Maintenance Instructions and the notes from its last service, so it doubles as the worksheet.
The three icons in the page header:
- Add alert — schedules this report, with its current filters, to be e-mailed as a PDF to chosen recipients.
- List — shows the alerts already scheduled, to edit or remove.
- Print — prints or downloads the report now.
Frequently Asked Questions
I deleted a maintenance record by mistake. Is it gone?
No. Open the asset’s Maintenance tab — the record is still listed, struck through and badged Deleted. Click it and press Restore Record.
Why can’t I edit this maintenance record?
Because it has been deleted. The heading starts with DELETED - and the fields are read-only. Restore it first, then edit it.
Last Maintained changed on its own. Why?
It is always the date of the newest active maintenance record. Adding a record with a later date, or deleting the record that was the most recent one, will both move it.
An asset keeps appearing as due for service.
Check its Service Period on the General tab and its newest maintenance record. An asset with no active maintenance record has never been serviced as far as the report is concerned, so it will always show as due.
How do I retire an asset?
Set its Status to Disabled on the General tab. It disappears from the default register view and from the maintenance report, but its history is kept.
What’s the difference between the two Files tabs?
The asset’s own Files & Uploads tab holds documents about the asset — manuals, certificates, purchase paperwork. The Maintenance Files & Uploads tab inside a maintenance record holds the paperwork for that one service.
Support
For help with asset types, service scheduling or setting up automated maintenance alerts, contact Evolution ERP Support.